Image from Camera for Rear View Monitor is Abnormal
Circuit diagnosis · Vehicles built Oct 2014 – Dec 2014
Versions by build date: Oct 2014 – Dec 2014 Jan 2015 – Nov 2017 from Dec 2017
DESCRIPTION
The video signal from the television camera assembly is transmitted to the inner rear view mirror assembly.WIRING DIAGRAM
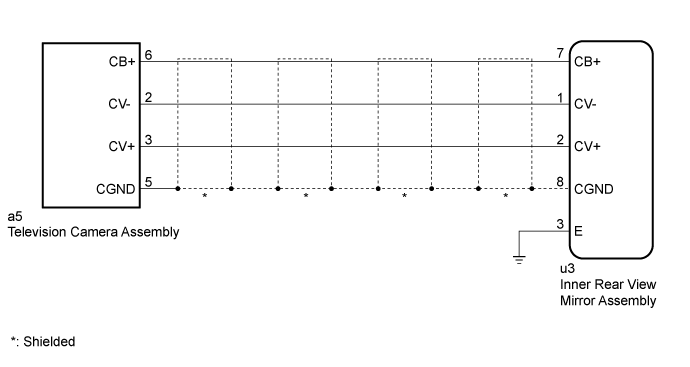

INSPECTION PROCEDURE
| 1. CHECK HARNESS AND CONNECTOR (INNER REAR VIEW MIRROR ASSEMBLY - TELEVISION CAMERA ASSEMBLY AND BODY GROUND) |

Disconnect the u3 inner rear view mirror assembly connector.
Disconnect the a5 television camera assembly connector.
Measure the resistance according to the value(s) in the table below.
- Standard Resistance:
Tester Connection
Condition
Specified Condition
u3-1 (CV-) - a5-2 (CV-)
Always
Below 1 Ω
u3-2 (CV+) - a5-3 (CV+)
Always
Below 1 Ω
u3-7 (CB+) - a5-6 (CB+)
Always
Below 1 Ω
u3-8 (CGND) - a5-5 (CGND)
Always
Below 1 Ω
u3-3 (E) - Body ground
Always
Below 1 Ω
u3-1 (CV-) - Body ground
Always
10 kΩ or higher
u3-2 (CV+) - Body ground
Always
10 kΩ or higher
u3-7 (CB+) - Body ground
Always
10 kΩ or higher
u3-8 (CGND) - Body ground
Always
10 kΩ or higher
|
|
||||

| OK | |
 |
| 2. CHECK INNER REAR VIEW MIRROR ASSEMBLY (CB+, CGND) |
Reconnect the inner rear view mirror assembly connector.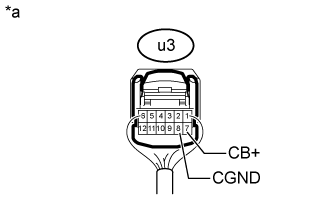
Measure the resistance according to the value(s) in the table below.
- Standard Resistance:
Tester Connection
Switch Condition
Specified Condition
u3-8 (CGND) - Body ground
Always
Below 1 Ω
Measure the voltage according to the value(s) in the table below.
- Standard Voltage:
Tester Connection
Switch Condition
Specified Condition
u3-7 (CB+) - u3-8 (CGND)
Ignition switch ON, shift lever in R
5.5 to 7.05 V
| *a |
Component with harness connected (Inner Rear View Mirror Assembly) |
|
|
||||
| OK | |
|
| 3. CHECK TELEVISION CAMERA ASSEMBLY (CV+, CGND) |
Reconnect the a5 television camera assembly connector.
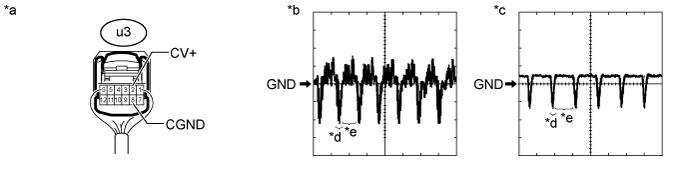
Text in Illustration *a
Component with harness connected
(Inner Rear View Mirror Assembly)
*b
Waveform A
*c
Waveform B
*d
Synchronization Signal
*e
Video Waveform
-
-
Check the waveform of the television camera assembly using an oscilloscope.
- HINT:
- A waterproof connector is used for the television camera assembly. Therefore, inspect the waveform at the inner rear view mirror assembly with the connector connected.
- The video waveform changes according to the image sent by the television camera assembly.
- A waterproof connector is used for the television camera assembly. Therefore, inspect the waveform at the inner rear view mirror assembly with the connector connected.
Item
Content
Tester Connection
u3-2 (CV+) - u3-8 (CGND)
Tool Setting
0.2 V/DIV., 50 μs/DIV.
Condition
- Waveform A: Ignition switch ON, shift lever in R (camera lens is not covered, displaying an image).
- Waveform B: Ignition switch ON, shift lever in R (camera lens is covered, blacking out the screen).
- OK:
- Waveform is as shown in illustration.
|
|
||||
| OK | ||
 |
||
| ||