AXLE AND DIFFERENTIAL REAR DIFFERENTIAL CARRIER ASSEMBLY REMOVAL
CAUTION / NOTICE / HINT
- CAUTION:
- ·
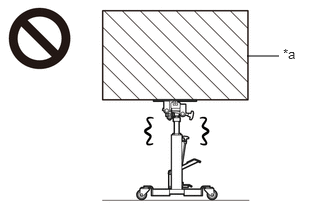 2.573,0.583 2.906,0.583 false 2.948,0.479 3.26,0.677 0.313,0.198 10 false *a
*a Object Exceeding Weight Limit of Transmission Jack
Be sure to perform this procedure with several people as the rear differential carrier assembly is very heavy.
·Be sure to follow the procedure described in the repair manual, or the transmission jack may suddenly drop or a part may fall.
PROCEDURE

 1.REMOVE REAR WHEEL
37100
2.REMOVE PROPELLER SHAFT WITH CENTER BEARING ASSEMBLY
for Standard Roof:
Click hereDrivetrain>DRIVE SHAFT / PROPELLER SHAFT>PROPELLER SHAFT ASSEMBLY (for Standard Roof)>REMOVAL
for High Roof:
Click hereDrivetrain>DRIVE SHAFT / PROPELLER SHAFT>PROPELLER SHAFT ASSEMBLY (for High Roof)>REMOVAL
3.DRAIN DIFFERENTIAL OIL
4.REMOVE REAR AXLE SHAFT WITH BACKING PLATE LH
for Rear Disc Brake:
Click hereDrivetrain>AXLE AND DIFFERENTIAL>REAR AXLE SHAFT (for Rear Disc Brake)>REMOVAL
for Rear Drum Brake:
Click hereDrivetrain>AXLE AND DIFFERENTIAL>REAR AXLE SHAFT (for Rear Drum Brake)>REMOVAL
5.REMOVE REAR AXLE SHAFT WITH BACKING PLATE RH
- HINT:
-
Use the same procedure described for the LH side.
41196
6.REMOVE REAR DIFFERENTIAL DYNAMIC DAMPER
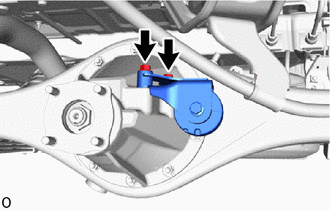
Remove the 2 bolts and rear differential dynamic damper from the rear differential carrier assembly.
41110
7.REMOVE REAR DIFFERENTIAL CARRIER ASSEMBLY
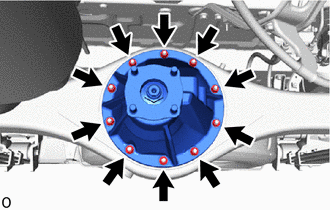
Remove the 10 nuts, 10 washers and rear differential carrier assembly from the rear axle housing.
- CAUTION:
-
The rear differential carrier assembly is a heavy component. Make sure that it is supported securely.
- NOTICE:
- ·
Securely support the rear differential carrier assembly while performing this step to avoid excessively tilting or dropping the rear differential carrier assembly.
·The remaining oil may leak out when removing the rear differential carrier assembly.
·Do not damage the installation surface when removing the rear differential carrier assembly.
·Remove the bolts with the rear differential carrier assembly secured.
42181
8.REMOVE REAR DIFFERENTIAL CARRIER GASKET