1GD-FTV ENGINE CONTROL ECD SYSTEM(w/ DPF) DATA LIST / ACTIVE TEST
DATA LIST
- HINT:
-
Using the GTS to read the Data List allows the values or states of switches, sensors, actuators and other items to be read without removing any parts. This non-intrusive inspection can be very useful because intermittent conditions or signals may be discovered before parts or wiring is disturbed. Reading the Data List information early in troubleshooting is one way to save diagnostic time.
- NOTICE:
-
In the table below, the values listed under "Normal Condition" are reference values. Do not depend solely on these reference values when deciding whether a part is faulty or not.
Warm up the engine.
Turn the ignition switch off.
Connect the GTS to the DLC3.
Turn the ignition switch to ON.
Start the engine.
Turn the GTS on.
Enter the following menus: Powertrain / Engine / Data List.
- HINT:
- ·
To display the list box, press the pull down menu button next to "Primary". Then select a measurement group.
·When you select a measurement group, the ECU data belonging to that group is displayed.
- ·
Measurement Group List / Description
-Primary / -
-All Data / All data
-Engine Control / Engine control system related data
-Diesel General
-Common Rail
-Common Rail (All)
-Diesel EGR / EGR system related data
-Diesel Throttle / Diesel throttle system related data
-VN Turbo / VN turbo related data
-Diesel Exhaust / Exhaust system related data
-Diesel Starting / "Difficult to start" related data
-Diesel Rough Idle / "Rough idle" related data
-Diesel Lack of Power / "Lack of power" related data
-Diesel Knocking / "Knocking" relater data
-Diesel Black Smoke / "Black Smoke" related data
-Check Mode / Check mode
-Monitor Status / Monitor status related data
-Ignition / Not Applicable
-Charging Control / Charging control system related data
-Compression / Data used during "Check the Cylinder Compression" Active Test
-AT / Automatic transaxle system related data
-Vehicle Information / Vehicle information
Check the values by referring to the table below.
- NOTICE:
-
Normal Condition: If no idling conditions are specified, the shift lever should be in N, and the A/C switch and all accessory switches are OFF.
Various Vehicle Conditions 1 (All Data)
- Powertrain > Engine > Data List
-
Tester Display Measurement Item Range Normal Condition Diagnostic Note Total Distance Traveled Total distance traveled Min.: 0, Max.: 16777215 - - Total Distance Traveled - Unit Total distance Traveled unit km or mile - - Vehicle Speed Vehicle speed Min.: 0 km/h, Max.: 255 km/h Actual vehicle speed - Target Idle Engine Speed Target idling engine Speed Min.: 0 rpm, Max.: 51199 rpm - - Engine Speed Engine speed Min.: 0 rpm, Max.: 16383 rpm ·50 to 400 rpm: Cranking
·700 to 800 rpm: Idling with warm engine
When the crankshaft position sensor is malfunctioning, "Engine Speed" is approximately 0 or varies greatly from the actual engine speed. Calculate Load Load calculated by ECM Min.: 0%, Max.: 100% ·Idling: 6.6 to 16.5%
·Running without load (3000 rpm): 15.5 to 28.0%
Calculated load = (Final injection volume / max. injection volume at current engine speed) x 100. Mass Air Flow Sensor Air flow rate from mass air flow meter sub-assembly Min.: 0 gm/sec, Max.: 655.35 gm/sec Idling:·0.5 to 15 gm/sec (EGR on)
·10 to 21 gm/sec (EGR off)
Running without load (3000 rpm):·43 to 89 gm/sec (EGR on)
·72 to 117 gm/sec (EGR off)
·Based on the Mass Air Flow Sensor, the ECM controls the fuel injection volume, injection timing, EGR, etc.
·When a judgment is difficult, turn off the EGR system and confirm this value.
Atmospheric Pressure Atmospheric pressure value Min.: 0 kPa(abs), Max.: 255 kPa(abs) Actual atmospheric pressure ·With the ignition switch ON, when the difference between the atmospheric pressure sensor and intake manifold absolute pressure is 10 kPa or more, there is a malfunction in one of the sensors.
·With the ignition switch ON, when the atmospheric pressure is 0 kPa or 140 kPa, there is a malfunction in the sensor circuit.
·Standard atmospheric pressure: 101 kPa.
·For every 100 m increase in elevation, pressure drops by 1 kPa.
This varies by weather (high atmospheric pressure, low atmospheric pressure).
Intake Manifold Absolute Pressure Absolute pressure inside intake manifold Min.: 0 kPa, Max.: 2047.96 kPa Idling:·93 to 105 kPa (EGR on)
·93 to 107 kPa (EGR off)
Running without load (3000 rpm):·118 to 160 kPa (EGR on)
·106 to 153 kPa (EGR off)
·When the ignition switch is ON or the vehicle is idling, the intake manifold absolute pressure and atmospheric pressure are approximately the same (standard atmospheric pressure = 101 kPa).
Above approximately 1500 rpm, the turbo becomes effective and the pressure becomes higher than atmospheric pressure.
·Inspect while comparing with "Target Boost Pressure".
·With the accelerator fully open, if the actual manifold absolute pressure (MAP) is low compared to the target boost pressure by at least 20 kPa for 5 seconds or more, a feeling of insufficient power will occur.
·When a judgment is difficult, turn off the EGR system and confirm this value.
Intake Manifold Absolute Pressure Supported Intake manifold absolute pressure support Unsupp or Supp - ·Supp: The item is supported by the vehicle.
·Unsupp: The monitor is not supported by the vehicle.
Coolant Temperature Engine coolant temperature Min.: -40°C, Max.: 215°C After warming up engine: 70 to 90°C (158 to 194°F) ·If the value is -40°C (-40°F) or 140°C (284°F), the sensor circuit is open or shorted.
·After a long soak, the coolant temperature, intake air temperature and ambient temperature are approximately equal.
Intake Air Temperature Intake air temperature Min.: -40°C, Max.: 140°C Equivalent to temperature at location of mass air flow meter sub-assembly ·After a long soak, the engine coolant temperature, intake air temperature and ambient temperature are approximately equal.
·If the value is -40°C (-40°F) or 140°C (284°F), the sensor circuit is open or shorted.
Intake Air Temperature B1S1 (Turbo) Intake air temp (Turbo) support Min.: -40°C, Max.: 215°C 70°C (158°F) or less ·This is the intake air temperature at the intake manifold (after the intercooler).
·During fail-safe operation, the value is set to 165°C (329°F). As the value is set to a high temperature, the turbo pressure may be suppressed and there may be a lack of power.
Intake Air Temperature B1S1 (Turbo) Supported Intake air temp (Turbo) support Unsupp or Supp - ·Supp: The item is supported by the vehicle.
·Unsupp: The monitor is not supported by the vehicle.
Various Vehicle Conditions 2 (All Data)
- Powertrain > Engine > Data List
-
Tester Display Measurement Item Range Normal Condition Diagnostic Note Ambient Temperature Ambient temperature Min.: -40°C, Max.: 215°C Equivalent to ambient temperature After a long soak, the engine coolant temperature, intake air temperature and ambient temperature are approximately equal. Engine Run Time Engine run time Min.: 0 sec., Max.: 65535 sec. Time after the ignition switch turned to ON Time passed since the ignition switch was turned to ON. IG-ON Coolant Temperature Engine coolant temperature when the ignition switch is turned to ON Min.: -40°C, Max.: 119.3°C - This is the engine coolant temperature stored when the ignition switch is turned to ON. Initial Engine Coolant Temperature Initial engine coolant temperature Min.: -40°C, Max.: 119.3°C Engine coolant temperature when engine started For freeze frame data, this tells whether the malfunction happened at a cold start or with a warm engine. IG-ON Intake Air Temperature Intake air temperature when the ignition switch is turned to ON Min.: -40°C, Max.: 119.3°C - This is the intake air temperature stored when the ignition switch is turned to ON. Initial Engine Intake Air Temperature Initial intake air temperature Min.: -40°C, Max.: 119.3°C Intake air temperature when engine started - Battery Voltage Battery voltage Min.: 0 V, Max.: 65.5 V 11 to 14 V ·If 11 V or less, characteristics of some electrical components change.
·Symptoms when out of range:
-If 5 V or less, starting becomes difficult
BATT Voltage Battery voltage Min.: 0 V, Max.: 79.998 V 11 to 14 V This displays the BATT terminal voltage of the ECU. Glow Relay Request Bank 1 Status of the glow relay request ON or OFF - - Glow Control Unit Duty Glow plug controller duty Min.: 0%, Max.: 127.5% - This is the ECM command. Accel Position Accelerator position status Min.: 0%, Max.: 100% ·Accelerator pedal released:
0%
·Accelerator pedal fully depressed:
100%
·"Accel Position" is the accelerator opening amount (%) for engine control use.
·When the accelerator pedal position sensor output itself (Accelerator Position Sensor No.1 Voltage %, Accelerator Position Sensor No.2 Voltage %) is in the normal range, another actuator malfunction has caused the fail-safe function to restrict the accelerator.
·Without cruise, ECT or VSC requests, and without accelerator restriction by the fail-safe function, this is adjusted in proportion to the amount the accelerator pedal is depressed by the driver.
·Accelerator pedal released: 0%
·Accelerator pedal fully depressed: 100%
Accelerator Position Sensor No.1 Voltage % Accelerator position No. 1 Min.: 0%, Max.: 100% ·Accelerator pedal released:
10 to 22%
·Accelerator pedal fully depressed:
52 to 90%
Read value with ignition switch ON (do not start engine).
- HINT:
-
This is used only for diagnosing malfunctions in the accelerator pedal position sensor. Under normal conditions, it is sufficient to only check the final accelerator opening angle value "Accel Position".
Accelerator Position Sensor No.2 Voltage % Accelerator position No. 2 Min.: 0%, Max.: 100% ·Accelerator pedal released:
24 to 40%
·Accelerator pedal fully depressed:
68 to 99%
Read value with ignition switch ON (do not start engine).
- HINT:
-
This is used only for diagnosing malfunctions in the accelerator pedal position sensor. Under normal conditions, it is sufficient to only check the final accelerator opening angle value "Accel Position".
Neutral Control Neutral control status ON or OFF OFF: Idling, shift lever in P - N Range Status Shift lever N status ON or OFF ON: Shift lever in P or N -
Various Vehicle Conditions 3 (All Data)
- Powertrain > Engine > Data List
-
Tester Display Measurement Item Range Normal Condition Diagnostic Note Injection Volume Cylinder #1 Injection volume (cylinder 1) Min.: 0 ml, Max.: 2.047 ml - This is the injection volume for 10 injections. Injection Control Malfunction (Target Injection Volume 1) Injection control malfunction (fuel injection volume 1) Normal or Abnormal Normal ·When a malfunction is detected in the "accelerator pedal recognition value" used for calculating the target injection volume, "Abnormal" is displayed.
·When "Abnormal" is displayed, P060694 is output.
Injection Control Malfunction (Target Injection Volume 2) Injection control malfunction (fuel injection volume 2) Normal or Abnormal Normal ·When a malfunction is detected in the "minimum engine torque" used for calculating the target injection volume, "Abnormal" is displayed.
·When "Abnormal" is displayed, P060694 is output.
Injection Control Malfunction (Target Injection Volume 3) Injection control malfunction (fuel injection volume 3) Normal or Abnormal Normal ·When a malfunction is detected where the target injection volume is larger than the original target, "Abnormal" is displayed.
·When "Abnormal" is displayed, P060694 is output.
Injection Control Malfunction (Injector Current-Carrying Time 1) Injection control malfunction (fuel injection duration 1) Normal or Abnormal Normal ·When a malfunction is detected where power continues to be supplied to the injector, "Abnormal" is displayed.
·When P02EE00, P02EF00, P02F000 or P02F100 is output, "Abnormal" is displayed.
Injection Control Malfunction (Injector Current-Carrying Time 2) Injection control malfunction (fuel injection duration 2) Normal or Abnormal Normal ·When a malfunction is detected where the actual injection operation status does not match the target injection volume, "Abnormal" is displayed.
·When P02EE00, P02EF00, P02F000 or P02F100 is output, "Abnormal" is displayed.
Injection Control Malfunction (Injector Current-Carrying Time 3) Injection control malfunction (fuel injection duration 3) Normal or Abnormal Normal ·When a malfunction is detected where the injector power duration deviates from the target injection volume, "Abnormal" is displayed.
·When P02EE00, P02EF00, P02F000 or P02F100 is output, "Abnormal" is displayed.
Injection Control Malfunction (Fail Safe Function) Injection control malfunction (fail safe function) Normal or Abnormal Normal ·When a malfunction is detected in the function that stops injection as a fail-safe during a fuel injection control malfunction, "Abnormal is displayed".
·When "Abnormal" is displayed, P062D00 is output.
Current Fuel Type Current fuel type - Diesel -
Diesel Throttle System
- Powertrain > Engine > Data List
-
Tester Display Measurement Item Range Normal Condition Diagnostic Note Actual Throttle Position Bank 1 Actual throttle position Min.: 0%, Max.: 100% Idling after engine warmed-up: 0 to 92% Closing percentage of the throttle valve.
·Fully closed: 0%.
·Fully open: 100%.
- HINT:
-
There is no connection with the accelerator. However, under full load, the throttle is usually fully open (100%).
Symptoms when out of range:
·Stuck closed: Engine stall, difficult to start, lack of power, black smoke, rough idle
·Stuck open: Loud turbocharging sound, bad vibration when engine is stopped
·When ECM detects a malfunction of the diesel throttle (MIL on), engine power is restricted so that the vehicle can drive with a maximum speed of 80 to 100 km/h.
Target Throttle Position Bank 1 Target throttle position Min.: 0%, Max.: 100% ·Throttle valve fully closed: 0%
·Throttle valve fully opened: 100%
If there is a malfunction of the throttle actuator, compare the target and actual throttle position values for troubleshooting. Actual Throttle Position Bank 1 Supported Actual throttle position support Unsupp or Supp - ·Supp: The item is supported by the vehicle.
·Unsupp: The monitor is not supported by the vehicle.
Actual Throttle Position Bank 2 Supported Actual No. 2 throttle position support Unsupp or Supp - ·Supp: The item is supported by the vehicle.
·Unsupp: The monitor is not supported by the vehicle.
Target Throttle Position Bank 1 Supported Target throttle position support Unsupp or Supp - ·Supp: The item is supported by the vehicle.
·Unsupp: The monitor is not supported by the vehicle.
Target Throttle Position Bank 2 Supported Target throttle position (No. 2) support Unsupp or Supp - ·Supp: The item is supported by the vehicle.
·Unsupp: The monitor is not supported by the vehicle.
Throttle Position Sensor No.1 Voltage % Absolute throttle position sensor Min.: 0%, Max.: 100% ·Ignition switch ON: 60 to 100%
·Warmed-up and idling: 8 to 100%
·Throttle position sensor output voltage is converted using 5 V = 100%.
·When fully closed: 20%.
·When fully open: 82%.
·When the ignition switch is turned from off to ON, the throttle valve fully opens once.
·When the ignition switch is turned from ON to off, the throttle valve fully closes once.
Symptoms when out of range:
·Stuck closed: Engine stall, difficult to start, rough idling, lack of power, black smoke, white smoke
·Stuck open: Loud turbocharging sound, bad vibration when engine is stopped
·When the ECM detects a malfunction with the diesel throttle (MIL on), engine power is restricted but city driving is possible.
Diesel Throttle Motor Duty Bank 1 Throttle motor duty Min.: 0%, Max.: 127.5% 0 to 80% When the moving force to open and close the diesel throttle valve increases, the value of the Throttle Motor duty Bank 1 increases. Diesel Throttle Target Angle Bank 1 Throttle motor duty Min.: 0%, Max.: 255% Warmed-up and idling: 0 to 80% ·When drive requests to open and close the diesel throttle valve increase, the throttle motor duty value increases.
·Since the throttle valve opening and closing directions cannot be determined when the throttle motor duty value is high during drive control, the opening and closing directions are determined from the throttle target opening angle and throttle actual opening angle.
·If the throttle motor duty value continues to be high, there may be an operation malfunction due to deposits in the throttle.
Throttle Close Learning Value Bank 1 Throttle fully closed position learned value Min.: 0 deg, Max.: 499.99 deg 14 to 22 deg ·When the ignition switch is turned from ON to off and 5 seconds elapse, learning of "Throttle Close Learning Value Bank 1" will be complete.
·When "Throttle Close Learning Value Bank 1" is outside of the normal range, a foreign object may be lodged in the throttle valve.
·If the value is stuck at the upper limit of 21.25 deg, there is a chance that a malfunction is present.
However, as the initial value for the learned value is 21.25 deg, it is necessary to check the value after learning is completed.
Common Rail
- Powertrain > Engine > Data List
-
Tester Display Measurement Item Range Normal Condition Diagnostic Note Target Injection Volume Target injection volume Min.: 0 mm3/st, Max.: 1279.98 mm3/st Idling: 3 to 15 mm3/st ·Injection amount for each combustion.
·If injector assemblies are clogged, fuel quality is poor, the fuel filter element sub-assembly is clogged, or engine friction increases, "Target Injection Volume" will increase.
·If there is a malfunction due to low turbocharger pressure or a low intake air volume, the target injection volume is limited and there is a lack of power.
Injection Feedback Volume for Idle Idle stability status integral control volume Min.: -640 mm3/st, Max.: 639.98 mm3/st -20 to 30 mm3/st ·When the actual engine speed does not match the target idling speed, this corrects the injection volume.
If this item displays 10 mm3/st or more or -10 mm3/st or less even with the engine completely warmed up and the air conditioning and other electrical loads off, the internal parts of the engine may be damaged, or the fuel injection system or other auxiliary components may be malfunctioning.
·Only calculated and reflected at idle.
Injection Feedback Value #1 Injection volume correction for No. 1 injector assembly Min.: -20 mm3/st, Max.: 19.84 mm3/st Idling: -5.0 to 5.0 mm3/st ·When idling after warmup, the injection amount for each cylinder is corrected to optimize the difference between the engine speed of each cylinder.
Example: For cylinders that are slowing the engine speed compared to other cylinders, the injection volume is increased.
·"Injection Feedback Value" more than 5.0 mm3/st: Injector breakdown is causing injection volume deviation, or insufficient compression is causing poor combustion.
·Even if "Injection Feedback Value" for a cylinder is less than -5.0 mm3/st, the cylinder with this value does not necessarily have a problem.
- HINT:
- ·
The ECM adjusts each cylinder so that the average "Injection Feedback Value" of the 4 cylinders is approximately 0 mm3/st.
·If more than one cylinder has a positive correction value, a normal cylinder may have a value less than -5.0 mm3/st.
Injection Feedback Value #2 Injection volume correction for No. 2 injector assembly Min.: -20 mm3/st, Max.: 19.84 mm3/st Idling: -5.0 to 5.0 mm3/st Same as Injection Feedback Value #1 Injection Feedback Value #3 Injection volume correction for No. 3 injector assembly Min.: -20 mm3/st, Max.: 19.84 mm3/st Idling: -5.0 to 5.0 mm3/st Same as Injection Feedback Value #1 Injection Feedback Value #4 Injection volume correction for No. 4 injector assembly Min.: -20 mm3/st, Max.: 19.84 mm3/st Idling: -5.0 to 5.0 mm3/st Same as Injection Feedback Value #1 Pilot 1 Injection Period Pilot 1 injection period Min.: 0 μs, Max.: 65535 μs Idling:·100 to 500 μs (Atmospheric pressure higher than 85 kPa)
·100 to 600 μs (Atmospheric pressure 85 kPa or less)
Check to see if "Pilot 1 Injection Period" is not zero when symptoms occur. Pilot 2 Injection Period Pilot 2 injection period Min.: 0 μs, Max.: 65535 μs Idling: 100 to 500 μs Check to see if "Pilot 2 Injection Period" is not zero when symptoms occur. Pre Injection Period Pre injection period Min.: 0 μs, Max.: 65535 μs - - Main Injection Period Main injection period Min.: 0 μs, Max.: 65535 μs Idling:·200 to 600 μs (Atmospheric pressure higher than 85 kPa)
·100 to 400 μs (Atmospheric pressure 85 kPa or less)
·When the fuel pressure becomes 15000 kPag or less, "Main Injection Period" is set to 0.
·When the engine will not start, confirm that injection is performed.
After Injection Period After injection period Min.: 0 μs, Max.: 65535 μs - Check to see if "After Injection Period" is not zero when the following symptoms occur:
Black smoke, poor driveability.Pilot 1 Injection Timing Pilot 1 injection timing Min.: -210 deg(CA), Max.: 301.992 deg(CA) Idling after engine warmed up and vehicle under standard atmospheric pressure: 6.5 to 1.0 deg(CA) ·Negative values indicate values after top dead center (ATDC).
·Positive values indicate values before top dead center (BTDC).
Pilot 2 Injection Timing Pilot 2 injection timing Min.: -210 deg(CA), Max.: 301.992 deg(CA) Idling after engine warmed up and vehicle standard atmospheric pressure: 20 to 8.0 deg(CA) ·Negative values indicate values after top dead center (ATDC).
·Positive values indicate values before top dead center (BTDC).
Pre Injection Timing Pre injection timing Min.: -210 deg(CA), Max.: 301.992 deg(CA) - - Main Injection Timing Main injection timing Min.: -210 deg(CA), Max.: 301.992 deg(CA) Idling after engine warmed up and vehicle under standard atmospheric pressure: 3.0 to -3.0 deg(CA) ·Negative values indicate values after top dead center (ATDC).
·Positive values indicate values before top dead center (BTDC).
After Injection Timing After injection timing Min.: -210 deg(CA), Max.: 301.992 deg(CA) - ·Negative values indicate values after top dead center (ATDC).
·Positive values indicate values before top dead center (BTDC).
Pilot Quantity Learning State of "Pilot Quantity Learning" Standby, Waiting, Learning, Stop, Complete - ·The status is only displayed while performing "Pilot Quantity Learning".
·If "Pilot Quantity Learning" is incomplete, the MIL illuminates and DTC P062F46 is stored.
Injector Pilot Quantity Learning Status of the injector pilot quantity learning Ready or NG - - Actuator Pilot Quantity Learning Status of the actuator pilot quantity learning Ready or NG - - Temperature Pilot Quantity Learning Status of the temperature pilot quantity learning Ready or NG - - Catalyst Pilot Quantity Learning Status of the catalyst pilot quantity learning Ready or NG - - Target Fuel Pressure (High) Target fuel pressure Min.: 0 kPag, Max.: 250000 kPag 20000 to 220000 kPag when engine running ·Inspect the Fuel Pressure (High), comparing it with the common rail target value.
·Considered normal when the actual fuel pressure is within 5000 kPag of the target fuel pressure under stable conditions when idling after warm up the engine.
Target Fuel Pressure (High) Supported Target fuel pressure support Unsupp or Supp - ·Supp: The item is supported by the vehicle.
·Unsupp: The monitor is not supported by the vehicle.
Target Fuel Pressure (Low) / Target Fuel Pressure 2 Target fuel pressure 2 Min.: 0 kPag, Max.: 250000 kPag 20000 to 220000 kPag when engine running - Target Fuel Pressure (Low) / Target Fuel Pressure 2 Supported Target fuel pressure 2 support Unsupp or Supp - ·Supp: The item is supported by the vehicle.
·Unsupp: The monitor is not supported by the vehicle.
Fuel Pressure (High) Actual fuel pressure Min.: 0 kPag, Max.: 250000 kPag Idling: 30000 to 50000 kPag ·Fuel Pressure (High) indicates output from the main system of the fuel pressure sensor.
·Fuel Pressure (High) is the actual common rail fuel pressure.
·Inspect by comparing the fuel pressure with the target fuel pressure.
·When in a stable condition such as when idling after warm up the engine, the fuel pressure is within 5000 kPag of the target fuel pressure.
·The ECM uses fuel pressure for feedback control of the target fuel pressure via the fuel supply pump assembly.
The injection amount is determined based on the injection timing and fuel pressure.
Also, the spray pattern is selected based on the fuel pressure.
·For startup, at least 25000 kPag of fuel pressure is needed (take care as there is a response lag when the pressure rises).
·When the fuel pressure is below 25000 kPag, it may cause rough idling.
·When the fuel pressure has decreased by 20000 kPag from the target fuel pressure, there may be a lack of power.
·If the actual fuel pressure is 5000 kPag higher than the target fuel pressure, P122900 will be stored. When the actual fuel pressure is lower than the target fuel pressure, "vehicle control history code X0846" may be detected depending on the degree of deviation from the target pressure.
·When the fuel pressure is higher than 240000 kPag, DTC P008800 will be stored.
Fuel Pressure (High) Supported Fuel pressure support Unsupp or Supp Supp ·Supp: The item is supported by the vehicle.
·Unsupp: The monitor is not supported by the vehicle.
Fuel Pressure (Low) / Fuel Pressure 2 Fuel Pressure 2 Min.: 0 kPag, Max.: 655350 kPag Idling: 30000 to 50000 kPag Fuel Pressure (Low) indicates output from the sub system of the fuel pressure sensor. Fuel Pressure (Low) / Fuel Pressure 2 Supported Fuel pressure 2 support Unsupp or Supp Supp ·Supp: The item is supported by the vehicle.
·Unsupp: The monitor is not supported by the vehicle.
Fuel Return Temperature Fuel return temperature Min.: -40°C, Max.: 215°C Idling after engine warmed-up: 35 to 88°C (95 to 190°F) If the "Fuel Return Temp" value is not between 35°C (95°F) and 110°C (230°F), "Pilot Quantity Learning" is prohibited.
Diesel Exhaust
- Powertrain > Engine > Data List
-
Tester Display Measurement Item Range Normal Condition Diagnostic Note Fuel Injection Valve + Output Signal Bank 1 Exhaust fuel addition injector power supply terminal signal ON or OFF ON: Power supplied to exhaust fuel addition injector When Fuel Injection Valve + Output Signal Bank 1 and Fuel Injection Valve - Output Signal Bank 1 are both ON, the fuel addition injector assembly is operating. Fuel Injection Valve - Output Signal Bank 1 Exhaust fuel addition injector drive terminal signal ON or OFF ON: Exhaust fuel addition injector assembly open When Fuel Injection Valve + Output Signal Bank 1 and Fuel Injection Valve - Output Signal Bank 1 are both ON, the fuel addition injector assembly is operating. A/F (O2) Lambda B1S1 Lambda equivalent ratio Min.: 0, Max.: 7.995 ·AF (O2) Lambda B1S1 = air fuel ratio / 14.5 (Stoichiometric air fuel ratio)
·Value less than 1 (0.000 to 0.999): Rich
·Value more than 1 (1.001 to 255): Lean
·Air fuel ratio = intake air mass / (main fuel injection and exhaust fuel addition injection mass)
·Check the air fuel ratio sensor output with the exhaust gas temperature (Exhaust Temperature B1S2) at 200°C (392°F) or higher (example: driving at speed of 50 km/h (31 mph) or more in 3rd gear).
·If the exhaust fuel addition injector assembly is clogged, the AF (O2) Lambda B1S1 value changes according to engine combustion, but large changes due to the addition of fuel are not seen even when PM forced regeneration is performed with the GTS.
·Furthermore, if the main injectors become clogged, the AF (O2) Lambda B1S1 value will increase under all circumstances while the engine is running (the value increases regardless of whether the PM forced regeneration has been performed).
Cause of Out of Range:
·Air fuel ratio sensor
·Air fuel ratio sensor circuit
·Injector assembly clogged
A/F (O2) Lambda B1S1 Supported Status of the A/F (O2) Lambda B1S1 Supported Unsupp or Supp Supp ·Supp: The item is supported by the vehicle.
·Unsupp: The monitor is not supported by the vehicle.
A/F (O2) Lambda B1S2 Supported Status of the A/F (O2) Lambda B1S2 Supported Unsupp or Supp Unsupp ·Supp: The item is supported by the vehicle.
·Unsupp: The monitor is not supported by the vehicle.
A/F (O2) Lambda B2S1 Supported Status of the A/F (O2) Lambda B2S1 Supported Unsupp or Supp Unsupp ·Supp: The item is supported by the vehicle.
·Unsupp: The monitor is not supported by the vehicle.
A/F (O2) Lambda B2S2 Supported Status of the A/F (O2) Lambda B2S2 Supported Unsupp or Supp Unsupp ·Supp: The item is supported by the vehicle.
·Unsupp: The monitor is not supported by the vehicle.
A/F (O2) Density B1S1 Supported Status of the A/F (O2) Density B1S1 Supported Unsupp or Supp Unsupp ·Supp: The item is supported by the vehicle.
·Unsupp: The monitor is not supported by the vehicle.
A/F (O2) Density B1S2 Supported Status of the A/F (O2) Density B1S2 Supported Unsupp or Supp Unsupp ·Supp: The item is supported by the vehicle.
·Unsupp: The monitor is not supported by the vehicle.
A/F (O2) Density B2S1 Supported Status of the A/F (O2) Density B2S1 Supported Unsupp or Supp Unsupp ·Supp: The item is supported by the vehicle.
·Unsupp: The monitor is not supported by the vehicle.
A/F (O2) Density B2S2 Supported Status of the A/F (O2) Density B2S2 Supported Unsupp or Supp Unsupp ·Supp: The item is supported by the vehicle.
·Unsupp: The monitor is not supported by the vehicle.
Exhaust Temperature B1S1 Exhaust gas temperature of DOC catalyst Min.: -40°C, Max.: 6513.5°C ·Idling after engine warmed up: 50 to 400°C (122 to 752°F)
·During PM forced regeneration: 50 to 450°C (122 to 842°F)
·If an open occurs in an exhaust gas temperature sensor circuit, 0°C (32°F) is displayed on the GTS.
·If a short occurs in an exhaust gas temperature sensor circuit, 1000°C (1832°F) is displayed on the GTS.
Cause of Out of Range:
·Exhaust gas temperature sensor
·DPF catalyst deteriorated
Exhaust Temperature B1S2 Exhaust gas temperature of upstream of the DPF catalyst Min.: -40°C, Max.: 6513.5°C ·Idling after engine warmed up: 50 to 400°C (122 to 752°F)
·During PM forced regeneration: 500 to 700°C (932 to 1292°F)
·If an open occurs in an No. 2 exhaust gas temperature sensor circuit, 0°C (32°F) is displayed on the GTS.
·If a short occurs in an No. 2 exhaust gas temperature sensor circuit, 1000°C (1832°F) is displayed on the GTS.
Cause of Out of Range:
·No. 2 exhaust gas temperature sensor
·DPF catalyst deteriorated
Exhaust Temperature B1S3 Exhaust gas temperature of downstream of the DPF catalyst Min.: -40°C, Max.: 6513.5°C ·Idling after engine warmed up: 50 to 400°C (122 to 752°F)
·During PM forced regeneration: 500 to 700°C (932 to 1292°F)
·If an open occurs in an No. 3 exhaust gas temperature sensor circuit, 0°C (32°F) is displayed on the GTS.
·If a short occurs in an No. 3 exhaust gas temperature sensor circuit, 1000°C (1832°F) is displayed on the GTS.
Cause of Out of Range:
·No. 3 exhaust gas temperature sensor
·DPF catalyst deteriorated
Exhaust Temperature B1S1 Supported Status of exhaust gas temperature B1S1 supported Supp or Unsupp Supp If this item displays "Unsupp", a fixed value is displayed for "Exhaust Temperature B1S1", as exhaust gas temperature sensors are not equipped on the vehicle. Exhaust Temperature B1S2 Supported Status of exhaust gas temperature B1S2 supported Supp or Unsupp Supp If this item displays "Unsupp", a fixed value is displayed for "Exhaust Temperature B1S2", as No. 2 exhaust gas temperature sensors are not equipped on the vehicle. Exhaust Temperature B1S3 Supported Status of exhaust gas temperature B1S3 supported Supp or Unsupp Supp If this item displays "Unsupp", a fixed value is displayed for "Exhaust Temperature B1S3", as No. 3 exhaust gas temperature sensors are not equipped on the vehicle. Exhaust Temperature B1S4 Supported Status of exhaust gas temperature B1S4 supported Supp or Unsupp Unsupp If this item displays "Unsupp", a fixed value is displayed for "Exhaust Temperature B1S4", as No. 4 exhaust gas temperature sensors are not equipped on the vehicle. Particulate Filter Differential Pressure Bank 1 DPF differential pressure Min.: -327.68 kPa, Max.: 327.67 kPa Ignition switch ON: Approximately 0 kPa ·When PM (Particulate Matter) builds up in the DPF catalyst, the "Particulate Filter Differential Pressure Bank 1" value increases.
·At 3000 rpm (no load), if "Catalyst Differential Pressure Bank 1" is more than 0.27, the DPF catalyst has become blocked.
Cause of Out of Range:
·Exhaust manifold converter sub-assembly (DPF catalyst)
·Differential pressure sensor
·Vacuum pipe clogged
·Air hose clogged
Particulate Filter Differential Pressure Bank 1 Supported DPF differential pressure supported Supp or Unsupp Supp ·Supp: The item is supported by the vehicle.
·Unsupp: The monitor is not supported by the vehicle.
Catalyst Differential Pressure Bank 1 Amount of clogging in catalyst Min.: -32.768, Max.: 32.767 0.27 or less ·Diagnosis is possible when the Mass Air Flow Sensor reading is between 30 and 140 gm/sec.
·When the air intake volume is very low, such as when idling, due to excessive pressure fluctuation the correct values will not be displayed.
·Catalyst Differential Pressure Bank 1 is the Particulate Filter Differential Pressure Bank 1 corrected in response to the "Mass Air Flow Sensor" and other values.
·If the DPF catalyst is clogged, the "Catalyst Differential Pressure Bank 1" value increases.
·When the difference in pressure is more than 0.27, DTC P244B00 is stored.
Symptoms when out of range:
·If the difference in pressure increases, a decrease in engine power may be felt.
·If an abnormal difference in pressure is detected, engine power is limited to protect the engine and catalyst.
Differential Pressure Sensor Correction Bank 1 Differential pressure sensor 0 point learned value Min.: -327.68 kPa, Max.: 327.67 kPa Ignition switch ON (engine stopped): - 1.5 to 1.5 kPa ·This number indicates the correction value (0 point calibration) for compensation of variance in the differential pressure sensor.
·If the value of Particulate Filter Differential Pressure Bank 1 does not approach 0 kPa when the ignition switch is ON (engine is stopped) and the Differential Pressure Sensor Correction Bank 1 displays less than -1.5 kPa, or higher than 1.5 kPa, there may be a malfunction in the differential pressure sensor.
·Note that the output of the differential pressure sensor fluctuates depending on the temperature.
Cause of Out of Range:
Differential pressure sensorCatalyst Regeneration Switch Outputs ON/OFF of the Catalyst Regeneration Switch. ON or OFF ON: Catalyst regeneration switch is ON - DPNR/DPF Status Regeneration (PM) PM forced regeneration status Standby, Ready, Operating, Complete During PM forced regeneration: Operate The status is only displayed while performing PM forced regeneration.
·Standby
Before entering PM forced regeneration.
·Ready
Enabling condition for PM forced regeneration is not met.
·Operating
PM forced regeneration is being performed.
If PM forced regeneration does not finish completely, the status turns to Ready.
If PM forced regeneration finishes completely, the status turns to Compl.
·Complete
PM forced regeneration is completed.
Exhaust Fuel Addition F/B Bank 1 Exhaust fuel addition correction value Min.: -327.68, Max.: 327.67 0.9 to 1.45 ·Usually Exhaust Fuel Addition F/B Bank 1 is between 0.9 and 1.45.
·Exhaust Fuel Addition F/B Bank 1 is a correction value to increase the fuel volume injected from the exhaust fuel addition injector assembly when the catalyst temperature does not rise to the target range during PM forced regeneration.
·If the correction value is more than 1.45, a clog in the exhaust fuel addition injector assembly or fuel filter element assembly may be causing a reduction in injection volume or a problem with the engine (injector assemblies, EGR, etc.) where the exhaust gas temperature decreases may be present. As a result, the catalyst temperature does not rise properly causing the catalyst to deteriorate.
Cause of Out of Range:
·Exhaust fuel addition injector assembly clogged
·Exhaust manifold converter sub-assembly (DPF catalyst) deteriorated
PM Accumulation Ratio Bank 1 PM accumulation ratio Min.: 0%, Max.: 510% - ·When PM forced regeneration is necessary, 100% is displayed for PM Accumulation Ratio Bank 1.
·If the ratio exceeds 100%, PM forced regeneration will be performed automatically.
Diesel EGR
- Powertrain > Engine > Data List
-
Tester Display Measurement Item Range Normal Condition Diagnostic Note Target EGR Valve Position No.1 EGR valve target opening amount Min.: 0%, Max.: 100% Idling after engine warmed up: 0 to 90% ·Fully closed: 0%.
·Fully open: 100%.
·Used for comparison to "Actual EGR Valve Position No.1".
Symptoms when out of range:
·When value is out of range and approaching 0%: mass air flow meter degradation, intake or exhaust system blockage
·When value is out of range and approaching 100%: EGR pipe blockage
Target EGR Valve Position No.1 Supported Target EGR valve position support Unsupp or Supp - ·Supp: The item is supported by the vehicle.
·Unsupp: The monitor is not supported by the vehicle.
EGR Step Position Bank 1 EGR step position Bank 1 Min.: 0%, Max.: 100% - Active Test item [Activate the EGR Step position Bank 1] support data. Actual EGR Valve Position No.1 EGR valve position Min.: 0%, Max.: 100% Idling after engine warmed up: 0 to 90% ·Fully closed: 0%.
·Fully open: 100%.
·Inspect while comparing to "Target EGR Valve Position No.1".
·Check the valve movement via the Active Test.
·Sometimes malfunctions only occur around a certain temperature, so refer to the engine coolant temperature and outside temperature at the time the malfunction occurred.
Symptoms when out of range:
·EGR valve stuck open: Poor starts (engine does not stop), black smoke, white smoke, lack of power
·EGR valve stuck closed: Increased turbo booster noise
Actual EGR Valve Position No.1 Supported Actual EGR valve position support Unsupp or Supp - ·Supp: The item is supported by the vehicle.
·Unsupp: The monitor is not supported by the vehicle.
EGR Rate Differential (Actual-Target) Difference between actual EGR and target EGR while idling Min.: -128%, Max.: 127% - ·Percentage value (-100 to 100%), calculated as (Actual EGR - Target EGR) * 100 is displayed.
·The maximum value is retained once idling is stabilized. Once the vehicle is no longer idling, such as when the vehicle is accelerated, the value resets to 0%.
·A positive value indicates a large amount of EGR and a negative value indicates a small amount of EGR.
Target EGR Valve Position No.2 Supported Target EGR valve positon No. 2 support Unsupp or Supp - ·Supp: The item is supported by the vehicle.
·Unsupp: The monitor is not supported by the vehicle.
Actual EGR Valve Position No.2 Supported Actual EGR valve position No. 2 support Unsupp or Supp - ·Supp: The item is supported by the vehicle.
·Unsupp: The monitor is not supported by the vehicle.
EGR Cooler Bypass VSV Status of the vacuum switching valve assembly (for EGR Bypass Valve) ON or OFF ·ON: Vacuum switching valve assembly (for EGR Bypass Valve) is ON
·OFF: Vacuum switching valve assembly (for EGR Bypass Valve) is OFF
·for Single Actuator EGR bypass Valve:
-When vacuum switching valve assembly (for EGR Bypass Valve) is ON, the value for EGR Cooler Bypass Position is Cooler and, when vacuum switching valve assembly (for EGR Bypass Valve) is OFF, the value for EGR Cooler Bypass Position is Bypass.
·for Double Actuator EGR bypass Valve:
-When EGR Cooler Bypass VSV and EGR Cooler Bypass VSV2 are both "ON", EGR Cooler Bypass Position displays "Cooler". When they are both "OFF", EGR Cooler Bypass Position displays "Bypass".
-When EGR Cooler Bypass VSV is "ON" and EGR Cooler Bypass VSV2 is "OFF", EGR Cooler Bypass Position displays "Half Position".
·The EGR cooler bypass VSV is controlled by the ECM and the vacuum switching valve assembly (for EGR bypass valve) is opened and closed by the vacuum created by the vacuum pump.
EGR Cooler Bypass VSV2 Status of the vacuum switching valve assembly (for No. 2 EGR Bypass Valve) ON or OFF ·ON: Vacuum switching valve assembly (for No. 2 EGR Bypass Valve) is ON
·OFF: Vacuum switching valve assembly (for No. 2 EGR Bypass Valve) is OFF
·Only for Double Actuator EGR bypass Valve:
-When EGR Cooler Bypass VSV and EGR Cooler Bypass VSV2 are both "ON", EGR Cooler Bypass Position displays "Cooler". When they are both "OFF", EGR Cooler Bypass Position displays "Bypass".
-When EGR Cooler Bypass VSV is "ON" and EGR Cooler Bypass VSV2 is "OFF", EGR Cooler Bypass Position displays "Half Position".
·The EGR cooler bypass VSV is controlled by the ECM and the vacuum switching valve assembly (for No. 2 EGR bypass valve) is opened and closed by the vacuum created by the vacuum pump.
EGR Cooler Bypass Position Status of the EGR cooler bypass position Cooler, Half Position or Bypass for Single Actuator EGR bypass Valve:
·Cooler: Vacuum switching valve assembly (for EGR Bypass Valve) is "ON"
·Bypass: Vacuum switching valve assembly (for EGR Bypass Valve) is "OFF"
for Double Actuator EGR bypass Valve:
·Cooler: EGR Cooler Bypass VSV and EGR Cooler Bypass VSV2 are both "ON"
·Half Position: EGR Cooler Bypass VSV is "ON"
·Bypass: EGR Cooler Bypass VSV and EGR Cooler Bypass VSV2 are both "OFF"
·for Single Actuator EGR bypass Valve:
-When vacuum switching valve assembly (for EGR Bypass Valve) is ON, the value for EGR Cooler Bypass Position is Cooler and, when vacuum switching valve assembly (for EGR Bypass Valve) is OFF, the value for EGR Cooler Bypass Position is Bypass.
·for Double Actuator EGR bypass Valve:
-When EGR Cooler Bypass VSV and EGR Cooler Bypass VSV2 are both "ON", EGR Cooler Bypass Position displays "Cooler". When they are both "OFF", EGR Cooler Bypass Position displays "Bypass".
-When EGR Cooler Bypass VSV is "ON" and EGR Cooler Bypass VSV2 is "OFF", EGR Cooler Bypass Position displays "Half Position".
EGR Close Learning Value Bank 1 EGR fully closed position learned value Min.: 0 V, Max.: 4.999 V 0 to 1 V ·This value is the EGR position sensor output voltage.
·When the value is at the upper or lower limit of the normal range, it is possible that a foreign object is lodged in the EGR valve seat area.
·As the lower and upper limits are 0 V and 1 V respectively, if the value becomes stuck at either of these values, there is a malfunction in the lift sensor or the valve position may be misaligned (foreign matter is present, etc.).
EGR Position Sensor Bank 1 EGR position sensor Min.: 0 V, Max.: 4.999 V - Displays the output voltage of the EGR valve position sensor.
VN Turbo
- Powertrain > Engine > Data List
-
Tester Display Measurement Item Range Normal Condition Diagnostic Note Target Boost Pressure Target boost pressure Min.: 0 kPa, Max.: 2047.96 kPa Driving vehicle on level surface at 3000 rpm with full load: 190 to 290 kPa ·Inspect while comparing with "Intake Manifold Absolute Pressure".
·With the accelerator fully open, if the actual manifold absolute pressure (MAP) is low compared to the target boost pressure by at least 20 kPa for 5 second or more, a feeling of a lack of power will occur.
·When the vehicle is driven with the engine speed at 3000 rpm or more and the accelerator pedal fully depressed, "Intake Manifold Absolute Pressure" is approximately equal to "Target Boost Pressure".
Target Boost Pressure Supported Target boost pressure support Unsupp or Supp - ·Supp: The item is supported by the vehicle.
·Unsupp: The monitor is not supported by the vehicle.
Target Boost Pressure2 Supported Target boost pressure2 support Unsupp or Supp - ·Supp: The item is supported by the vehicle.
·Unsupp: The monitor is not supported by the vehicle.
Boost Pressure Sensor Supported Boost Pressure Sensor Supported Unsupp or Supp - ·Supp: The item is supported by the vehicle.
·Unsupp: The monitor is not supported by the vehicle.
Boost Pressure Sensor2 Supported Boost Pressure Sensor2 Supported Unsupp or Supp - ·Supp: The item is supported by the vehicle.
·Unsupp: The monitor is not supported by the vehicle.
Target VN Turbo Position Bank 1 Target VN turbo position Min.: 0%, Max.: 100% 0 to 96% ·When the nozzle vanes are fully closed (boost is applied), the value is 0%.
·When the nozzle vanes are fully opened (boost is not applied), the value is 100%.
Actual VN Turbo Position Bank 1 Actual VN turbo position Min.: 0%, Max.: 100% 0 to 96% ·When the nozzle vane gets stuck or the movement is abnormal, the difference between this value and Target VN Turbo Position Bank 1 increases and the DC motor output (duty) also increases.
·Actual VN Turbo Position Bank 1 is controlled to match Target VN Turbo Position Bank 1.
Target VN Turbo Position Bank 1 Supported Target VN position supported Unsupp or Supp - ·Supp: The item is supported by the vehicle.
·Unsupp: The monitor is not supported by the vehicle.
Actual VN Turbo Position Bank 1 Supported Actual VN position supported Unsupp or Supp - ·Supp: The item is supported by the vehicle.
·Unsupp: The monitor is not supported by the vehicle.
Target VN Turbo Position Bank 2 Supported Target VN position bank 2 supported Unsupp or Supp - ·Supp: The item is supported by the vehicle.
·Unsupp: The monitor is not supported by the vehicle.
Actual VN Turbo Position Bank 2 Supported Actual VN position bank 2 supported Unsupp or Supp - ·Supp: The item is supported by the vehicle.
·Unsupp: The monitor is not supported by the vehicle.
VN Position Sensor Out Bank 1 VN position sensor output voltage Min.: 0 V, Max.: 4.999 V Idling after engine warmed-up: 1 to 4.5 V VN Position Sensor Bank 1 Out displays the opening angle of the nozzle vane output by the sensor. VN Close Learn Value Bank 1 VN turbo fully closed position learned value Min.: 0 V, Max.: 4.999 V 1.1 to 1.9 V - VN Turbo Minimum Angle VN turbo minimum opening amount Min.: 0%, Max.: 127.5% - ·The maximum vane opening amount is displayed in %.
·The VN turbo is operated between VN Turbo Maximum Angle and VN Turbo Minimum Angle when the Test the Turbo Charger Step Motor Active Test is performed.
VN Turbo Maximum Angle VN turbo maximum opening amount Min.: 0%, Max.: 127.5% - ·The maximum vane opening amount is displayed in %.
·The VN turbo is operated between VN Turbo Maximum Angle and VN Turbo Minimum Angle when the Test the Turbo Charger Step Motor Active Test is performed.
Turbo Charger Step Motor Bank 1 Turbo charger step motor position Min.: 0%, Max.: 127.5% - Active Test item [Test the Turbo Charger Step Motor Bank 1] support data.
Various Vehicle Conditions 4 (All Data)
- Powertrain > Engine > Data List
-
Tester Display Measurement Item Range Normal Condition Diagnostic Note Starter SW Starter switch signal ON or OFF ON: Cranking Starter SW condition:
·ON: Starter is operating
·OFF: Starter is not operating
Cause of Out of Range:
·OFF malfunction (ignition switch (STA) is ON but the signal is OFF and the starter is operating): Wire harness is open or shorted to ground
·ON malfunction (ignition switch (STA) is off but the signal is ON and the starter is not operating): Wire harness is shorted to +B
·Operation malfunction: ignition switch malfunction, starter relay malfunction, starter malfunction, battery or battery cable is defective, or wire harness is open or shorted
Symptoms when out of range:
·Ignition switch is ON but the starter does not operate: Starting is not possible
·Ignition switch is off but the starter continues to operate: STA signal malfunction (P061512) is stored
Power Steering SW Power steering switch signal ON or OFF - - Neutral Position SW Park/neutral position switch status ON or OFF ON: Shift lever in neutral - Clutch SW Clutch switch signal ON or OFF ON: Clutch pedal depressed When OFF with the clutch pedal depressed, the engine does not start. Stop Light SW Stop light switch ON or OFF ·ON: Brake pedal depressed
·OFF: Brake pedal released
Stop light switch (STP) operation condition:
·ON: Light is on (Brake pedal is depressed)
·OFF: Light is off (Brake pedal is released)
Cause of Out of Range:
·OFF malfunction: Wire harness (stop light switch to ECM, stop light switch to +B) open or shorted to ground
·ON malfunction: Wire harness (stop light switch to ECM) shorted to +B
·Stop light switch
Symptoms when out of range:
Stop light switch malfunction DTC P05042B is storedImmobiliser Communication Immobiliser communication ON or OFF ·ON: Normal
·OFF: Engine cannot be started due to immobiliser communication malfunction
Cause of Out of Range:
·Use of a non-registered key
·Key battery is fully depleted
Clogged Fuel Filter Switch Fuel Filter clogging switch status ON or OFF ON Switch turns off when the fuel filter is clogged. Cruise Main SW Cruise control switch status ON or OFF - -
Check Mode
- Powertrain > Engine > Data List
-
Tester Display Measurement Item Range Normal Condition Diagnostic Note Exhaust Temperature B1S1 Test Result Check mode result for exhaust temperature B1S1 Compl or Incmpl - Incmpl / Compl: The item changes from Incmpl to Compl if the monitor was completed at least once at some time in the past. This item does not change when the ignition switch is turned off. However, the item changes back to Incmpl when DTCs are cleared or the battery cable is disconnected. Exhaust Temperature B1S2 Test Result Check mode result for exhaust temperature B1S2 Compl or Incmpl - Incmpl / Compl: The item changes from Incmpl to Compl if the monitor was completed at least once at some time in the past. This item does not change when the ignition switch is turned off. However, the item changes back to Incmpl when DTCs are cleared or the battery cable is disconnected. Exhaust Temperature B1S3 Test Result Check mode result for exhaust temperature B1S3 Compl or Incmpl - Incmpl / Compl: The item changes from Incmpl to Compl if the monitor was completed at least once at some time in the past. This item does not change when the ignition switch is turned off. However, the item changes back to Incmpl when DTCs are cleared or the battery cable is disconnected.
Test Result (Monitor Status)
- Powertrain > Engine > Data List
-
Tester Display Measurement Item Range Normal Condition Diagnostic Note Complete Parts Monitor Comprehensive component monitor Not Avl or Avail - * Ignition Monitor Ignition monitor Spark Ignition or Compression Ignition Compression Ignition - Fuel System Monitor Fuel system monitor Not Avl or Avail - * Fuel System Monitor Result Fuel system monitor Compl or Incmpl - * Misfire Monitor Misfire monitor Not Avl or Avail - * EGR/VVT Monitor EGR/VVT monitor Not Avl or Avail - * EGR/VVT Monitor Result EGR/VVT monitor Compl or Incmpl - * A/F (O2) Sensor Heater Monitor O2S(A/FS) heater monitor Not Avl or Avail - * A/F (O2) Sensor Heater Monitor Result O2S(A/FS) heater monitor Compl or Incmpl - * A/F (O2) Sensor Monitor O2S(A/FS) monitor Not Avl or Avail - * A/F (O2) Sensor Monitor Result O2S(A/FS) monitor Compl or Incmpl - * Secondary Air Injection System Monitor 2nd air monitor Not Avl or Avail - * Secondary Air Injection System Monitor Result 2nd air monitor Compl or Incmpl - * EVAP Monitor EVAP monitor Not Avl or Avail - * EVAP Monitor Result EVAP monitor Compl or Incmpl - * Heated Catalyst Monitor Heated catalyst monitor Not Avl or Avail - * Heated Catalyst Monitor Result Heated catalyst monitor Compl or Incmpl - * Catalyst Monitor Catalyst monitor Not Avl or Avail - * Catalyst Monitor Result Catalyst monitor Compl or Incmpl - *
*:
Avail: The monitor is available on the vehicle.
Not Avl: The monitor is not available on the vehicle.
Incmpl / Compl: The item changes from Incmpl to Compl if the monitor was completed at least once at some time in the past. This item does not change when the ignition switch is turned off. However, the item changes back to Incmpl when DTCs are cleared or the battery cable is disconnected.
Various Vehicle Conditions 5 (All Data)
- Powertrain > Engine > Data List
-
Tester Display Measurement Item Range Normal Condition Diagnostic Note TC Terminal TC terminal status ON or OFF - - MIL MIL status ON or OFF OFF: MIL off - MIL ON Run Distance Distance traveled with MIL on Min.: 0 km, Max.: 65535 km Distance traveled after DTC stored ·Distance traveled after a DTC is stored.
·Cleared when the cable is disconnected from the negative (-) battery terminal, or when the DTC is cleared using the GTS.
Running Time from MIL ON Running time after MIL turns on Min.: 0 min., Max.: 65535 min. Running time after MIL turns on ·Engine run time since the MIL illumination.
·Cleared when the cable is disconnected from the negative (-) battery terminal, or when the DTC is cleared using the GTS.
Time after DTC Cleared Time after DTC cleared Min.: 0 min., Max.: 65535 min. Time after DTCs cleared Time elapsed since the DTCs were cleared (or shipment from the factory). Distance from DTC Cleared Distance driven after DTC cleared Min.: 0 km, Max.: 65535 km Distance driven after DTCs cleared ·Distance driven since the DTCs were cleared.
·(Data List "Distance from DTC clear") - (Freeze frame data "Distance from DTC cleared") = Distance driven since the abnormality occurred.
Warmup Cycle Cleared DTC Warmup cycles after DTC cleared Min.: 0, Max.: 255 - ·Number of engine warmup since DTCs were cleared.
·(Data List "Warmup Cycle Cleared DTC") - (Freeze frame data "Warmup Cycle Cleared DTC") = Warmup cycles since the abnormality occurred.
Distance Traveled from Last Battery Cable Disconnect Distance driven after battery cable disconnected Min.: 0 km, Max.: 65535 km - - IG OFF Elapsed Time Time after ignition switch turned off Min.: 0 min, Max.: 655350 min. Cumulative time after ignition switch turned off - Soak IC Current Timer Value Current soak timer value Min.: 0 sec, Max.: 614390.625 sec - - OBD Requirements OBD requirement - - - OBD Requirements (Diesel) OBD requirement (Diesel) Other than WWH-OBD, Euro5 (WWH-OBD) or Euro6 (WWH-OBD) - - Number of Emission DTC Emissions-related DTCs Min.: 0, Max.: 127 - -
Diesel Starting
- Powertrain > Engine > Data List
-
Tester Display Measurement Item Range Normal Condition Diagnostic Note Electric Duty Feedback Value Electric load feedback value Min.: 0 mm3/st, Max.: 39.84 mm3/st 0 to 5.8 mm3/st Expected injection volume increase after the electrical load turns from off to on. PS Duty Feedback Value Power steering load feedback value Min.: 0 mm3/st, Max.: 39.84 mm3/st 0 mm3/st Expected injection volume increase after the power steering turns from off to on. Engine Speed (Starter Off) Engine speed when starter off Min.: 0 rpm, Max.: 51199 rpm - Engine speed immediately after starting the engine. Starter Count Starter on count Min.: 0, Max.: 255 - Number of times the starter turned on from the time the ignition switch was turned to ON. Run Distance of Previous Trip Distance driven during previous trip Min.: 0 km, Max.: 655.35 km - Before 5 seconds elapse after starting the engine, Run Distance of Previous Trip indicates the distance driven during the previous trip. After 5 seconds elapse after starting the engine, this item indicates the distance driven during the current trip calculated from the vehicle speed.
- HINT:
-
If DTCs indicating insufficient power or problems with the DPF system, diesel throttle or EGR valve are stored, confirm this item in the freeze frame data of the stored DTCs to determine the distance driven when the DTCs were stored. The distance driven can be used as a reference when troubleshooting.
Engine Starting Time Engine starting time Min.: 0 ms, Max.: 655350 ms - ·This is the time elapsed after the starter turns on until the engine speed reaches 400 rpm.
·This value is cleared 5 seconds after the engine is started and the value is displayed as 0 ms.
IG ON Time IG ON time Min.: 0 ms, Max.: 25500 ms - ·By comparing Glow Request Lighting Time to IG ON Time, the operation state (whether the engine was started, etc.) can be determined.
·If the malfunction occurred when starting a cold engine at 0°C (32°F) or less, this item is useful in determining whether the engine was started after the glow plug indicator lights turned off.
Glow Request Lighting Time Glow request lighting time Min.: 0 ms, Max.: 25500 ms - ·By comparing Glow Request Lighting Time to IG ON Time, the operation state (whether the engine was started, etc.) can be determined.
·If the malfunction occurred when starting a cold engine at 0°C (32°F) or less, this item is useful in determining whether the engine was started after the glow plug indicator lights turned off.
Minimum Engine Speed Minimum engine speed Min.: 0 rpm, Max.: 51199 rpm - -
Diesel Rough Idle
- Powertrain > Engine > Data List
-
Tester Display Measurement Item Range Normal Condition Diagnostic Note Compression Leakage Count Compression leakage count Min.: 0, Max.: 255 0 When the counter displays 1 or higher during an engine stall, startability malfunction or rough idle, it may be the result of pressure loss caused by deposits jamming the valve, etc. Plural Cylinders Rough Idle Status of the plural cylinders rough idle ON or OFF OFF Indicates multiple cylinders are the cause of rough idling when ON. Rough Idle Cylinder #1 Status of the rough idle #1 ON or OFF OFF ·Indicates speed has dropped compared to other cylinders and idling is rough for the indicated cylinder when ON.
·This item indicates cylinders which are likely to be the cause of rough idle.
Rough Idle Cylinder #2 Status of the rough idle #2 ON or OFF OFF Same as Rough Idle #1 Rough Idle Cylinder #3 Status of the rough idle #3 ON or OFF OFF Same as Rough Idle #1 Rough Idle Cylinder #4 Status of the rough idle #4 ON or OFF OFF Same as Rough Idle #1
Diesel Lack of Power
- Powertrain > Engine > Data List
-
Tester Display Measurement Item Range Normal Condition Diagnostic Note Engine Coolant Temperature High Status of the engine coolant temperature high ON or OFF OFF This item indicates whether the fuel injection volume was reduced for a certain period of time due to a high engine coolant temperature (overheating). If this is the case, this item displays "ON" and vehicle control history code X0848 is stored. Common Rail Pressure Low Status of the common rail pressure low ON or OFF OFF This item indicates whether the actual common rail pressure was lower than the target pressure for a certain period of time. If this is the case, this item displays "ON" and vehicle control history code X0846 is stored. Boost Pressure Low Status of the boost pressure low ON or OFF OFF This item indicates whether the actual boost pressure was insufficient compared to the target boost pressure, which would cause the fuel injection volume to be reduced for a certain period of time. If this is the case, this item displays "ON" and vehicle control history code X0843 is stored. MAF Low Mass air flow low ON or OFF OFF ·This item indicates whether the intake air amount measured by the mass air flow meter sub-assembly was insufficient, which would cause the fuel injection volume to be reduced for a certain period of time. If this is the case, this item displays "ON" and vehicle control history code X0847 is stored.
·This item is "ON" when the intake air amount is low due to blockage in the intake system, disconnection of hoses or an excessive amount of EGR, and also when the intake air amount is measured to be low due to deterioration of the mass air flow meter sub-assembly.
MAF/Estimate MAF Ratio Ratio of intake air amount to estimated intake air amount Min.: 0, Max.: 2.55 Engine speed 4000 rpm, EGR system off:
0.6 to 1.4·Even when the system is normal, the value may deviate from the range specified in Normal Condition for a short period of time (approximately 1 second).
·This item indicates the ratio of the intake air amount to the estimated intake air amount. The estimated air amount is calculated using the intake manifold pressure and intake air temperature.
·When vehicle control history code X0843 is stored, this item is useful in determining whether there is a problem in the turbocharger system or a disconnected or leaking pipe in the high pressure intake system when the boost pressure is insufficient.
·When performing troubleshooting, this information is only valid when there is a high load (the diesel throttle is fully open) and the EGR system is off.
Various Vehicle Conditions 6 (All Data)
- Powertrain > Engine > Data List
-
Tester Display Measurement Item Range Normal Condition Diagnostic Note Brake Override System Brake override system status ON or OFF ON: Brake override system operating - Immobiliser Fuel Cut Status Status of immobiliser fuel cut ON or OFF OFF - Immobiliser Fuel Cut History Immobiliser fuel cut history ON or OFF OFF If Immobiliser Fuel Cut History was "ON" when vehicle control history code X0812 was stored, the engine could not be started due to the immobiliser. VSV for Swirl Control Valve Swirl control valve status Open or Close - -
Compression
- Powertrain > Engine > Data List
-
Tester Display Measurement Item Range Normal Condition Diagnostic Note Engine Speed Cylinder #1 Engine speed for No. 1 cylinder Min.: 0 rpm, Max.: 51199 rpm Engine speeds of all cylinders almost same ·Output only when the "Check the Cylinder Compression" Active Test is performed.
·Indicates the speed of each cylinder when cranking.
Example - Normal: Engine speeds of all cylinders are approximately equal.
When No. 1 cylinder compression is low, "Engine Speed Cylinder #1" is approximately 300 rpm, and "Engine Speed Cylinder #2 to #4" is approximately 200 rpm.
Symptoms when out of range:
When the engine speeds of all cylinders are not equal, idling will be rough.Engine Speed Cylinder #2 Engine speed for No. 2 cylinder Min.: 0 rpm, Max.: 51199 rpm Engine speeds of all cylinders almost same Same as Engine Speed Cylinder #1 Engine Speed Cylinder #3 Engine speed for No. 3 cylinder Min.: 0 rpm, Max.: 51199 rpm Engine speeds of all cylinders almost same Same as Engine Speed Cylinder #1 Engine Speed Cylinder #4 Engine speed for No. 4 cylinder Min.: 0 rpm, Max.: 51199 rpm Engine speeds of all cylinders almost same Same as Engine Speed Cylinder #1 Average Engine Speed of All Cylinder Average engine speed for all cylinders Min.: 0 rpm, Max.: 51199 rpm - ·Output only when the Active Test "Check the Cylinder Compression" is performed.
·Indicates the average engine speed of all cylinders during cranking.
Automatic Transmission (All Data)
- Powertrain > Engine > Data List
-
Tester Display Measurement Item Range Normal Condition Diagnostic Note NT Sensor Speed Input turbine speed Min.: 0 rpm, Max.: 12750 rpm ·Lock-up on (after warming up the engine): Value from transmission revolution sensor (NT) equal to engine speed
·Lock-up off (idling with shift lever in N): Value from transmission revolution sensor (NT) nearly equal to engine speed
Data is displayed in increments of 50 rpm. Speed (SP2) Output shaft speed Min.: 0 km/h, Max.: 255 km/h 0 km/h (0 mph): Vehicle stopped (equal to vehicle speed) - SP2 Sensor Voltage Transmission revolution sensor (SP2) sensor voltage Min.: 0 V, Max.: 4.999 V 0.2 to 1.8 V: Engine idling - Shift SW Status (P Range) Park/Neutral position switch status ON or OFF ·ON: Shift lever in P
·OFF: Shift lever not in P
When the shift lever position displayed on the GTS differs from the actual position, adjustment of the park/neutral position switch or the shift cable may be incorrect. Shift SW Status (R Range) Park/Neutral position switch status ON or OFF ·ON: Shift lever in R
·OFF: Shift lever not in R
When the shift lever position displayed on the GTS differs from the actual position, adjustment of the park/neutral position switch or the shift cable may be incorrect. Shift SW Status (N Range) Park/Neutral position switch status ON or OFF ·ON: Shift lever in N
·OFF: Shift lever not in N
When the shift lever position displayed on the GTS differs from the actual position, adjustment of the park/neutral position switch or the shift cable may be incorrect. Sport Shift Up SW Sport shift up switch status ON or OFF ·ON: Shift lever held in "+" (up-shift)
·OFF: Shift lever not held in "+" (up-shift)
- Sport Shift Down SW Sport shift down switch status ON or OFF ·ON: Shift lever held in "-" (down-shift)
·OFF: Shift lever not held in "-" (down-shift)
- Shift SW Status (S Range) Sport mode select switch status ON or OFF ·ON: Shift lever in S, "+" or "-"
·OFF: Shift lever not in S, "+" or "-"
- Shift SW Status (D Range) Park/Neutral position switch status ON or OFF ·ON: Shift lever in D, S, "+" or "-"
·OFF: Shift lever not in D, S, "+" or "-"
When the shift lever position displayed on the GTS differs from the actual position, adjustment of the park/neutral position switch or the shift cable may be incorrect. A/T Oil Temperature No.1 A/T oil temperature No.1 value Min.: -40°C, Max.: 215.9°C ·Approx. 80°C (176°F): After stall test
·Equal to ambient temperature when cold soak
- A/T Oil Temperature No.2 A/T oil temperature No.2 value Min.: -40°C, Max.: 215.9°C ·Approx. 80°C (176°F): After stall test
·Equal to ambient temperature when cold soak
- ATF Thermal Degradation Estimate Estimated value of ATF thermal degradation Min.: 0, Max.: 65535 - - Torque Converter Temperature Raise History Torque converter temperature raise history status Min.: 0, Max.: 255 - - NT Sensor Voltage NT sensor voltage value Min.: 0 V, Max.: 4.999 V 0.1 to 1.9 V: Engine idling - Lock Up Status Lock up status ON or OFF ·ON: Lock-up operating
·OFF: Lock-up not operating
- Shift Status Shift position status 1st, 2nd, 3rd, 4th, 5th, 6th Same as actual gear -
Various Vehicle Conditions 7 (All Data)
- Powertrain > Engine > Data List
-
Tester Display Measurement Item Range Normal Condition Diagnostic Note Stop and Start System Engine Status Stop and start system engine status IG, Run, Stopreq, Stop or Restart - ·IG: Engine stopped
·Run: Engine running
·Stopreq: Engine stop requested
·Stop: Engine stopped (by stop and start control)
·Restart: Engine restarted
Body Control with Torque Demand Body control with torque demand status ON or OFF Under the body control with torque demand: ON -
ACTIVE TEST
- HINT:
-
Using the GTS to perform Active Tests allows relays, VSVs, actuators and other items to be operated without removing any parts. This non-intrusive functional inspection can be very useful because intermittent operation may be discovered before parts or wiring is disturbed. Performing Active Tests early in troubleshooting is one way to save diagnostic time. Data List information can be displayed while performing Active Tests.
Connect the GTS to the DLC3.
Turn the ignition switch to ON.
Turn the GTS on.
Enter the following menus: Powertrain / Engine / Active Test.
Perform the Active Test.
- Powertrain > Engine > Active Test
-
Tester Display Measurement Item Control Range Diagnostic Note Activate the TC Terminal Turn on and off TC and TE1 (CG) connection ON/OFF ·Confirm that the vehicle is stopped.
·ON: TC and TE1 (CG) are connected.
·OFF: TC and TE1 (CG) are disconnected.
Control the Select Cylinder Fuel Cut Selected cylinder (cylinder #1 to #4) injector fuel cut ·#1/#2/#3/#4
·Start/Stop
Fuel injection is stopped while the test is ON.
·Confirm that the vehicle is stopped and the engine is idling.
·If the running condition of the engine does not worsen even though injection of the designated cylinder is stopped, the cylinder can be determined to be malfunctioning.
Check the Cylinder Compression Check the cylinder compression pressure* Start/Stop Fuel injection stops in all cylinders. Activate the VSV for Swirl Control Valve Activate the vacuum switching valve assembly (for swirl control valve) Open/Close Test is possible when the following conditions are met:
·Ignition switch ON.
·Shift lever in neutral.
Control the EGR Step Position Bank 1 Control the electric EGR control valve assembly 1 to 100% Test is possible when the following conditions are met:
·Ignition switch ON.
·Engine is stopped.
Activate the EGR Valve Close Bank 1 Activate the electric EGR control valve assembly Close/OFF Confirm that the vehicle is stopped and the engine is idling Activate the VN Turbo Cleaning Active the VN turbo cleaning control Start/Stop Test is possible when the following conditions are met:
·Engine warmed up (Engine coolant temperature 77°C (170°F) or higher.
·Engine is idling.
·Shift lever in neutral.
Diesel Throttle Target Angle Bank 1 Control the diesel throttle valve 10 to 100% Test is possible when the following conditions are met:
·Ignition switch ON
·Engine is stopped
Test the Turbo Charger Step Motor Bank 1 Activate the turbocharger sub-assembly 0 to 60% Test is possible when the following conditions are met:
·Ignition switch ON
·Engine is stopped
Activate the VN Turbo Open Bank 1 Activate the turbocharger sub-assembly OFF/Open Confirm that the engine is running. Test the Fuel Leak Pressurize the common rail interior and check for fuel leaks Stop/Start ·Fuel pressure inside common rail pressurized to specified value and engine speed increased to 2000 rpm when Start is selected
·Above conditions preserved while test is Start
- HINT:
-
If this Active Test is performed when the engine is cold, combustion may become unstable. However, this is not a malfunction. It is only necessary to confirm that the pressure rises to the target pressure and that there are no fuel leaks.
Activate the Pre-stroke Control Valve Activates the pre-stroke control valve Open/Close Test is possible when the following conditions are met:
·Ignition switch ON
·Engine is stopped
·Shift lever in neutral
Activate the VSV for EGR Cooler Bypass for Single Actuator EGR bypass Valve:
Activate the vacuum switching valve assembly (for EGR Bypass Valve)
for Double Actuator EGR bypass Valve:
Activate the vacuum switching valve assembly (for EGR Bypass Valve and No. 2 EGR Bypass Valve)
Bypass/OFF/Half Pos/Cooler Test is possible when the following conditions are met:
·Engine warmed up
·Engine is idling
·Shift lever in neutral
If performing the Active Test continuously, it must be finished within 5 minutes.Activate the VSV for EGR Cooler Bypass (Linear) Activate the vacuum switching valve assembly (for EGR Bypass Valve) linear drive 0 to 100% Test is possible when the following conditions are met:
·Engine warmed up
·Engine is idling
·Shift lever in neutral
If performing the Active Test continuously, it must be finished within 5 minutes.
- HINT:
-
*: When cranking the engine, the Active Test measures the speed of each cylinder. In this Active Test, the fuel of all cylinders is cut when the engine is cranked for approximately 10 seconds.
At this time, the speed of each cylinder is measured. If the speed of one cylinder is more than the other cylinders, it can be determined that the compression pressure of that cylinder is lower than the other cylinders.
Warm up the engine.
Turn the ignition switch off.
Connect the GTS to the DLC3.
Turn the ignition switch to ON and turn the GTS on.
Enter the following menus: Powertrain / Engine / Active Test / Check the Cylinder Compression.
- HINT:
-
If the results are not displayed normally, select the display items from the Data List before performing the Active Test. Enter the following menus: Powertrain / Engine / Data List / Compression / Engine Speed Cylinder #1, Engine Speed Cylinder #2, Engine Speed Cylinder #3, Engine Speed Cylinder #4 and Average Engine Speed of All Cylinder.
Push the snapshot button to turn the snapshot function on.
- HINT:
-
Using the snapshot function, data can be recorded during the Active Test.
While the engine is not running, press the RIGHT or LEFT button to change Check the Cylinder Compression to ON.
- HINT:
-
After performing the above procedure, the "Check the Cylinder Compression" Active Test will start. Fuel injection for all cylinders is prohibited and the engine speed measurement of each cylinder enters standby mode.
Crank the engine for about 10 seconds.
- HINT:
-
Continue to crank the engine until the values change from the default value (51199 rpm).
Monitor the engine speed (Engine Speed Cylinder #1 to #4, Average Engine Speed of All Cylinder) displayed on the GTS.
- HINT:
-
At first, the GTS display will show the engine speed measurement of each cylinder to be extremely high. After approximately 10 seconds of engine cranking, the engine speed measurement of each cylinder will change to the actual engine speed.
- NOTICE:
- ·
After the "Check the Cylinder Compression" Active Test is turned on, it will automatically turn off after 255 seconds.
·When the "Check the Cylinder Compression" test is off and the engine is cranked, the engine will start.
·If the "Check the Cylinder Compression" test needs to be performed after it is turned on and performed once, press "EXIT" to return to the Active Test menu screen. Then perform the "Check the Cylinder Compression" test again.
·Use a fully-charged battery.
Stop cranking the engine, and then change "Check the Cylinder Compression" to OFF after the engine stops.
- NOTICE:
-
If the Active Test is changed to OFF while the engine is being cranked, the engine will start.
Push the snapshot button to turn the snapshot function off.
Select "Stored Data" on the GTS screen, select the recorded data and display the data as a graph.
- HINT:
-
If the data is not displayed as a graph, the change of the values cannot be observed.
Check the change in engine speed values.
- HINT:
-
As the data values of the Active Test return to their default values when cranking is stopped, the engine speed value of each cylinder cannot be observed. Therefore, it is necessary to use the data recorded with the snapshot function to check the engine speed values recorded during cranking.
SYSTEM CHECK
Connect the GTS to the DLC3.
Turn the ignition switch to ON.
Turn the GTS on.
Enter the following menus: Powertrain / Engine / Utility.
- Powertrain > Engine > Utility
-
Tester Display Diagnostic Note Pressure Discharge Valve Check Pressure Discharge Valve Check*
·Malfunctions can be determined by checking the fuel pressure when performing a forced operation of the pressure discharge valve.
·Use when troubleshooting fuel pressure control malfunctions and abnormal combustion noise.
*: Activate the Pressure Discharge Valve Check
- HINT:
- ·
This is the procedure for troubleshooting fuel pressure control malfunctions and combustion problems.
·Malfunctions can be determined by checking the fuel pressure when performing a fuel cut and operating the pressure discharge valve with the GTS.
·During "Pressure Discharge Valve Check", the GTS measures the fuel pressure while the engine is running, after the engine is stopped, and after the pressure discharge valve operates.
Connect the GTS to the DLC3.
Turn the ignition switch to ON.
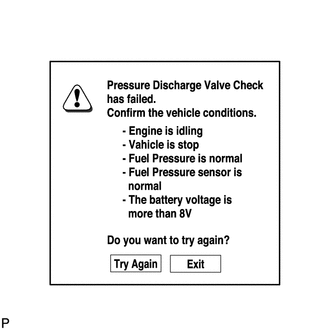
Turn the GTS on.
- NOTICE:
-
Confirm the following conditions:
- ·
Engine is idling.
·Vehicle is stopped.
·Fuel pressure is not extremely high (below 100000 kPag).
·Fuel pressure is not extremely low (higher than 26000 kPag).
·Fuel pressure sensor is normal.
·Battery voltage is higher than 8 V.
- HINT:
-
When the common rail pressure is unstable, the fuel pressure may decrease to a level where the test cannot be performed. In this situation, wait until the common rail pressure meets the test condition, and then perform the test.
Enter the following menus: Powertrain / Engine / Utility / Pressure Discharge Valve Check.
- Powertrain > Engine > Utility
-
Tester Display Pressure Discharge Valve Check - 50005 372 2573
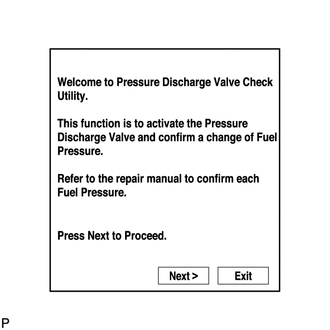
Press "Next".
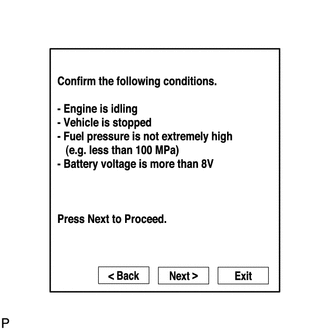
Press "Next" again to proceed.
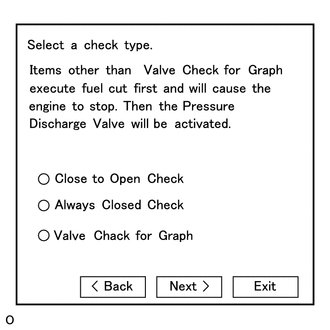
Select the check type "Valve Check for Graph".
Press "Next" again to proceed.
Press "Start" again to proceed.
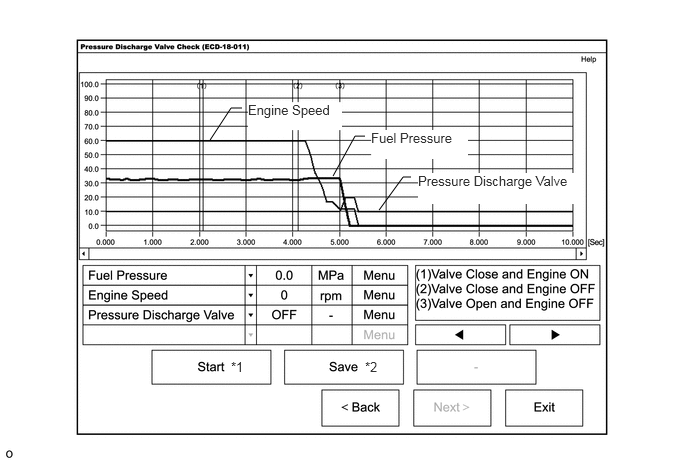
- HINT:
-
*1: When "Start" is pressed, the pressure discharge valve check begins.
-
*2: If "Save" is pressed after the pressure discharge valve check, the data recorded during the valve check can be saved.
Select the check type "Close to Open Check" or "Always Closed Check".
- HINT:
- ·
"Close to Open Check" opens the pressure discharge valve after the engine stops.
·"Always Closed Check" holds the pressure discharge valve closed during the check.
Press "Next".
Perform troubleshooting based on the measurement results.
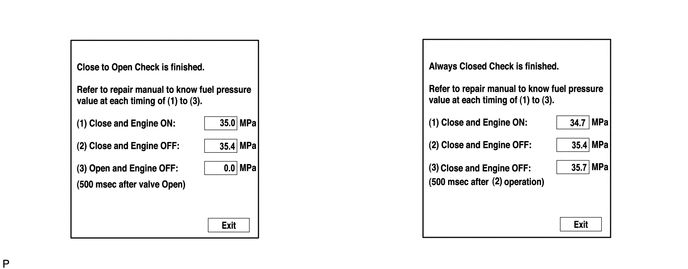
- HINT:
- ·
During "Close to Open Check", if there is no large change in fuel pressure when the pressure discharge valve is closed while the engine is running and after the engine is stopped, and if the value is 0 kPag when the pressure discharge valve is open, the system is normal.
·Perform "Always Closed Check" if the value is not 0 kPag when the pressure discharge valve is open during "Close to Open Check". If the results are the same as during "Close to Open Check", there is a pressure discharge valve operation malfunction.
·If the fuel temperature is high, perform "Pressure Discharge Valve Check" after the fuel has cooled to the outside air temperature.
·If a large amount of fuel is leaking, the fuel pressure decreases when the engine is stopped. However, the condition of the pressure discharge valve can still be determined by comparing the measurement results of "Close to Open Check" and "Always Closed Check".
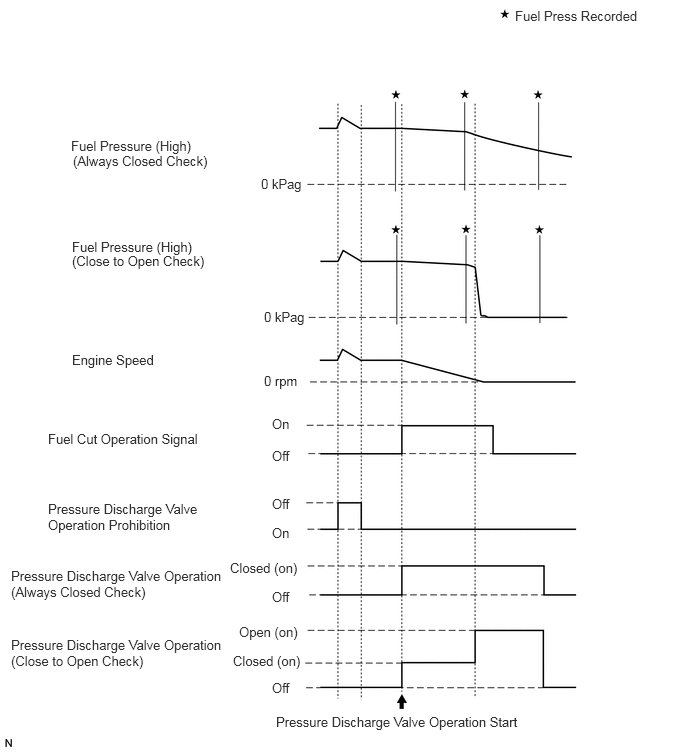 5.365,0.083 6.771,0.281 1.406,0.198 10 false Fuel Press Recorded 0.74,1.438 2.406,1.646 1.667,0.208 10 false Fuel Pressure (High) 0.75,2.635 2.281,2.833 1.531,0.198 10 false (Close to Open Check) 2.719,1.833 3.323,2.031 0.604,0.198 10 false 0 kPag 0.75,2.49 2.417,2.677 1.667,0.188 10 false Fuel Pressure (High) 0.76,1.594 2.292,1.792 1.531,0.198 10 false (Always Closed Check) 2.75,3.219 3.375,3.573 0.625,0.354 10 false 0 kPag 0.75,3.667 2.417,4.083 1.667,0.417 10 false Engine Speed 2.75,3.885 3.198,4.083 0.448,0.198 10 false 0 rpm 2.833,4.333 3.281,4.531 0.448,0.198 10 false On 2.833,4.667 3.135,4.865 0.302,0.198 10 false Off 0.5,4.49 2.26,4.74 1.76,0.25 10 false Fuel Cut Operation Signal 0.5,5.219 2.156,5.583 1.656,0.365 10 false Pressure Discharge Valve Operation Prohibition 2.833,5.167 3.135,5.365 0.302,0.198 10 false Off 2.833,5.469 3.281,5.667 0.448,0.198 10 false On 2.396,5.833 3.25,6.073 0.854,0.24 10 false Closed (on) 2.833,6.135 3.135,6.333 0.302,0.198 10 false Off 2.49,6.5 3.344,6.74 0.854,0.24 10 false Open (on) 2.427,6.802 3.281,7.042 0.854,0.24 10 false Closed (on) 2.833,7.083 3.135,7.281 0.302,0.198 10 false Off 2.875,7.438 5.542,7.688 2.667,0.25 10 false Pressure Discharge Valve Operation Start 0.115,5.917 2.385,6.406 2.271,0.49 10 false Pressure Discharge Valve Operation (Always Closed Check) 0.115,6.635 2.365,7.125 2.25,0.49 10 false Pressure Discharge Valve Operation (Close to Open Check)