2007-2013 Highlander Kluger · Service Manual RESTRAINTS

INSTALLATION

Removal / installation · Vehicles built from Jul 2010

Versions by build date: May 2007 – Jul 2008 Aug 2008 – Jun 2010 from Jul 2010


1. INSTALL SEAT POSITION SENSOR

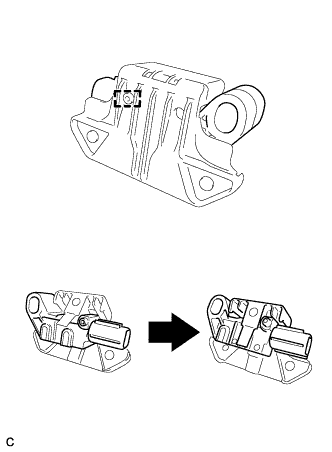
  1. C168034
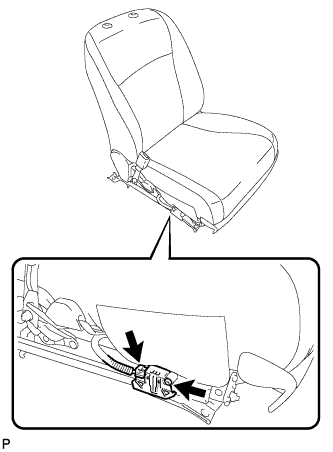
    Install the seat position sensor to the seat slide position sensor protector with the pin as shown in the illustration.

  1. C107067E10
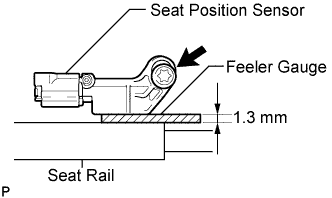
    Using a 1.3 mm (0.051 in.) feeler gauge, temporarily install the seat position sensor.

    NOTICE:
    1. If the seat position sensor has been dropped, or there are any cracks, dents or other defects in the case or connector, replace the seat position sensor with a new one.
    2. When installing the seat position sensor, be careful that the SRS wiring does not interfere with other parts and that it is not pinched between other parts.

    HINT:
    Be sure that the clearance between the seat position sensor and the seat rail is within 0.6 mm (0.024 in.) to 2.0 mm (0.079 in.).

  1. C166974
    Using a "TORX" socket wrench (T30), tighten the "TORX" screw to install the seat position sensor.

    Torque:
    8.0 N*m{ 82 kgf*cm , 71 in.*lbf }

  1. Make sure that the clearance between the seat position sensor and the seat rail is within 0.6 mm (0.024 in.) to 2.0 mm (0.079 in.).

  1. Check that there are no loose parts after installing the seat position sensor.

  1. Connect the connector.


2. INSTALL FRONT SEAT ASSEMBLY (for Manual Seat)
  1. Place the front seat assembly in the cabin.

    NOTICE:
    Be careful not to damage the vehicle body.

  1. Connect the connectors under the seat.

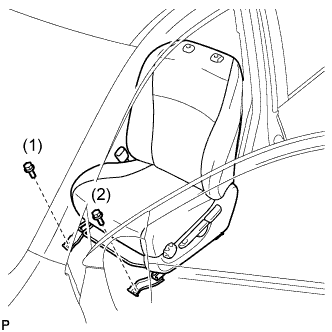
  1. Temporarily install the front seat assembly with the 4 bolts.

  1. Lift up the seat track adjusting handle and move the seat to the rearmost position.

  1. B174588E01
    Tighten the 2 bolts on the front side of the seat.

    Torque:
    37 N*m{ 377 kgf*cm , 27 ft.*lbf }

    HINT:
    Tighten the bolts in the order indicated in the illustration.

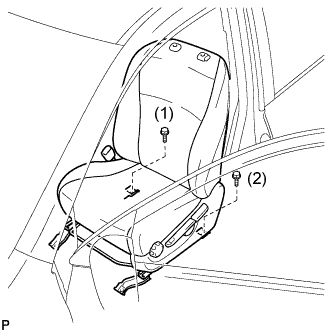
  1. Lift up the seat track adjusting handle and move the seat to the foremost position.

  1. B174587E01
    Tighten the 2 bolts on the rear side of the seat.

    Torque:
    37 N*m{ 377 kgf*cm , 27 ft.*lbf }

    HINT:
    Tighten the bolts in the order indicated in the illustration.


3. INSPECT FRONT SEAT SLIDE ADJUSTER LOCK (for Manual Seat)
  1. During sliding operation of the front seat, check that the left and right adjusters move together smoothly and lock simultaneously.
    If the seat adjusters do not lock simultaneously, loosen the bolts securing the seat to adjust the adjuster position.

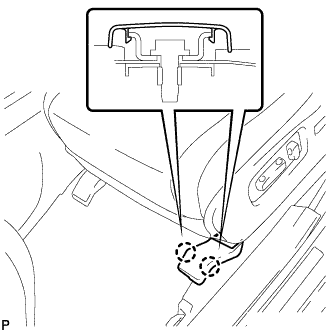
4. INSTALL REAR SEAT TRACK COVER (for Manual Seat)

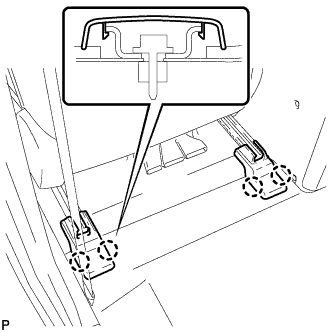
  1. B180417
    Engage the 4 claws and install the 2 rear seat track covers.


5. INSTALL FRONT INNER SEAT TRACK COVER (for Manual Seat)
  1. Lift up the seat track adjusting handle and move the seat to the rearmost position.

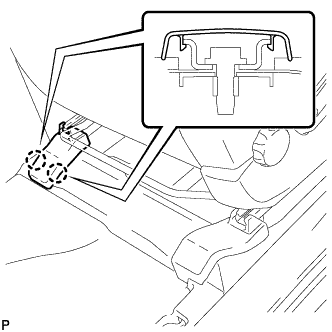
  1. B174584
    Engage the 2 claws and install the front inner seat track cover.


6. INSTALL FRONT OUTER SEAT TRACK COVER (for Manual Seat)

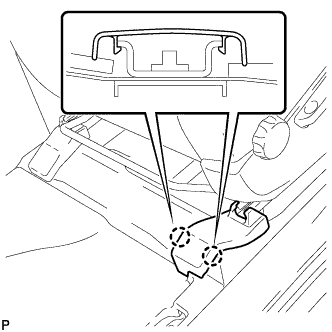
  1. B174583
    Engage the 2 claws and install the front outer seat track cover.


7. INSTALL FRONT SEAT HEADREST ASSEMBLY (for Manual Seat)

8. CONNECT CABLE TO NEGATIVE BATTERY TERMINAL (for Manual Seat)

NOTICE:
When disconnecting the cable, some systems need to be initialized after the cable is reconnected (Click here).


9. INSTALL FRONT SEAT ASSEMBLY (for Power Seat)
  1. Place the front seat assembly in the cabin.

    NOTICE:
    Be careful not to damage the vehicle body.

  1. Connect the connectors under the seat.

  1. Connect the cable to the negative (-) battery terminal.

    NOTICE:
    When reconnected the cable, some systems need to be initialized (Click here).

  1. Temporarily install the front seat assembly with the 4 bolts.

  1. Operate the power seat switch knob and move the seat to the rearmost position.

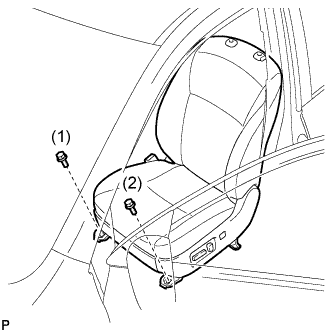
  1. B174582E01
    Tighten the 2 bolts on the front side of the seat.

    Torque:
    37 N*m{ 377 kgf*cm , 27 ft.*lbf }

    HINT:
    Tighten the bolts in the order indicated in the illustration.

  1. Operate the power seat switch knob and move the seat to the foremost position.

  1. B174581E01
    Tighten the 2 bolts on the rear side of the seat.

    Torque:
    37 N*m{ 377 kgf*cm , 27 ft.*lbf }

    HINT:
    Tighten the bolts in the order indicated in the illustration.


10. INSTALL REAR INNER SEAT TRACK COVER (for Power Seat)

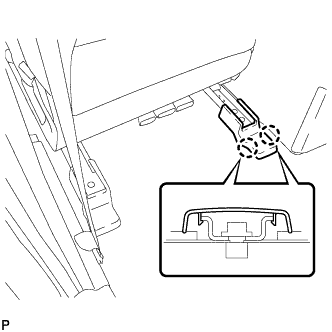
  1. B172844
    Engage the 2 claws and install the rear inner seat track cover.


11. INSTALL REAR OUTER SEAT TRACK COVER (for Power Seat)

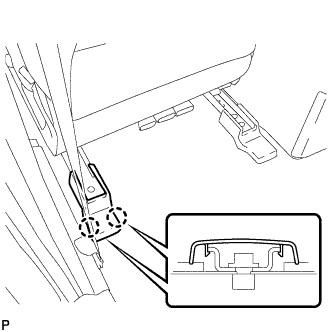
  1. B172843
    Engage the 2 claws and install the rear outer seat track cover.


12. INSTALL FRONT INNER SEAT TRACK COVER (for Power Seat)
  1. Operate the power seat switch knob and move the seat to the rearmost position.

  1. B172842
    Engage the 2 claws and install the front inner seat track cover.


13. INSTALL FRONT OUTER SEAT TRACK COVER (for Power Seat)

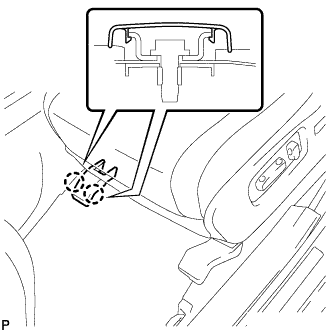
  1. B172841
    Engage the 2 claws and install the front outer seat track cover.


14. INSTALL FRONT SEAT HEADREST ASSEMBLY (for Power Seat)

15. INSPECT FRONT SEAT ASSEMBLY (for Power Seat)
  1. Inspect the power seat operation.

  1. w/ Seat Heater System:
    Check the seat heater operation.

    1. Turn the ignition switch on (IG).

    2. Turn the seat heater switch on.

    3. Wait 5 minutes or more and confirm that the seat surface becomes warm.


16. INSPECT SRS WARNING LIGHT
  1. Inspect the SRS warning light (Click here).

← INSTALLATION (Aug 2008 – Jun 2010)COMPONENTS (from May 2007) →