TEST MODE PROCEDURE
Troubleshooting · Vehicles built May 2007 – Jul 2008
Versions by build date: May 2007 – Jul 2008 Aug 2008 – Jun 2010 from Jul 2010
| WARNING LIGHT AND INDICATOR LIGHT INITIAL CHECK |
Release the parking brake.
- NOTICE:
- Before releasing the parking brake, move the shift lever to the P position for safety.
- HINT:
- When the parking brake is applied or the level of the brake fluid is low, the brake warning light comes on.
When the ignition switch is turned on (IG), check that the ABS warning, brake warning, VSC OFF indicator, slip indicator and downhill assist control indicator (for 4WD) lights come on for approximately 3 seconds.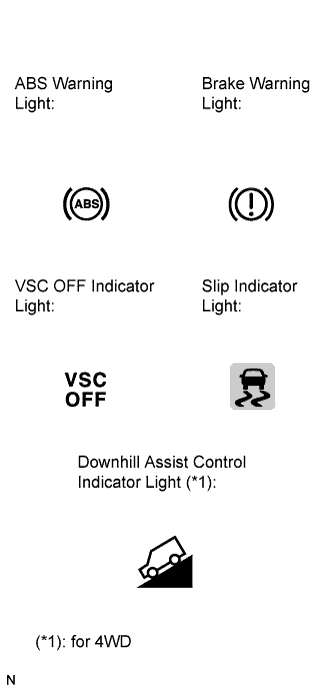

- HINT:
- If the skid control ECU stores any DTCs, the ABS warning, brake warning, slip indicator and downhill assist control indicator (for 4WD) lights will come on and the VSC OFF indicator light will blink.
- For vehicles with the multi-information display, the master caution indicator light will come on and a warning message will be displayed on the multi-information display if any of the EBD system, BA system, or TRC system is malfunctioning or if the ABS control or VSC cannot be performed.
- If any of the indicators remains on or does not come on, proceed to troubleshooting for the light circuits listed below.
- If the skid control ECU stores any DTCs, the ABS warning, brake warning, slip indicator and downhill assist control indicator (for 4WD) lights will come on and the VSC OFF indicator light will blink.
Trouble Area
See procedure
ABS warning light circuit (Remains on)
Click here
ABS warning light circuit (Does not come on)
Click here
Brake warning light circuit (Remains on)
Click here
Brake warning light circuit (Does not come on)
Click here
VSC OFF indicator light circuit (Remains on)
Click here
VSC OFF indicator light circuit (Does not come on)
Click here
Slip indicator light circuit (Remains on)
Click here
Slip indicator light circuit (Does not come on)
Click here
Downhill assist control indicator light circuit (Remains on)
Click here
Downhill assist control indicator light circuit (Does not come on)
Click here
| SENSOR CHECK USING TEST MODE (SIGNAL CHECK) (When Using Intelligent Tester) |
- NOTICE:
- After replacement of the brake actuator assembly and/or yaw rate and acceleration sensor, perform zero point calibration of the yaw rate and acceleration sensor.
- HINT:
- If the ignition switch is turned from on (IG) to on (ACC) or off during Test Mode (signal check), DTCs recorded during the sensor check will be erased.
- During Test Mode (signal check), the skid control ECU records all DTCs detected in the sensor check. By performing Test Mode (signal check), the codes are erased if a normal condition is confirmed. The remaining codes are the codes where an abnormality was found.
- If the ignition switch is turned from on (IG) to on (ACC) or off during Test Mode (signal check), DTCs recorded during the sensor check will be erased.
Procedure to enter Test Mode
Turn the ignition switch off.
Check that the steering wheel is in the straight-ahead position.
Check that the shift lever is in the P position.
Connect the intelligent tester to the DLC3.
Turn the ignition switch on (IG).
Turn the intelligent tester on.
Switch the skid control ECU to Test Mode using the intelligent tester. Enter the following menus: Chassis / ABS/VSC/TRC / Signal Check.
Check that the ABS warning and VSC OFF indicator lights come on for several seconds and then blink in Test Mode.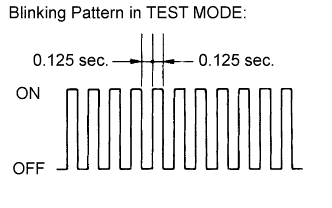
- HINT:
- If the ABS warning and VSC OFF indicator lights do not blink, inspect the TS and CG terminal circuit and ABS warning and VSC OFF indicator light circuits.
Check the ABS sensors.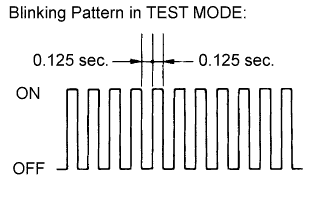
- HINT:
- Check that the ABS warning light is blinking in the Test Mode blinking pattern before performing the ABS sensor check.
Lost Booster Pressure Judgement Check and Master Cylinder Pressure Sensor Zero Point Calibration
- NOTICE:
- Preform the check in the lost booster pressure state (negative pressure in the booster is depressurized).
Turn the ignition switch on (IG).
Check that the brake warning light comes on when depressing the brake pedal with a force greater than 59 N (6 kgf, 13.2 lbf) for 1 second or more. (The lost booster pressure state is judged as normal.)
Start the engine depressing the brake pedal with a force greater than 59 N (6 kgf, 13.2 lbf) for 1 second or more.
Check that the brake warning light goes off when quickly releasing the brake pedal. (The lost booster pressure state is judged as normal.)
Leave the vehicle for 1 second or more. (Master cylinder pressure sensor zero point calibration)
- NOTICE:
- If you slowly depress the brake pedal or depress it again, master cylinder pressure sensor zero point calibration is not performed normally.
- If the lost booster pressure judgement check results are not normal, then the master cylinder pressure sensor check will not be able to be performed.
- If recheck is performed after the engine has started, end Test Mode, transit to Test Mode again, and release vacuum in the booster by pumping the brake pedal prior to the recheck.
- If you slowly depress the brake pedal or depress it again, master cylinder pressure sensor zero point calibration is not performed normally.
Acceleration Sensor Check
Keep the vehicle stationary on a level surface for 1 second or more.
- HINT:
- The acceleration sensor check can be performed with the master cylinder pressure sensor check below.
Master Cylinder Pressure Sensor Check
Leave the vehicle in a stationary condition and release the brake pedal for 1 second or more, and quickly and continuously depress the brake pedal with a force greater than 98 N (10 kgf, 22 lbf) for 1 second.
Check that the ABS warning light stays on for 3 seconds.
- HINT:
- Confirm that the ABS warning light comes on.
- While the ABS warning light stays on, continue to depress the brake pedal with a force of 98 N (10 kgf, 22 lbf) or more.
- The ABS warning light comes on for 3 seconds every time brake pedal operation above is performed.
- If the master cylinder pressure sensor check is not completed, depressing the brake pedal causes further decreases in vacuum in the brake booster, making the sensor check difficult to complete.
- If the vacuum is insufficient, the master cylinder pressure sensor check may not be completed. In this case, run the engine at idle to obtain sufficient vacuum.
- If the brake pedal is strongly depressed when the vacuum is insufficient, the brake warning light may come on in accordance with the booster pressure control. In this case, run the engine at idle to obtain sufficient vacuum.
- Confirm that the ABS warning light comes on.
Speed Sensor Check
Drive the vehicle straight-ahead.
Accelerate the vehicle to a speed of 45 km/h (28 mph) or more for several seconds and check that the ABS warning light goes off.- HINT:
- The sensor check may not be completed if wheelspin occurs.
- The ABS warning light blinks when the sensor check has been completed and the brake pedal is depressed.
- The ABS warning light comes on immediately if a malfunction is detected during the speed sensor check.
- The sensor check may not be completed if wheelspin occurs.
Stop the vehicle.
- NOTICE:
- Before performing the speed sensor check, complete the acceleration sensor and master cylinder pressure sensor checks.
- The speed sensor check may not be completed if the speed sensor check is started while turning the steering wheel or spinning the wheels.
- After the ABS warning light goes off, if vehicle speed exceeds 80 km/h (50 mph), a sensor check code will be stored again. Decelerate or stop the vehicle before the speed reaches 80 km/h (50 mph).
- If the sensor check has not been completed, the ABS warning light will blink while driving and the ABS will not operate.
- Before performing the speed sensor check, complete the acceleration sensor and master cylinder pressure sensor checks.
- HINT:
- When the sensor check has been completed, the ABS warning light goes off while driving and blinks in the Test Mode pattern while the vehicle is stationary.
Check the VSC sensor.
- HINT:
- Check that the VSC OFF indicator light is blinking in the Test Mode blinking pattern before performing the VSC sensor check.
Yaw Rate Sensor Check
Keep the vehicle in a stationary condition on a level surface for 1 second or more.
Move the shift lever from the P position to the D position and drive the vehicle at a speed of approximately 5 km/h (3 mph), and turn the steering wheel either to the left or right 90° or more until the vehicle makes a 180° turn.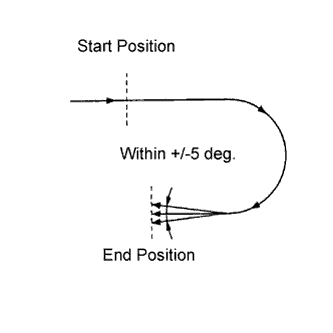
Stop the vehicle and move the shift lever to the P position. Check that the skid control buzzer sounds for 3 seconds.
- HINT:
- If the skid control buzzer sounds, the sensor check has completed normally.
- If the skid control buzzer does not sound, check the skid control buzzer circuit (Click here), then perform the sensor check again.
- If the skid control buzzer still does not sound, the yaw rate sensor may be malfunctioning. Check for DTCs.
- Make a 180° turn. At the end of the turn, the direction of the vehicle should be within 180° +/-5° of its start position.
- Do not allow the wheels to spin.
- Do not turn the ignition switch off while turning.
- Do not move the shift lever to the P position while turning, but changing the vehicle speed, stopping, or driving in reverse is acceptable.
- Complete the turn within 20 seconds.
- If the skid control buzzer sounds, the sensor check has completed normally.
Downhill Assist Control Switch Check (for 4WD)
Push the downhill assist control switch on.
Check that the downhill assist control indicator light blinks.Push the downhill assist control switch off.
Check that the downhill assist control indicator light goes off.
End of Sensor Check
If the sensor check is completed, the ABS warning light blinks (Test Mode) when the vehicle is stopped and goes off while the vehicle is driving.
- NOTICE:
- When the yaw rate sensor, downhill assist control switch (for 4WD), acceleration sensor, speed sensor, and master cylinder pressure sensor checks are completed, the sensor check is completed.
- If the sensor check is not completed, the ABS warning light will blink even while the vehicle is driving and the ABS will not operate.
- When the yaw rate sensor, downhill assist control switch (for 4WD), acceleration sensor, speed sensor, and master cylinder pressure sensor checks are completed, the sensor check is completed.
Read Sensor Check DTCs
Read the DTC(s) by following the tester screen.
- NOTICE:
- If only DTCs other than Test Mode sensor check DTCs are displayed, repair the malfunctions and clear the DTCs.
- If Test Mode sensor check DTCs and other DTCs are displayed or if only Test Mode sensor check DTCs are displayed, repair the malfunctions, clear the DTCs, and perform Test Mode inspection again.
- If only DTCs other than Test Mode sensor check DTCs are displayed, repair the malfunctions and clear the DTCs.
- HINT:
- See "Sensor Check DTCs".
Turn the ignition switch off and disconnect the intelligent tester.
Sensor Check DTCs
ABS sensor: DTC Code
Detection Item
Trouble Area
C1271
Low Output Signal of Front Speed Sensor RH
- Front speed sensor RH
- Sensor installation
- Speed sensor rotor
C1272
Low Output Signal of Front Speed Sensor LH
- Front speed sensor LH
- Sensor installation
- Speed sensor rotor
C1273
Low Output Signal of Rear Speed Sensor RH
- Rear speed sensor RH
- Sensor installation
- Speed sensor rotor
C1274
Low Output Signal of Rear Speed Sensor LH
- Rear speed sensor LH
- Sensor installation
- Speed sensor rotor
C1275
Abnormal Change in Output Signal of Front Speed Sensor RH
Speed sensor rotor
C1276
Abnormal Change in Output Signal of Front Speed Sensor LH
Speed sensor rotor
C1277
Abnormal Change in Output Signal of Rear Speed Sensor RH
Speed sensor rotor
C1278
Abnormal Change in Output Signal of Rear Speed Sensor LH
Speed sensor rotor
C1279
Acceleration Sensor Output Voltage Malfunction
- Sensor installation
- Yaw rate and acceleration sensor
C1281
Master Cylinder Pressure Sensor Output Malfunction
- Stop light switch
- Brake pedal load sensing switch
- Master cylinder pressure sensor
(*1): for 4WDVSC sensor: DTC Code
Detection Item
Trouble Area
C0371
Yaw Rate Sensor
Yaw rate and acceleration sensor
C1379 (*1)
Downhill Assist Control Switch Malfunction
Downhill assist control switch
- HINT:
- The codes in this table are output only in Test Mode (signal check).
- Front speed sensor RH
| SENSOR CHECK USING TEST MODE (SIGNAL CHECK) (When not Using Intelligent Tester) |
- NOTICE:
- After replacement of the brake actuator assembly and/or yaw rate and acceleration sensor, perform zero point calibration of the yaw rate and acceleration sensor.
- HINT:
- If the ignition switch is turned from on (IG) to on (ACC) or off during Test Mode (signal check), DTCs recorded during the sensor check will be erased.
- During Test Mode (signal check), the skid control ECU records all DTCs detected in the sensor check. By performing Test Mode (signal check), the codes are erased if a normal condition is confirmed. The remaining codes are the codes where an abnormality was found.
- If the ignition switch is turned from on (IG) to on (ACC) or off during Test Mode (signal check), DTCs recorded during the sensor check will be erased.
Procedure to enter Test Mode
Turn the ignition switch off.
Check that the steering wheel is in the straight-ahead position.
Check that the shift lever is in the P position.
Using SST, connect terminals TS and CG of the DLC3.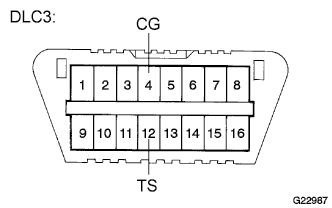
- SST
- 09843-18040
Turn the ignition switch on (IG).
Check that the ABS warning and VSC OFF indicator lights come on for several seconds and then blink in Test Mode.
- HINT:
- If the ABS warning and VSC OFF indicator lights do not blink, inspect the TS and CG terminal circuit and ABS warning and VSC OFF indicator light circuits.
Check the ABS sensors.
- HINT:
- Check that the ABS warning light is blinking in the Test Mode blinking pattern before performing the ABS sensor check.
Lost Booster Pressure Judgement Check and Master Cylinder Pressure Sensor Zero Point Calibration
- NOTICE:
- Preform the check in the lost booster pressure state (negative pressure in the booster is depressurized).
Turn the ignition switch on (IG).
Check that the brake warning light comes on when depressing the brake pedal with a force greater than 59 N (6 kgf, 13.2 lbf) for 1 second or more. (The lost booster pressure state is judged as normal.)
Start the engine depressing the brake pedal with a force greater than 59 N (6 kgf, 13.2 lbf) for 1 second or more.
Check that the brake warning light goes off when quickly releasing the brake pedal. (The lost booster pressure state is judged as normal.)
Leave the vehicle for 1 second or more. (Master cylinder pressure sensor zero point calibration)
- NOTICE:
- If you slowly depress the brake pedal or depress it again, master cylinder pressure sensor zero point calibration is not performed normally.
- If the lost booster pressure judgement check results are not normal, then the master cylinder pressure sensor check will not be able to be performed.
- If recheck is performed after the engine has started, end Test Mode, transit to Test Mode again, and release vacuum in the booster by pumping the brake pedal prior to the recheck.
- If you slowly depress the brake pedal or depress it again, master cylinder pressure sensor zero point calibration is not performed normally.
Acceleration Sensor Check
Keep the vehicle stationary on a level surface for 1 second or more.
- HINT:
- The acceleration sensor check can be performed with the master cylinder pressure sensor check below.
Master Cylinder Pressure Sensor Check
Leave the vehicle in a stationary condition and release the brake pedal for 1 second or more, and quickly and continuously depress the brake pedal with a force greater than 98 N (10 kgf, 22 lbf) for 1 second.
Check that the ABS warning light stays on for 3 seconds.
- HINT:
- Confirm that the ABS warning light comes on.
- While the ABS warning light stays on, continue to depress the brake pedal with a force of 98 N (10 kgf, 22 lbf) or more.
- The ABS warning light comes on for 3 seconds every time brake pedal operation above is performed.
- If the master cylinder pressure sensor check is not completed, depressing the brake pedal causes further decreases in vacuum in the brake booster, making the sensor check difficult to complete.
- If the vacuum is insufficient, the master cylinder pressure sensor check may not be completed. In this case, run the engine at idle to obtain sufficient vacuum.
- If the brake pedal is strongly depressed when the vacuum is insufficient, the brake warning light may come on in accordance with the booster pressure control. In this case, run the engine at idle to obtain sufficient vacuum.
- Confirm that the ABS warning light comes on.
Speed Sensor Check
Drive the vehicle straight-ahead.
Accelerate the vehicle to a speed of 45 km/h (28 mph) or more for several seconds and check that the ABS warning light goes off.- HINT:
- The sensor check may not be completed if wheelspin occurs.
- The ABS warning light blinks when the sensor check has been completed and the brake pedal is depressed.
- The ABS warning light comes on immediately if a malfunction is detected during the speed sensor check.
- The sensor check may not be completed if wheelspin occurs.
Stop the vehicle.
- NOTICE:
- Before performing the speed sensor check, complete the acceleration sensor and master cylinder pressure sensor checks.
- The speed sensor check may not be completed if the speed sensor check is started while turning the steering wheel or spinning the wheels.
- After the ABS warning light goes off, if vehicle speed exceeds 80 km/h (50 mph), a sensor check code will be stored again. Decelerate or stop the vehicle before the speed reaches 80 km/h (50 mph).
- If the sensor check has not been completed, the ABS warning light will blink while driving and the ABS will not operate.
- Before performing the speed sensor check, complete the acceleration sensor and master cylinder pressure sensor checks.
- HINT:
- When the sensor check has been completed, the ABS warning light goes off while driving and blinks in the Test Mode pattern while the vehicle is stationary.
Check the VSC sensor.
- HINT:
- Check that the VSC OFF indicator light is blinking in the Test Mode blinking pattern before performing the VSC sensor check.
Yaw Rate Sensor Check
Keep the vehicle in a stationary condition on a level surface for 1 second or more.
Move the shift lever from the P position to the D position and drive the vehicle at a speed of approximately 5 km/h (3 mph), and turn the steering wheel either to the left or right 90° or more until the vehicle makes a 180° turn.
Stop the vehicle and move the shift lever to the P position. Check that the skid control buzzer sounds for 3 seconds.
- HINT:
- If the skid control buzzer sounds, the sensor check has completed normally.
- If the skid control buzzer does not sound, check the skid control buzzer circuit (Click here), then perform the sensor check again.
- If the skid control buzzer still does not sound, the yaw rate sensor may be malfunctioning. Check for DTCs.
- Make a 180° turn. At the end of the turn, the direction of the vehicle should be within 180° +/-5° of its start position.
- Do not allow the wheels to spin.
- Do not turn the ignition switch off while turning.
- Do not move the shift lever to the P position while turning, but changing the vehicle speed, stopping, or driving in reverse is acceptable.
- Complete the turn within 20 seconds.
- If the skid control buzzer sounds, the sensor check has completed normally.
Downhill Assist Control Switch Check (for 4WD)
Push the downhill assist control switch on.
Check that the downhill assist control indicator light blinks.Push the downhill assist control switch off.
Check that the downhill assist control indicator light goes off.
End of Sensor Check
If the sensor check is completed, the ABS warning light blinks (Test Mode) when the vehicle is stopped and goes off while the vehicle is driving.
- NOTICE:
- When the yaw rate sensor, downhill assist control switch (for 4WD), acceleration sensor, speed sensor, and master cylinder pressure sensor checks are completed, the sensor check is completed.
- If the sensor check is not completed, the ABS warning light will blink even while the vehicle is driving and the ABS will not operate.
- When the yaw rate sensor, downhill assist control switch (for 4WD), acceleration sensor, speed sensor, and master cylinder pressure sensor checks are completed, the sensor check is completed.
Read Sensor Check DTCs
Using SST, connect terminals TC and CG of the DLC3.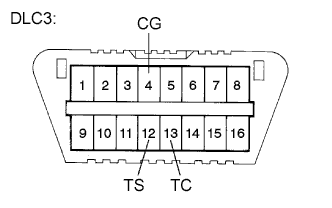
- SST
- 09843-18040
Count the number of blinks of the ABS warning and VSC OFF indicator lights.
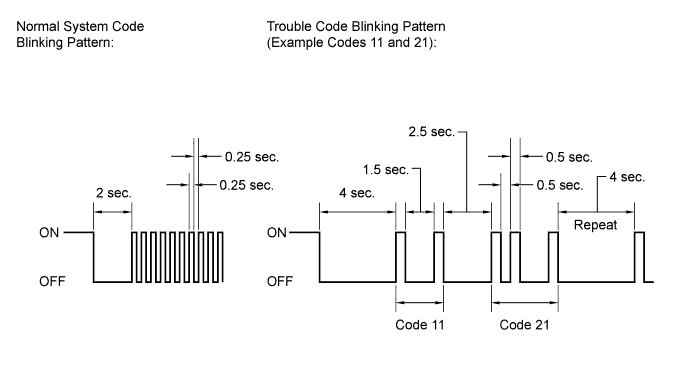
- NOTICE:
- If only DTCs other than Test Mode sensor check DTCs are displayed, repair the malfunctions and clear the DTCs.
- If Test Mode sensor check DTCs and other DTCs are displayed or if only Test Mode sensor check DTCs are displayed, repair the malfunctions, clear the DTCs, and perform Test Mode inspection again.
- If only DTCs other than Test Mode sensor check DTCs are displayed, repair the malfunctions and clear the DTCs.
- HINT:
- If more than 1 malfunction is detected at the same time, the lowest numbered code will be displayed first.
- See "Sensor Check DTCs".
- If more than 1 malfunction is detected at the same time, the lowest numbered code will be displayed first.
After performing the check, disconnect SST from terminals TS and CG, and TC and CG of the DLC3 and turn the ignition switch off.
Turn the ignition switch on (IG).
- HINT:
- If the ignition switch is not turned on (IG) after SST is removed from the DLC3, the previous Test Mode will continue.
- If the ignition switch is turned on (IG) with terminals TS and CG connected, the previous Test Mode will continue.
- If the ignition switch is not turned on (IG) after SST is removed from the DLC3, the previous Test Mode will continue.
Sensor Check DTCs
ABS sensor: DTC Code
Detection Item
Trouble Area
71
Low Output Signal of Front Speed Sensor RH
- Front speed sensor RH
- Sensor installation
- Speed sensor rotor
72
Low Output Signal of Front Speed Sensor LH
- Front speed sensor LH
- Sensor installation
- Speed sensor rotor
73
Low Output Signal of Rear Speed Sensor RH
- Rear speed sensor RH
- Sensor installation
- Speed sensor rotor
74
Low Output Signal of Rear Speed Sensor LH
- Rear speed sensor LH
- Sensor installation
- Speed sensor rotor
75
Abnormal Change in Output Signal of Front Speed Sensor RH
Speed sensor rotor
76
Abnormal Change in Output Signal of Front Speed Sensor LH
Speed sensor rotor
77
Abnormal Change in Output Signal of Rear Speed Sensor RH
Speed sensor rotor
78
Abnormal Change in Output Signal of Rear Speed Sensor LH
Speed sensor rotor
79
Acceleration Sensor Output Voltage Malfunction
- Sensor installation
- Yaw rate and acceleration sensor
81
Master Cylinder Pressure Sensor Output Malfunction
- Stop light switch
- Brake pedal load sensing switch
- Master cylinder pressure sensor
(*1): for 4WDVSC sensor: DTC Code
Detection Item
Trouble Area
71
Yaw Rate Sensor
Yaw rate and acceleration sensor
74 (*1)
Downhill Assist Control Switch Malfunction
Downhill assist control switch
- HINT:
- The codes in this table are output only in Test Mode (signal check).
- Front speed sensor RH
| VSC OFF SWITCH CHECK |
Push the VSC OFF switch on.
Check that the slip indicator light goes off.