INSTALLATION
Removal / installation · Vehicles built from Jul 2010
Versions by build date: May 2007 – Jul 2008 Aug 2008 – Jun 2010 from Jul 2010
| 1.
INSTALL FRONT SHOULDER BELT ANCHOR ADJUSTER ASSEMBLY |
 |
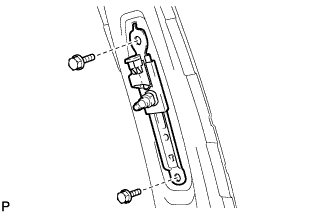
- Engage the adjuster positioning hole with the claw and install the front shoulder belt anchor adjuster assembly with the 2 bolts.
-
Torque:
- 42 N*m{
428 kgf*cm
, 31 ft.*lbf
}
| 2.
INSTALL FRONT SEAT OUTER BELT ASSEMBLY |
|
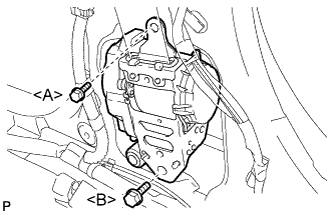
- Temporarily install the front seat outer belt assembly with the 2 bolts.
Fully tighten the bolt <A> first, then the bolt <B> to install the front seat outer belt assembly.
-
Torque:
- Bolt <A>:
- 7.5 N*m{
77 kgf*cm
, 66 in.*lbf
}
- Bolt <B>:
- 42 N*m{
428 kgf*cm
, 31 ft.*lbf
}
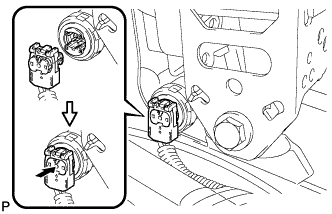
- Connect the connector and lock the locking button as shown in the illustration.
- NOTICE:
- Securely lock the locking button.
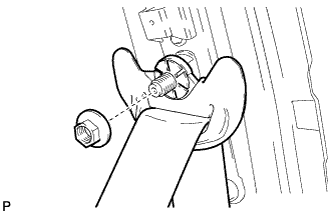
- Connect the shoulder anchor of the front seat outer belt assembly with the nut.
-
Torque:
- 42 N*m{
428 kgf*cm
, 31 ft.*lbf
}
| 3.
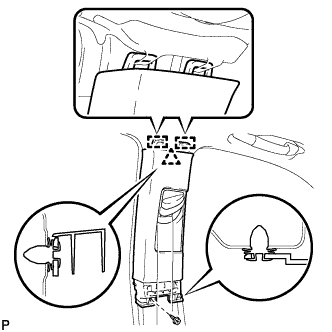
INSTALL CENTER PILLAR GARNISH
|
|
- Engage the 2 guides and clip.
Install the center pillar garnish LH with the clip and screw.
| 4.
CONNECT FRONT SEAT OUTER BELT ASSEMBLY |
|
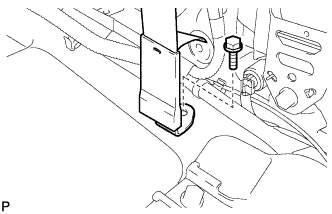
- Install the floor end of the front seat outer belt assembly with the bolt.
-
Torque:
- 42 N*m{
428 kgf*cm
, 31 ft.*lbf
}
Check if the ELR locks.
- NOTICE:
- The check should be performed with the outer belt assembly installed.
With the belt assembly installed, check that the belt locks when it is pulled out quickly.
| 5.
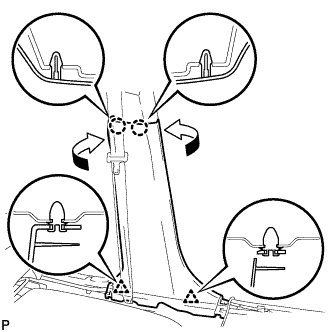
INSTALL LOWER CENTER PILLAR GARNISH
|
|
- Engage the 2 claws and 2 clips, and install the lower center pillar garnish LH.
| 6.
INSTALL REAR DOOR OPENING TRIM WEATHERSTRIP |
|
| 7.
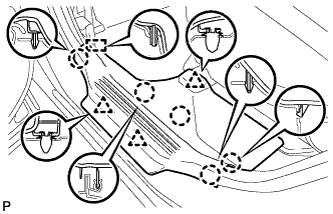
INSTALL REAR DOOR SCUFF PLATE
|
|
- Engage the guide, 3 clips and 5 claws, and install the rear door scuff plate LH.
| 8.
INSTALL FRONT DOOR OPENING TRIM WEATHERSTRIP |
|
| 9.
INSTALL FRONT DOOR SCUFF PLATE
|
|
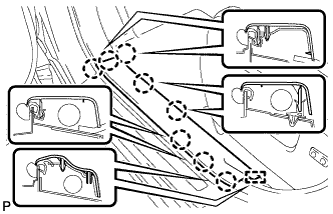
- Engage the guide and 8 claws, and install the front door scuff plate LH.
| 10.
CONNECT CABLE TO NEGATIVE BATTERY TERMINAL |
|
- NOTICE:
- When disconnecting the cable, some systems need to be initialized after the cable is reconnected (Click here).
| 11.
INSPECT SRS WARNING LIGHT |
|
(Click here)