Television Camera ECU Power Source Circuit
Circuit diagnosis · Vehicles built Aug 2008 – Jun 2010
Versions by build date: May 2007 – Jul 2008 Aug 2008 – Jun 2010
DESCRIPTION
This circuit is the power source circuit to operate the television camera ECU.WIRING DIAGRAM
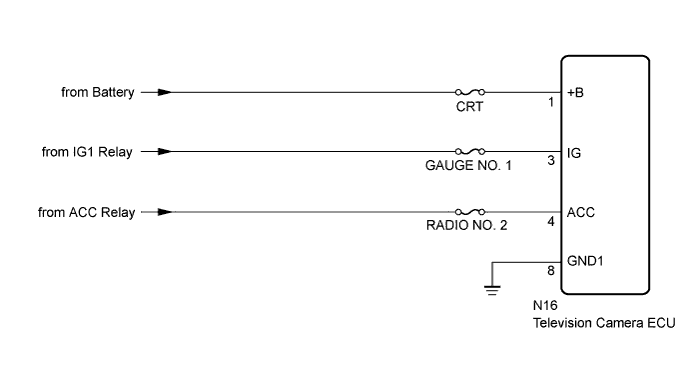

INSPECTION PROCEDURE
| 1. INSPECT FUSE (CRT, GAUGE NO. 1, RADIO NO. 2) |

Disconnect the CRT fuse from the engine room relay block and junction block.
Measure the resistance according to the value(s) in the table below.
- Standard resistance:
Tester Connection
Condition
Specified Condition
CRT fuse
Always
Below 1 Ω
Remove the RADIO NO. 2 fuse from the driver side junction block assembly.
Measure the resistance according to the value(s) in the table below.
- Standard resistance:
Tester Connection
Condition
Specified Condition
RADIO NO. 2 fuse
Always
Below 1 Ω
Remove the GAUGE NO. 1 fuse from the driver side junction block assembly.
Measure the resistance according to the value(s) in the table below.
- Standard resistance:
Tester Connection
Condition
Specified Condition
GAUGE NO. 1 fuse
Always
Below 1 Ω
|
|
||||

| OK | |
 |
| 2. CHECK HARNESS AND CONNECTOR (TELEVISION CAMERA ECU - BATTERY AND BODY GROUND) |
Disconnect television camera ECU connector N16.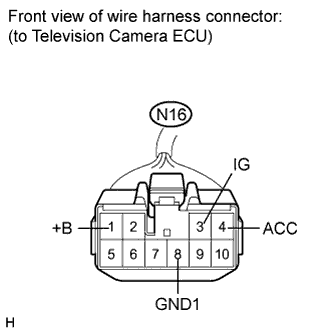
Measure the resistance according to the value(s) in the table below.
- Standard resistance:
Tester Connection
Condition
Specified Condition
N16-8 (GND1) - Body ground
Always
Below 1 Ω
Measure the voltage according to the value(s) in the table below.
- Standard voltage:
Tester Connection
Condition
Specified Condition
N16-1 (+B) - Body ground
Always
11 to 14 V
N16-3 (IG) - Body ground
Ignition switch on (IG)
11 to 14 V
N16-4 (ACC) - Body ground
Ignition switch on (ACC)
11 to 14 V
|
|
||||
| OK | ||
 |
||
| ||