Door Mirror Foot Light Circuit
Circuit diagnosis · Vehicles built from Jul 2010
Versions by build date: May 2007 – Jul 2008 Aug 2008 – Jun 2010 from Jul 2010
DESCRIPTION
The illuminated entry system controls the door mirror foot lights.WIRING DIAGRAM
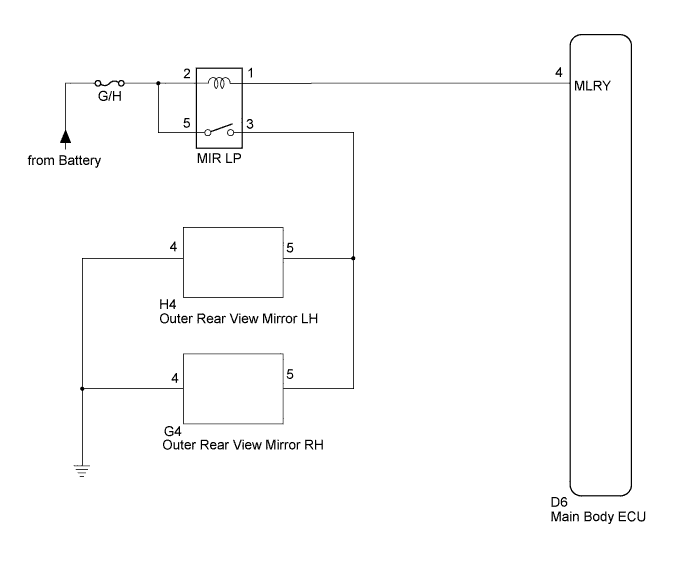

INSPECTION PROCEDURE
| 1. PERFORM ACTIVE TEST USING INTELLIGENT TESTER |
 |
Connect the intelligent tester to the DLC3.
Turn the ignition switch on (IG).
Turn the intelligent tester on.
Select the following menu items: Body Electrical / Main Body / Active Test.
Check the operation.
Main Body
Item
|
Test Details
|
Diagnostic Note
|
Side Mirror Foot Light
|
Door mirror foot lights ON / OFF
|
-
|
- OK:
- Door mirror foot lights come on.
|
NG |
 |
|
|
|
| OK |
|
 |
|
| PROCEED TO NEXT CIRCUIT INSPECTION SHOWN IN PROBLEM SYMPTOMS TABLE (Click here)
|
|
| 2. INSPECT MAIN BODY ECU (INSTRUMENT PANEL JUNCTION BLOCK) |
|
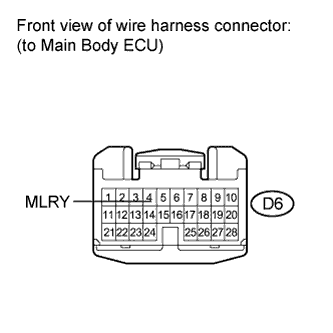
- Disconnect the D6 main body ECU connector.
Using a service wire, connect D6-4 of the wire harness side and body ground.
- OK:
- Door mirror foot lights come on.
|
NG |
|
|
|
|
| OK |
|
|
|
| REPLACE MAIN BODY ECU (INSTRUMENT PANEL JUNCTION BLOCK) |
|
| 3. INSPECT FUSE (G/H) |
|
Remove the G/H fuse from the engine room relay block.
Measure the resistance according to the value(s) in the table below.
- Standard resistance:
Tester Connection
|
Condition
|
Specified Condition
|
G/H fuse
|
Always
|
Below 1 Ω
|
|
NG |
 |
|
|
|
| OK |
|
 |
|
| 4. INSPECT DOOR MIRROR FOOT LIGHT RELAY (MIR LP) |
|
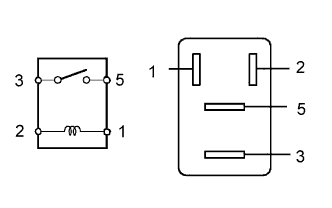
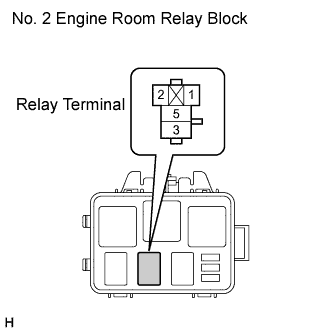
- Remove the door mirror foot light relay from the No. 2 engine room relay block.
Measure the resistance according to the value(s) in the table below.
- Standard resistance:
Tester Connection
|
Condition
|
Specified Condition
|
3 - 5
|
Voltage is not applied between terminals 1 and 2
|
10 kΩ or higher
|
3 - 5
|
Apply the battery voltage between terminals 1 and 2
|
Below 1 Ω
|
|
NG |
|
|
| REPLACE DOOR MIRROR FOOT LIGHT RELAY |
|
|
| OK |
|
|
|
| 5. CHECK HARNESS AND CONNECTOR (BATTERY - DOOR MIRROR FOOT LIGHT RELAY) |
|
- Measure the voltage according to the value(s) in the table below.
- Standard voltage:
Tester Connection
|
Condition
|
Specified Condition
|
Door mirror foot light relay terminal 5 - Body ground
|
Always
|
11 to 14 V
|
Door mirror foot light relay terminal 2 - Body ground
|
Always
|
11 to 14 V
|
|
NG |
|
|
| REPAIR OR REPLACE HARNESS OR CONNECTOR |
|
|
| OK |
|
|
|
| 6. CHECK HARNESS AND CONNECTOR (DOOR MIRROR FOOT LIGHT RELAY - MAIN BODY ECU) |
|
Disconnect the D6 main body ECU connector.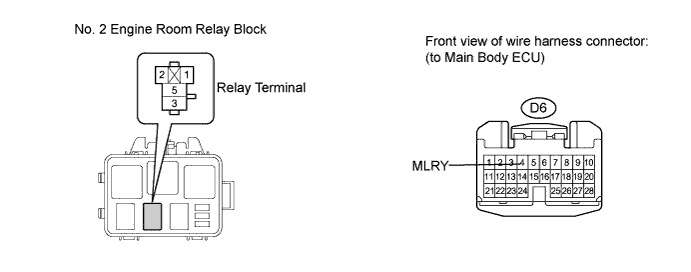
Measure the resistance according to the value(s) in the table below.
- Standard resistance:
Tester Connection
|
Condition
|
Specified Condition
|
Door mirror foot light relay terminal 1 - D6-4 (MLRY)
|
Always
|
Below 1 Ω
|
D6-4 (MLRY) - Body ground
|
Always
|
10 kΩ or higher
|
|
NG |
|
|
| REPAIR OR REPLACE HARNESS OR CONNECTOR (DOOR MIRROR FOOT LIGHT RELAY - MAIN BODY ECU) |
|
|
| OK |
|
|
|
| REPAIR OR REPLACE HARNESS OR CONNECTOR (DOOR MIRROR FOOT LIGHT RELAY - BODY GROUND) |
|