INSPECTION
Inspection · Vehicles built from May 2007
| INSPECT POWER WINDOW REGULATOR MASTER SWITCH ASSEMBLY |

Check that the switch function.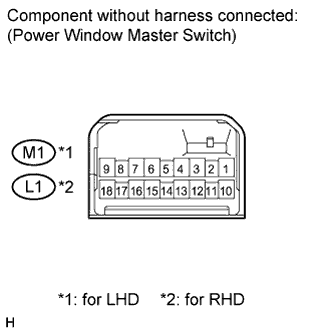

Measure the resistance according to the value(s) in the table below.
- Standard resistance:
- for LHD:
Tester Connection
Condition
Specified Condition
8 (U) - 1 (E) - 4 (A)
Auto UP (Driver side)
Below 1 Ω
8 (U) - 1 (E)
Manual UP (Driver side)
Below 1 Ω
5 (D) - 1 (E)
Manual DOWN (Driver side)
Below 1 Ω
4 (A) - 5 (D) - 1 (E)
Auto DOWN (Driver side)
Below 1 Ω
6 (B) - 16 (U)
15 (D) - 1 (E)
UP (Passenger side)
Below 1 Ω
6 (B) - 15 (D)
16 (U) - 1 (E)
DOWN (Passenger side)
Below 1 Ω
6 (B) - 12 (U)
13 (D) - 1 (E)
UP (Rear LH)
Below 1 Ω
6 (B) - 13 (D)
12 (U) - 1 (E)
DOWN (Rear LH)
Below 1 Ω
6 (B) - 10 (U)
18 (D) - 1 (E)
UP (Rear RH)
Below 1 Ω
6 (B) - 18 (D)
10 (U) - 1 (E)
DOWN (Rear RH)
Below 1 Ω
- for RHD:
Tester Connection
Condition
Specified Condition
1 (U) - 9 (E) - 4 (A)
Auto UP (Driver side)
Below 1 Ω
1 (U) - 9 (E)
Manual UP (Driver side)
Below 1 Ω
5 (D) - 9 (E)
Manual DOWN (Driver side)
Below 1 Ω
4 (A) - 5 (D) - 9 (E)
Auto DOWN (Driver side)
Below 1 Ω
6 (B) - 12 (U)
13 (D) - 9 (E)
UP (Passenger side)
Below 1 Ω
6 (B) - 13 (D)
12 (U) - 9 (E)
DOWN (Passenger side)
Below 1 Ω
6 (B) - 18 (U)
10 (D) - 9 (E)
UP (Rear LH)
Below 1 Ω
6 (B) - 10 (D)
18 (U) - 9 (E)
DOWN (Rear LH)
Below 1 Ω
6 (B) - 16 (U)
15 (D) - 9 (E)
UP (Rear RH)
Below 1 Ω
6 (B) - 15 (D)
16 (U) - 9 (E)
DOWN (Rear RH)
Below 1 Ω
Check that the LED illuminates.
Apply battery voltage to the master switch and check that the LED illuminates.
- OK:
- for LHD:
Measurement Condition
Specified Condition
Battery positive (+) → Terminal 3 (LED)
Battery negative (-) → Terminal 1 (E)
LED illuminates
- for RHD:
Measurement Condition
Specified Condition
Battery positive (+) → Terminal 3 (LED)
Battery negative (-) → Terminal 9 (E)
LED illuminates