REMOVAL
Removal / installation · Vehicles built from Jul 2010
Versions by build date: May 2007 – Jul 2008 Aug 2008 – Jun 2010 from Jul 2010
| 1.
DISCONNECT NEGATIVE BATTERY TERMINAL |
 |
- CAUTION:
- Wait for 90 seconds after disconnecting the terminal to prevent airbag deployment (Click here).
- NOTICE:
- When disconnecting the cable, some systems need to be initialized after the cable is reconnected (Click here).
| 2.
REMOVE REAR DOOR INSIDE HANDLE BEZEL PLUG
|
|
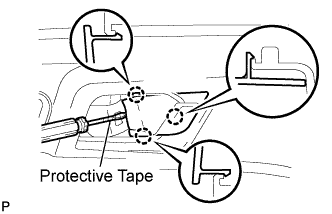
- Using a screwdriver with the tip wrapped with protective tape, disengage the 3 claws and remove the rear door inside handle bezel plug.
| 3.
REMOVE REAR DOOR ARMREST UPPER BASE PANEL
|
|
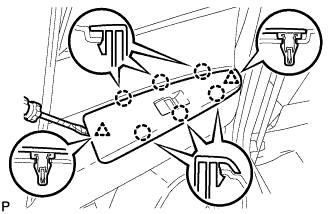
- Using a screwdriver with the tip wrapped with protective tape, disengage the 6 claws and 2 clips, and remove the rear door armrest upper base panel.
Disconnect the connector.
| 4.
REMOVE DOOR ASSIST GRIP COVER
|
|
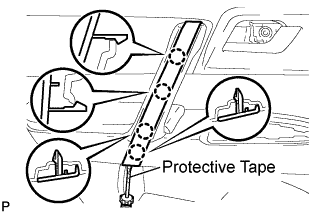
- Using a screwdriver with the tip wrapped with protective tape, disengage the 4 claws and remove the door assist grip cover.
| 5.
REMOVE REAR DOOR TRIM BOARD SUB-ASSEMBLY
|
|
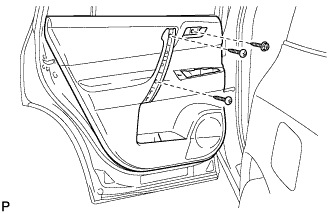
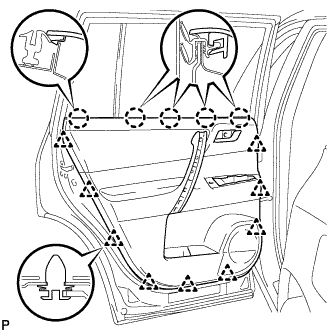
- Remove the 3 screws.
- Using a clip remover, disengage the 9 clips.
Disengage the 5 claws and separate the rear door trim board sub-assembly from the rear door inner glass weatherstrip.
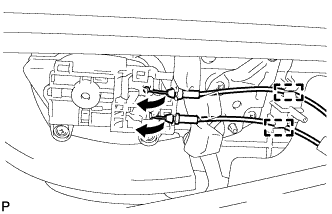
- Disengage the 2 clamps.
Disconnect the front door lock remote control cable and rear door inside locking cable.
| 6.
REMOVE REAR DOOR INNER GLASS WEATHERSTRIP
|
|
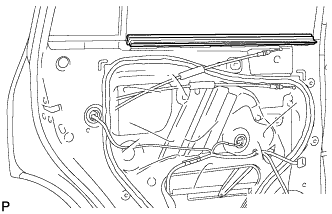
- Remove the rear door inner glass weatherstrip from the rear door panel.
| 7.
REMOVE REAR DOOR SERVICE HOLE COVER
|
|
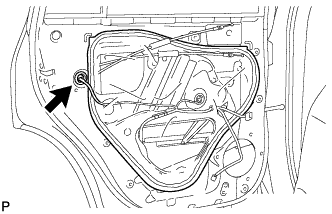
- Disconnect the connector.
Remove the rear door service hole cover.
- HINT:
- Remove the remaining tape on the door.
| 8.
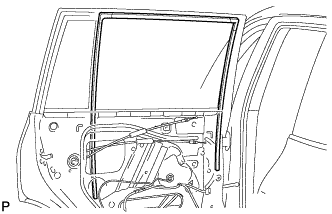
REMOVE REAR DOOR GLASS RUN
|
|
- Remove the rear door glass run.
| 9.
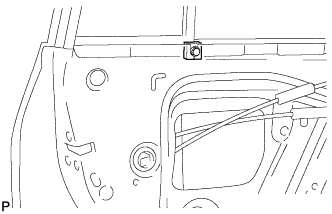
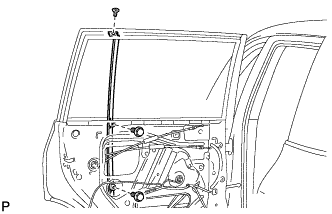
REMOVE REAR DOOR WINDOW DIVISION BAR SUB-ASSEMBLY
|
|
- Remove the rear door vent seal.
- Remove the 2 bolts, screw, and the rear door window division bar sub-assembly.
| 10.
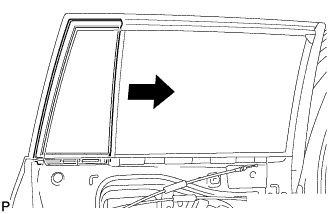
REMOVE REAR DOOR QUARTER WINDOW GLASS
|
|
- Remove the rear door quarter window glass and the rear door quarter window weatherstrip as a unit as shown in the illustration.
Remove the rear door quarter window glass from the rear door quarter window weatherstrip.
| 11.
REMOVE REAR DOOR GLASS SUB-ASSEMBLY
|
|
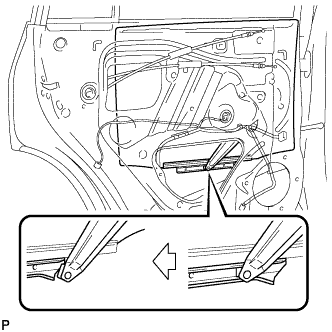
- Remove the rear door glass sub-assembly from the rear door window regulator sub-assembly as shown in the illustration.
- NOTICE:
- Do not damage the door glass.
| 12.
REMOVE REAR DOOR WINDOW REGULATOR SUB-ASSEMBLY
|
|
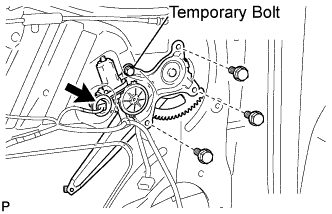
- Disconnect the connector.
Loosen the temporary bolt.
- NOTICE:
- Do not remove the temporary bolt. If the temporary bolt is removed, the rear door window regulator may fall and cause damage.
Remove the 3 bolts.
Remove the rear door window regulator sub-assembly and the rear power window regulator motor assembly as a unit.
Remove the temporary bolt from the rear door window regulator sub-assembly.
| 13.
REMOVE REAR DOOR BELT MOULDING ASSEMBLY
|
|
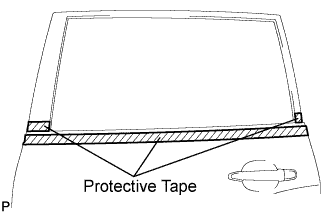
- Put protective tape around the rear door belt moulding assembly.
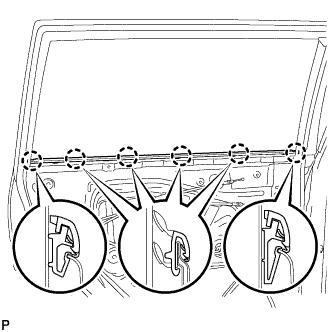
- Disengage the 6 claws and remove the rear door belt moulding assembly.
- NOTICE:
- Be careful when removing the moulding as there are claws attached to the front end of the moulding.
| 14.
REMOVE REAR DOOR FRAME GARNISH
|
|
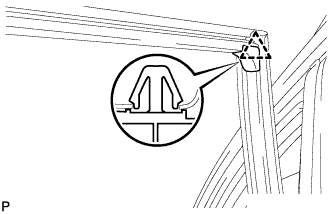
- Disengage the clip and remove the rear door frame garnish.
- HINT:
- This clip needs to be replaced with a new one because the clip will break when removing the rear door frame garnish.
| 15.
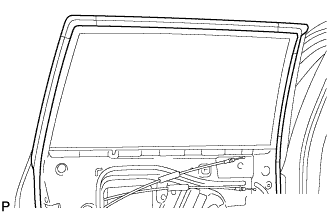
REMOVE REAR DOOR WEATHERSTRIP |
|
- Remove the upper part of the rear door weatherstrip to the extent that allows removal of the black out tape.
| 16.
REMOVE NO. 3 BLACK OUT TAPE |
|
Using a heat light, heat the No. 3 black out tape and vehicle body.
- Heating temperature:
Item
|
Temperature
|
Vehicle Body
|
40 to 60°C (104 to 140°F)
|
- NOTICE:
- Do not heat the vehicle body excessively.
Pull back an end of the No. 3 black out tape and pull it parallel to the vehicle body to pull it off.
| 17.
REMOVE NO. 2 BLACK OUT TAPE |
|
Using a heat light, heat the No. 2 black out tape and vehicle body.
- Heating temperature:
Item
|
Temperature
|
Vehicle Body
|
40 to 60°C (104 to 140°F)
|
- NOTICE:
- Do not heat the vehicle body excessively.
Pull back an end of the No. 2 black out tape and pull it parallel to the vehicle body to pull it off.
| 18.
REMOVE INNER UPPER BLACK OUT REAR DOOR TAPE |
|
Using a heat light, heat the inner upper black out rear door tape and vehicle body.
- Heating temperature:
Item
|
Temperature
|
Vehicle Body
|
40 to 60°C (104 to 140°F)
|
- NOTICE:
- Do not heat the vehicle body excessively.
Pull back an end of the inner upper black out rear door tape and pull it parallel to the vehicle body to pull it off.
| 19.
REMOVE INNER FRONT BLACK OUT REAR DOOR TAPE |
|
Using a heat light, heat the inner front black out rear door tape and vehicle body.
- Heating temperature:
Item
|
Temperature
|
Vehicle Body
|
40 to 60°C (104 to 140°F)
|
- NOTICE:
- Do not heat the vehicle body excessively.
Pull back an end of the inner front black out rear door tape and pull it parallel to the vehicle body to pull it off.
| 20.
REMOVE INNER REAR BLACK OUT REAR DOOR TAPE |
|
Using a heat light, heat the inner rear black out rear door tape and vehicle body.
- Heating temperature:
Item
|
Temperature
|
Vehicle Body
|
40 to 60°C (104 to 140°F)
|
- NOTICE:
- Do not heat the vehicle body excessively.
Pull back an end of the inner rear black out rear door tape and pull it parallel to the vehicle body to pull it off.