 |
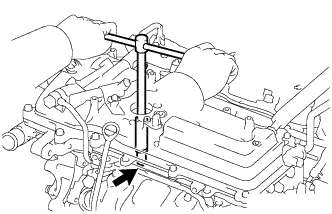
Remove the 6 spark plugs.
ENGINE UNIT > DISASSEMBLY |
| 1. REMOVE OIL FILLER CAP SUB-ASSEMBLY |
Remove the oil filler cap sub-assembly and oil filler gasket.
| 2. REMOVE SPARK PLUG |
|
Remove the 6 spark plugs.
| 3. REMOVE OIL PAN DRAIN PLUG |
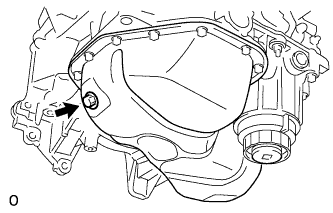 |
Remove the oil pan drain plug and oil pan drain plug gasket.
| 4. REMOVE VENTILATION VALVE SUB-ASSEMBLY |
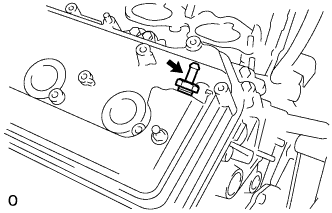 |
Remove the ventilation valve sub-assembly.
| 5. REMOVE CAMSHAFT POSITION SENSOR |
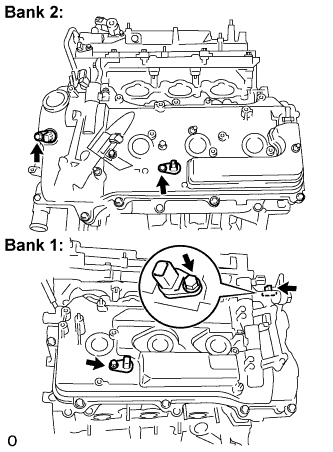 |
Remove the 4 bolts and 4 camshaft position sensors.
| 6. REMOVE CAMSHAFT TIMING OIL CONTROL VALVE ASSEMBLY |
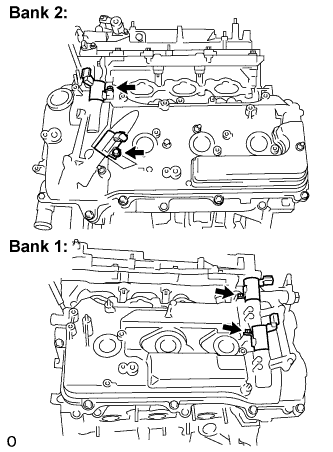 |
Remove the 4 bolts and 4 camshaft timing oil control valves.
| 7. REMOVE CRANKSHAFT POSITION SENSOR |
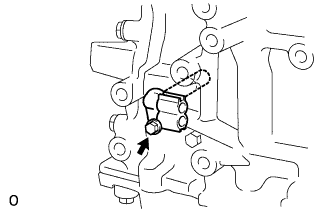 |
Remove the bolt and crankshaft position sensor.
| 8. REMOVE NO. 1 OIL PIPE |
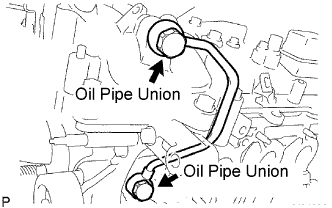 |
Remove the 2 oil pipe unions, gaskets and No. 1 oil pipe.
Remove the oil control valve filter LH and gaskets.
| 9. REMOVE OIL PIPE |
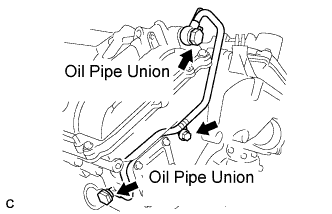 |
Remove the bolt.
Remove the 2 oil pipe unions and oil pipe.
Remove the oil control valve filter RH and gaskets.
| 10. REMOVE CYLINDER BLOCK WATER DRAIN COCK SUB-ASSEMBLY |
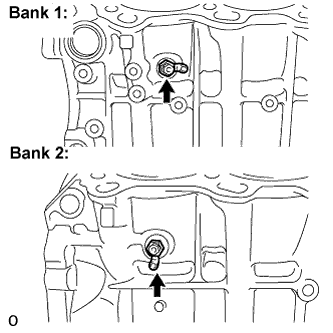 |
Remove the cylinder block water drain cock sub-assemblies from the cylinder block.
Remove the cylinder block water drain cock plugs from the water drain cock sub-assemblies.
| 11. REMOVE OIL FILTER ELEMENT |
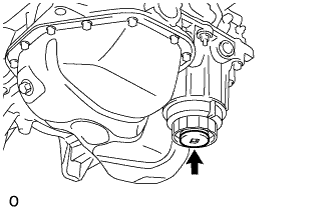 |
Remove the drain plug.
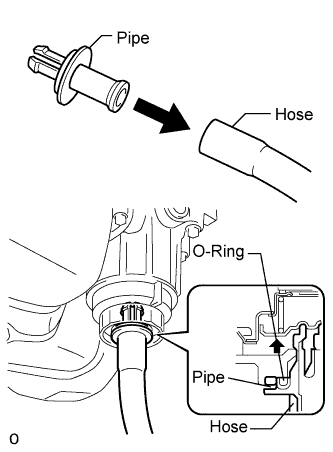 |
Connect the hose to the pipe.
Insert the pipe with the hose into the oil filter cap.
Make sure that the oil is completely drained and remove the pipe and O-ring.
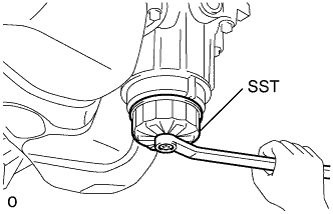 |
Using SST, remove the oil filter cap sub-assembly.
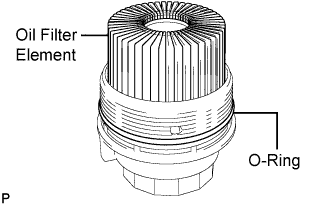 |
Remove the oil filter element and O-ring from the oil filter cap sub-assembly.
| 12. REMOVE CRANKSHAFT PULLEY |
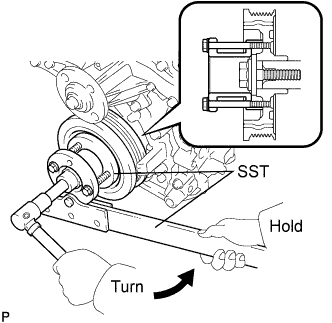 |
Using SST, loosen the crankshaft pulley bolt.
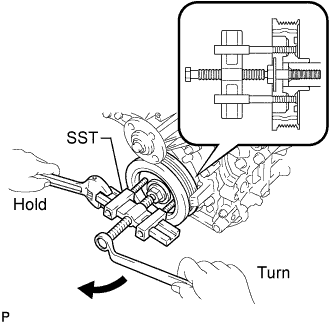 |
Using SST, remove the crankshaft pulley bolt and crankshaft pulley.
| 13. REMOVE OIL COOLER ASSEMBLY (w/ OIL COOLER) |
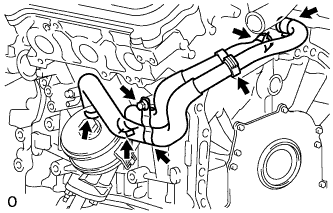 |
Remove the bolt, 2 clamps, and 4 clips and disconnect the 2 water by-pass hoses.
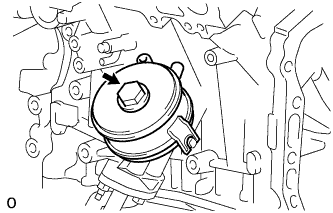 |
Remove the union bolt, oil cooler assembly, and O-ring.
| 14. REMOVE NO. 1 OIL COOLER BRACKET (w/ OIL COOLER) |
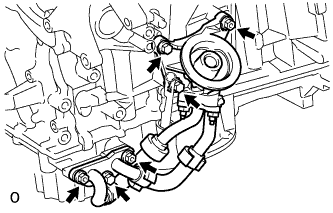 |
Remove the 3 bolts, 3 nuts, and oil cooler pipe with No. 1 oil cooler bracket.
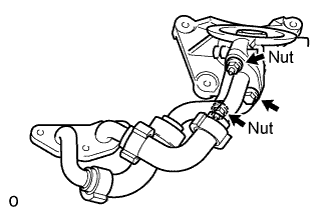 |
Remove the bolt, 2 nuts, No. 1 oil cooler bracket, and gasket.
Using a "TORX" socket wrench E8, remove the 2 stud bolts.
| 15. REMOVE NO. 1 ENGINE OIL LEVEL DIPSTICK GUIDE |
Remove the bolt and No. 1 engine oil level dipstick guide.
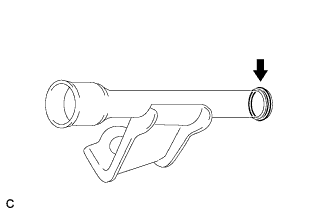 |
Remove the O-ring.
| 16. REMOVE NO. 1 FRONT ENGINE MOUNTING BRACKET LH |
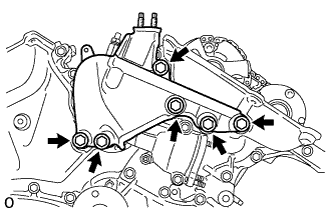 |
Remove the 6 bolts and No. 1 front engine mounting bracket LH.
Using a "TORX" socket wrench E8, remove the 2 stud bolts.
| 17. REMOVE WATER INLET HOUSING |
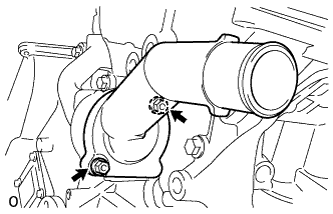 |
Remove the 2 nuts, water inlet and thermostat.
Remove the gasket.
Remove the drain cock plug.
Remove the drain cock assembly.
Remove the 2 stud bolts.
Separate the No. 1 water by-pass hose.
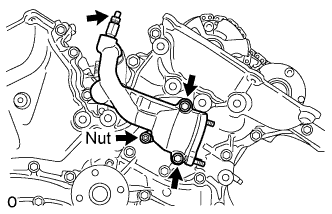 |
Remove the 2 bolts, nut and water inlet housing.
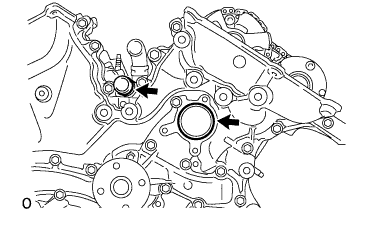 |
Remove the 2 O-rings.
| 18. REMOVE WATER OUTLET |
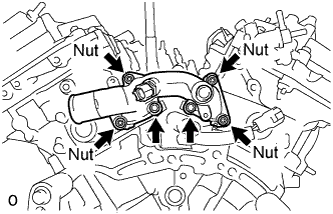 |
Remove the 2 bolts, 4 nuts and water outlet.
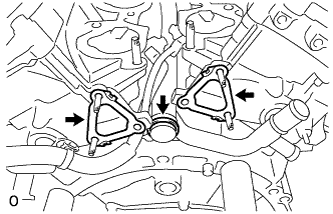 |
Remove the 2 gaskets and O-ring.
| 19. REMOVE CYLINDER HEAD COVER SUB-ASSEMBLY (for Bank 1) |
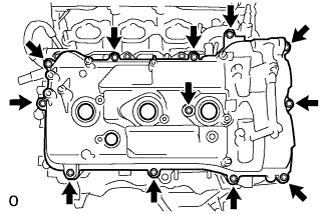 |
Remove the 12 bolts, seal washer, cylinder head cover sub-assembly and cylinder head cover gasket.
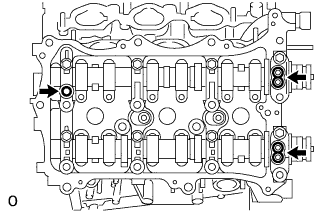 |
Remove the 3 gaskets.
| 20. REMOVE CYLINDER HEAD COVER SUB-ASSEMBLY (for Bank 2) |
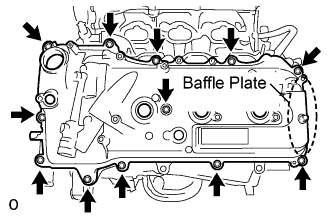 |
Remove the 12 bolts, seal washer, cylinder head cover sub-assembly and cylinder head cover gasket.
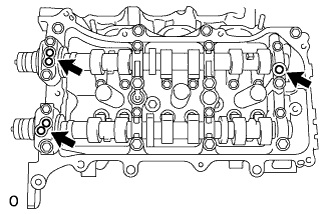 |
Remove the 3 gaskets.
| 21. REMOVE NO. 2 OIL PAN SUB-ASSEMBLY |
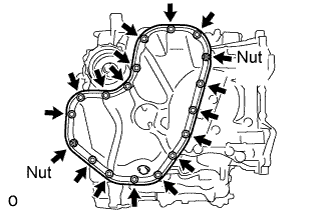 |
Remove the 16 bolts and 2 nuts.
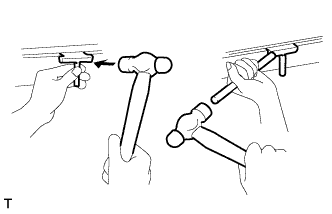 |
Insert the blade of oil pan seal cutter between the oil pans. Cut through the applied sealer and remove the No. 2 oil pan sub-assembly.
Using a "TORX" socket wrench E6, remove the 2 stud bolts.
| 22. REMOVE OIL STRAINER SUB-ASSEMBLY |
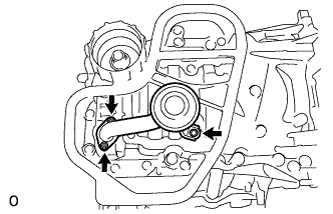 |
Remove the bolt, 2 nuts, oil strainer sub-assembly and gasket.
Using a "TORX" socket wrench E6, remove the 2 stud bolts.
| 23. REMOVE OIL PAN SUB-ASSEMBLY |
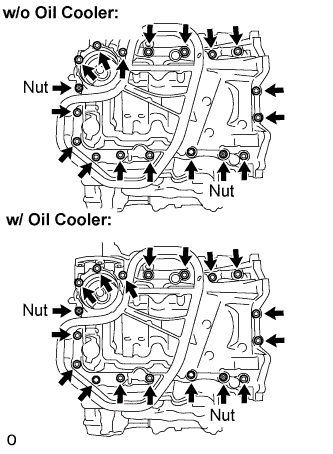 |
Remove the 16 bolts and 2 nuts.
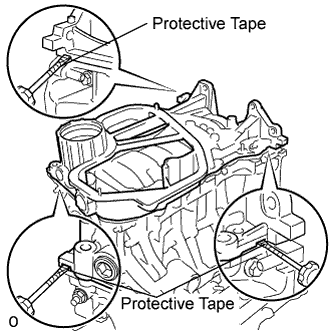 |
Remove the oil pan sub-assembly by prying between the oil pan sub-assembly and cylinder block sub-assembly with a screwdriver.
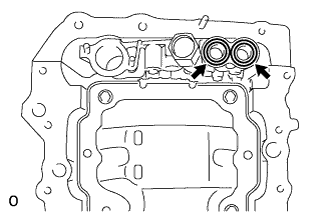 |
Remove the 2 O-rings.
Using a "TORX" socket wrench E8, remove the 2 stud bolts.
| 24. REMOVE NO. 1 OIL PAN BAFFLE PLATE |
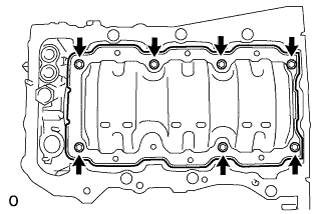 |
Remove the 7 bolts and No. 1 oil pan baffle plate.
| 25. REMOVE ENGINE REAR OIL SEAL RETAINER |
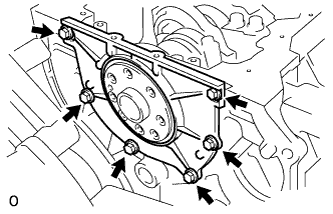 |
Remove the 6 bolts.
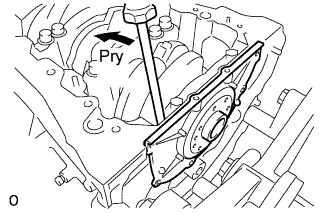 |
Using a screwdriver, pry out the engine rear oil seal retainer.
| 26. REMOVE ENGINE REAR OIL SEAL |
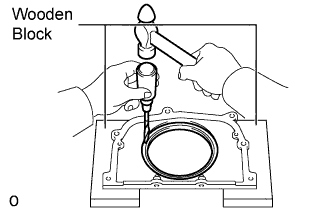 |
Place the engine rear oil seal retainer on wooden blocks.
Using a screwdriver and a hammer, tap out the oil seal.
| 27. REMOVE WATER PUMP ASSEMBLY |
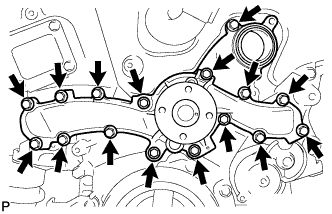 |
Remove the 16 bolts, water pump assembly and water pump gasket.
| 28. REMOVE TIMING CHAIN COVER SUB-ASSEMBLY |
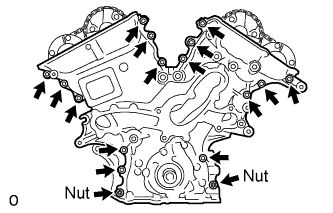 |
Remove the 15 bolts and 2 nuts as shown in the illustration.
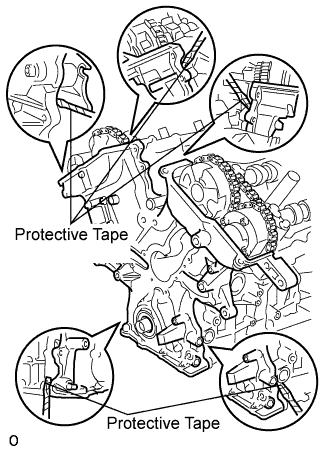 |
Remove the timing chain cover sub-assembly by prying between the timing chain cover and cylinder head sub-assembly or cylinder block sub-assembly with a screwdriver.
Remove the 4 bolts, chain cover plate and chain cover plate gasket.
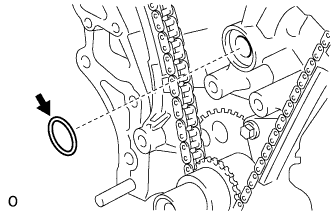 |
Remove the gasket.
| 29. REMOVE TIMING CHAIN CASE OIL SEAL |
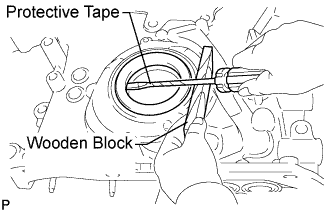 |
Using a screwdriver, pry out the timing chain case oil seal.
| 30. SET NO. 1 CYLINDER TO TDC / COMPRESSION |
Temporarily tighten the pulley set bolt.
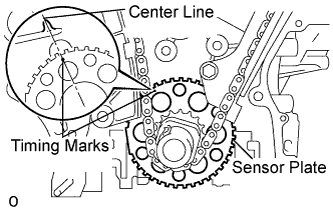 |
Set the timing mark on the crank angle sensor plate to the RH block bore center line (TDC / compression).
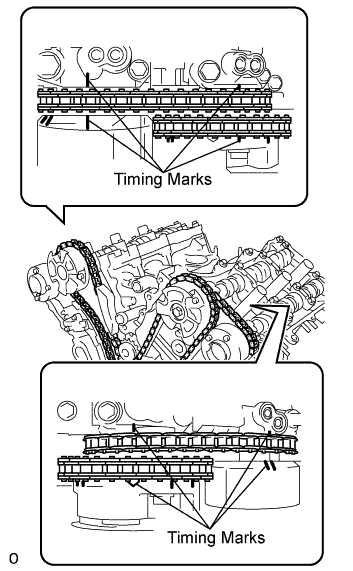 |
Check that the timing marks of the camshaft timing gears are aligned with those of the bearing cap as shown in the illustration.
If not, turn the crankshaft 1 revolution (360°) and align the timing marks as shown in the illustration.
| 31. REMOVE NO. 1 CHAIN TENSIONER ASSEMBLY |
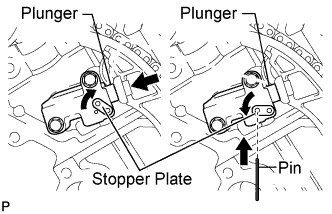 |
Move the stopper plate upward to release the lock, and push the plunger deep into the tensioner.
Move the stopper plate downward to set the lock, and insert a pin of 1.27 mm diameter (0.05 in.) into the stopper plate's hole.
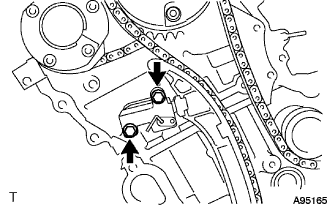 |
Remove the 2 bolts and No. 1 chain tensioner assembly.
| 32. REMOVE CHAIN TENSIONER SLIPPER |
Remove the chain tensioner slipper.
| 33. REMOVE CHAIN SUB-ASSEMBLY |
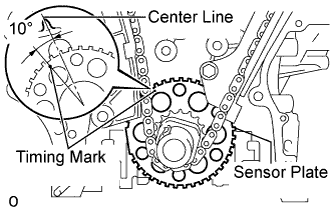 |
Turn the crankshaft counterclockwise 10° to loosen the chain sub-assembly.
Remove the pulley set bolt.
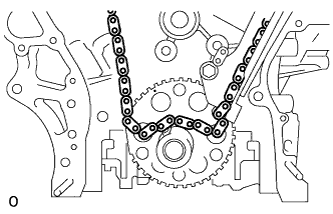 |
Remove the chain sub-assembly from the crankshaft timing sprocket and place it on the crankshaft.
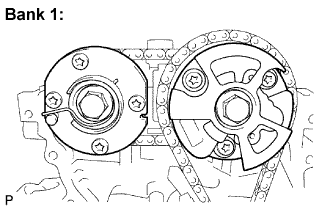 |
Turn the camshaft timing gear assembly on the bank 1 clockwise (approximately 60°) and set it as shown in the illustration. Be sure to loosen the chain sub-assembly between the banks.
Remove the chain sub-assembly.
| 34. REMOVE IDLE SPROCKET ASSEMBLY |
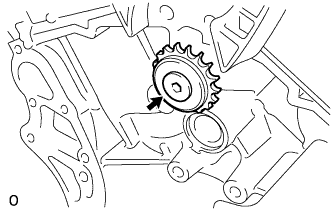 |
Using a 10 mm hexagon wrench, remove the No. 2 idle gear shaft, idle sprocket assembly and No. 1 idle gear shaft.
| 35. REMOVE NO. 1 CHAIN VIBRATION DAMPER |
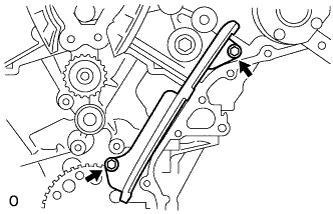 |
Remove the 2 bolts and No. 1 chain vibration damper.
| 36. REMOVE NO. 2 CHAIN VIBRATION DAMPER |
Remove the 2 No. 2 chain vibration dampers.
| 37. REMOVE CRANKSHAFT TIMING SPROCKET |
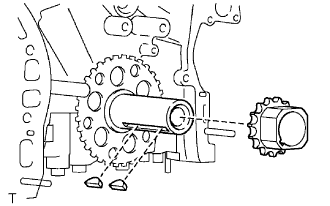 |
Remove the crankshaft timing sprocket from the crankshaft.
Remove the 2 keys from the crankshaft.
| 38. REMOVE CAMSHAFT TIMING GEARS AND NO. 2 CHAIN (for Bank 1) |
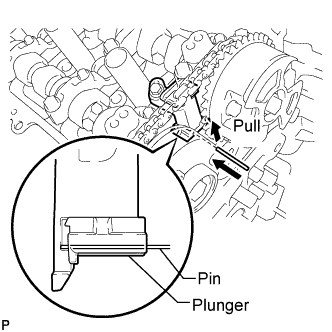 |
While raising the No. 2 chain tensioner assembly, insert a pin of 1.0 mm diameter (0.0394 in.) into the hole to fix the No. 2 chain tensioner assembly.
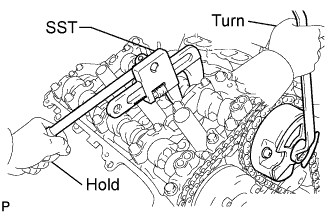 |
Using SST to hold the hexagonal portion of each camshaft, loosen the flange bolts of the camshaft timing gear assembly and the camshaft timing exhaust gear assembly LH.
Remove the 2 flange bolts and the camshaft timing gear assembly together with the No. 2 chain.
| 39. REMOVE NO. 2 CHAIN TENSIONER ASSEMBLY |
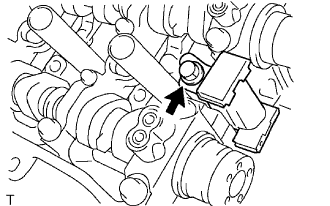 |
Remove the bolt and No. 2 chain tensioner assembly.
| 40. REMOVE CAMSHAFT BEARING CAP (for Bank 1) |
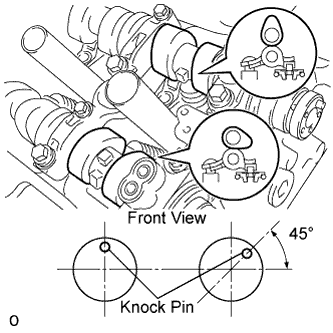 |
Check that the camshafts are positioned as shown in the illustration.
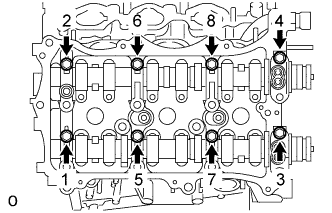 |
Uniformly loosen and remove the 8 bearing cap bolts in several steps and in the sequence shown in the illustration.
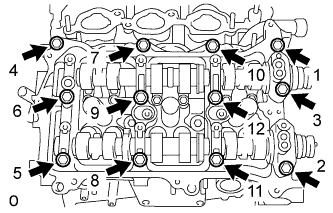 |
Uniformly loosen and remove the 12 bearing cap bolts in several steps in the sequence shown in the illustration.
Remove the 5 camshaft bearing caps.
| 41. REMOVE CAMSHAFT |
Remove the camshaft.
| 42. REMOVE NO. 2 CAMSHAFT |
Remove the No. 2 camshaft.
| 43. REMOVE CAMSHAFT HOUSING SUB-ASSEMBLY RH |
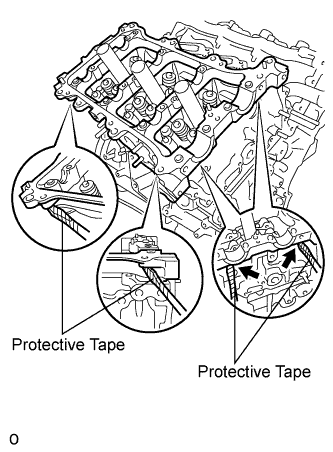 |
Remove the camshaft housing sub-assembly RH by prying between the cylinder head and camshaft housing sub-assembly RH with a screwdriver.
| 44. REMOVE CAMSHAFT TIMING GEARS AND NO. 2 CHAIN (for Bank 2) |
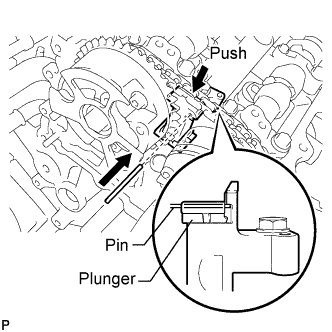 |
While pushing down the No. 3 chain tensioner assembly, insert a pin of 1.0 mm diameter (0.0394 in.) into the hole to fix the No. 3 chain tensioner assembly.
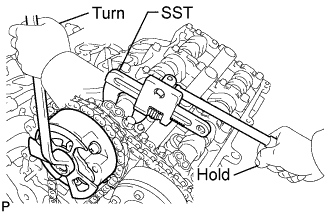 |
Using SST to hold the hexagonal portion of each camshaft, loosen the flange bolts of the camshaft timing gear assembly and the camshaft timing exhaust gear assembly LH.
Remove the 2 flange bolts and the camshaft timing gear together with the No. 2 chain.
| 45. REMOVE NO. 3 CHAIN TENSIONER ASSEMBLY |
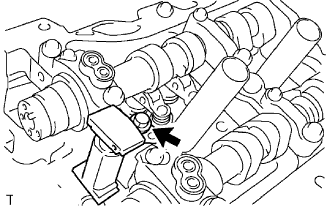 |
Remove the bolt and No. 3 chain tensioner assembly.
| 46. REMOVE CAMSHAFT BEARING CAP (for Bank 2) |
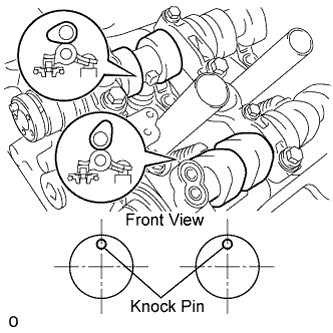 |
Check that the camshafts are positioned as shown in the illustration.
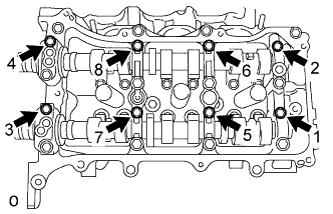 |
Uniformly loosen and remove the 8 bearing cap bolts in several steps and in the sequence shown in the illustration.
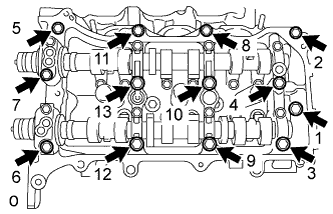 |
Uniformly loosen and remove the 13 bearing cap bolts in several steps and in the sequence shown in the illustration.
Remove the 5 camshaft bearing caps.
| 47. REMOVE NO. 3 CAMSHAFT |
Remove the No. 3 camshaft.
| 48. REMOVE NO. 4 CAMSHAFT |
Remove the No. 4 camshaft.
| 49. REMOVE CAMSHAFT HOUSING SUB-ASSEMBLY LH |
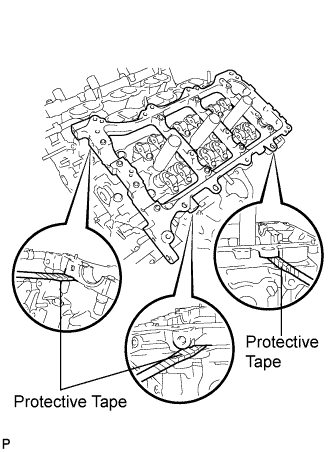 |
Remove the camshaft housing sub-assembly LH by prying between the cylinder head and camshaft housing sub-assembly LH with a screwdriver.
| 50. REMOVE NO. 1 VALVE ROCKER ARM SUB-ASSEMBLY |
Remove the 24 No. 1 valve rocker arm sub-assemblies.
| 51. REMOVE VALVE LASH ADJUSTER ASSEMBLY |
Remove the 24 valve lash adjuster assemblies from the cylinder head.
| 52. REMOVE CYLINDER HEAD SUB-ASSEMBLY RH |
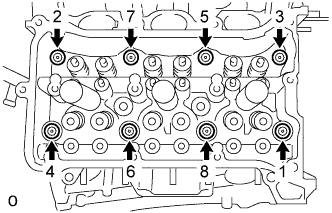 |
Using a 10 mm bi-hexagon wrench, uniformly loosen the 8 cylinder head bolts in the sequence shown in the illustration. Remove the 8 cylinder head bolts and plate washers.
Remove the cylinder head sub-assembly RH and cylinder head gasket.
| 53. REMOVE CYLINDER HEAD SUB-ASSEMBLY LH |
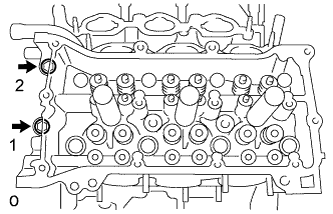 |
Uniformly loosen and remove the 2 cylinder head set bolts in several steps and in the sequence shown in the illustration.
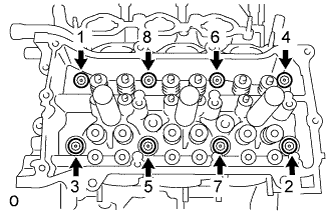 |
Using a 10 mm bi-hexagon wrench, uniformly loosen the 8 bolts in the sequence shown in the illustration. Remove the 8 cylinder head bolts and plate washers.
Remove the cylinder head sub-assembly LH and No. 2 cylinder head gasket.
| 54. REMOVE WATER INLET PIPE |
Remove 2 clamps and separate the No. 1 water by-pass hose.
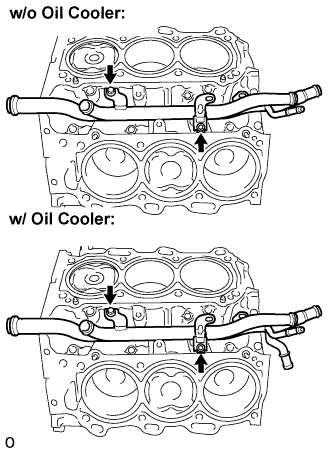 |
Remove the 2 bolts and water inlet pipe.