| NEXT | |
 |
HOW TO TROUBLESHOOT ECU CONTROLLED SYSTEMS > HOW TO PROCEED WITH TROUBLESHOOTING |
| OPERATION FLOW |
| 1.VEHICLE BROUGHT TO WORKSHOP |
| |||||
| 2.CUSTOMER PROBLEM ANALYSIS |
Ask the customer about the conditions and environment when the problem occurred.
| |||||
| 3.INSPECT BATTERY VOLTAGE |
| |||||
| 4.SYMPTOM CONFIRMATION AND DTC (AND FREEZE FRAME DATA) CHECK |
Visually check the wire harnesses, connectors and fuses for open and short circuits.
Warm up the engine to the normal operating temperature.
Confirm the problem symptoms and conditions, and check for DTCs.
| Result | Proceed to |
| DTC is output | A |
| DTC is not output | B |
|
| ||||
| |||||
| 5.DTC CHART |
Check the results obtained in step 4. Then find the output DTC in the DTC chart. Look at the "Trouble Area" column for a list of potentially malfunctioning circuits and/or parts.
|
|
| 6.PROBLEM SYMPTOMS CHART |
Check the results obtained in step 4. Then find the problem symptoms in the problem symptoms table. Look at the "Suspected Area" column for a list of potentially malfunctioning circuits and/or parts.
| |||||
| 7.CIRCUIT INSPECTION OR PARTS INSPECTION |
Identify the malfunctioning circuit or part.
| |||||
| 8.ADJUST, REPAIR OR REPLACE |
Adjust, repair or replace the malfunctioning circuit or parts.
| |||||
| 9.CONFIRMATION TEST |
After the adjustment, repairs or replacement, confirm that the malfunction no longer exists. If the malfunction does not reoccur, perform a confirmation test under the same conditions and in the same environment as when the malfunction occurred the first time.
|
| ||||
|---|---|---|---|---|---|
| CUSTOMER PROBLEM ANALYSIS |
| What | Vehicle model, system name |
| When | Date, time, occurrence frequency |
| Where | Road conditions |
| Under what conditions? | Driving conditions, weather conditions |
| How did it happen? | Problem symptoms |
| SYMPTOM CONFIRMATION AND DIAGNOSTIC TROUBLE CODE |
| System | SYMPTOM CONFIRMATION AND DIAGNOSTIC TROUBLE CODE | ||||
| DTC Check (Normal Mode) | DTC Check (Check Mode) | Sensor Check/Test Mode (Input Signal Check) | DATA LIST | ACTIVE TEST | |
| 2GR-FE SFI System | ○ | ○ | - | ○ | ○ |
| 2GR-FE Smart Key System | ○ | - | - | ○ | ○ |
| U151E, U151F Automatic Transaxle System | ○ | ○ | - | ○ | ○ |
| Tire Pressure Warning System | ○ | - | ○ | ○ | - |
| Vehicle Stability Control System | ○ | - | ○ | ○ | ○ |
| Steering Lock System | ○ | - | - | ○ | ○ |
| Power Steering System | ○ | - | - | ○ | - |
| Air Conditioning System (for Automatic Air Conditioning System) | ○ | - | - | ○ | ○ |
| Air Conditioning System (for Manual Air Conditioning System) | ○ | - | - | ○ | ○ |
| Airbag System | ○ | ○ | - | ○ | - |
| Occupant Classification System | ○ | - | - | ○ | - |
| Seat Belt Warning System | - | - | - | ○ | ○ |
| Theft Deterrent System (w/ Smart Key System) | - | - | - | ○ | ○ |
| Theft Deterrent System (w/o Smart Key System) | - | - | - | ○ | ○ |
| Engine Immobiliser System (w/ Smart Key System) | ○ | - | - | ○ | ○ |
| Engine Immobiliser System (w/o Smart Key System) | ○ | - | - | ○ | ○ |
| Cruise Control System | ○ | - | - | ○ | - |
| Lighting System | ○ | - | - | ○ | ○ |
| Power Door Lock Control System | - | - | - | ○ | ○ |
| Wireless Door Lock Control System (w/ Smart Key System) | ○ | - | - | ○ | ○ |
| Wireless Door Lock Control System (w/o Smart Key System) | ○ | - | - | ○ | ○ |
| Smart Key System (DOOR LOCK) | - | - | - | ○ | ○ |
| Key Reminder Warning System | - | - | - | ○ | - |
| Meter / Gauge System | ○ | - | - | ○ | ○ |
| Audio and Visual System | ○ | - | - | - | - |
| Navigation System | ○ | - | - | - | - |
| Power Window Control System | ○ | - | - | ○ | ○ |
| Windshield Deicer System | - | - | - | - | ○ |
| Window Defogger System | - | - | - | - | ○ |
| Glass Hatch Opener System | - | - | - | ○ | ○ |
| Sliding Roof System | ○ | - | - | ○ | ○ |
| Back Door Closer System | ○ | - | - | ○ | ○ |
| Power Back Door System | ○ | - | - | ○ | ○ |
| LIN Communication System | ○ | - | - | ○ | - |
| CAN Communication System | ○ | - | - | - | - |
| 1.DTC CHECK |
| |||||
| 2.MAKE A NOTE OF DTCS DISPLAYED AND THEN CLEAR MEMORY |
| |||||
| 3.SYMPTOM CONFIRMATION |
| Result | Proceed to |
| No symptoms exist | A |
| Symptoms exist | B |
|
| ||||
| |||||
| 4.SIMULATION TEST USING SYMPTOM SIMULATION METHODS |
| |||||
| 5.DTC CHECK |
| Result | Proceed to |
| DTC is not output | A |
| DTC is output | B |
|
| ||||
| |||||
| 6.SYMPTOM CONFIRMATION |
| Result | Proceed to |
| No symptoms exist | A |
| Symptoms exist | B |
|
| ||||
|
| ||||
|---|---|---|---|---|---|
| SYMPTOM SIMULATION |
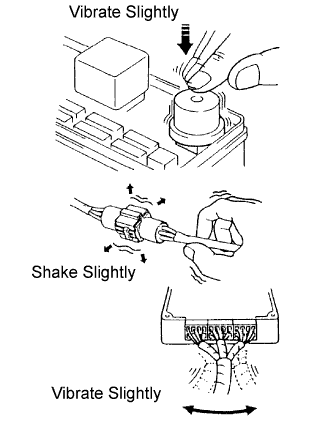 |
VIBRATION METHOD: When a malfunction seems to occur as a result of vibration.
PART AND SENSOR
Apply slight vibration with a finger to the part of the sensor suspected to be the cause of the problem, and check whether the malfunction occurs.
CONNECTORS
Slightly shake the connector vertically and horizontally.
WIRE HARNESS
Slightly shake the wire harness vertically and horizontally.
HEAT METHOD: When a malfunction seems to occur when the area in question is heated.
Heat the component that is the possible cause of the malfunction with a hair dryer or similar device. Check if the malfunction occurs.
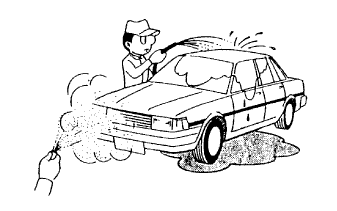 |
WATER SPRINKLING METHOD: When a malfunction seems to occur on a rainy day or in high-humidity.
Sprinkle water onto the vehicle and check if the malfunction occurs.
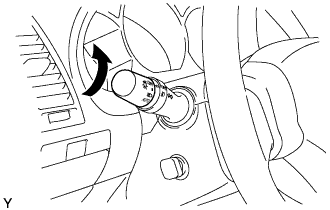 |
HIGH ELECTRICAL LOAD METHOD: When a malfunction seems to occur when an electrical load is excessive.
Turn on the heater blower, headlight, rear window defogger and all other electrical loads. Check if the malfunction reoccurs.
| DIAGNOSTIC TROUBLE CODE CHART |
| Item | Description |
| DTC No. | Indicates the diagnostic trouble code |
| Detection Item | Indicates the system or details of the problem |
| Trouble Area | Indicates the suspected areas of the problem |
| See Page | Indicates the page where the inspection procedures for each circuit is to be found, or gives instruction for checking and repairs. |
| PROBLEM SYMPTOMS TABLE |
| Item | Description |
| Symptom | - |
| Suspected Area | Indicates the circuit or part which needs to be checked. |
| See page | Indicates the page where the inspection procedure is located. |
| INSPECTION |
| Item | Description |
| Description | The major role and operation of the circuit or system and its component parts are explained. |
| DTC No., DTC Detection Condition and Trouble Area | Indicates the diagnostic trouble codes, DTC detection conditions and suspected areas for a problem. |
| Wiring Diagram | This is a wiring diagram for the circuit or system. This diagram can be used together with the Electrical Wiring Diagram to thoroughly understand the circuit. Wire colors are indicated by alphabetical codes. B = Black, L = Blue, R = Red, BR = Brown, LG = Light Green, V = Violet, G = Green, O = Orange, W = White, GR = Gray, P = Pink, Y = Yellow, SB = Sky Blue The first letter indicates the basic wire color and the second letter indicates the color of the stripe. |
| Inspection Procedure | This shows the procedure not only to determine whether the circuit is normal or abnormal, but also to determine whether the problem is located in the sensors, actuators, wire harness or ECU. |
| Illustration of the ECU connector during the check | The illustration shows whether the connector being checked is connected or disconnected. The connections for an electrical tester are indicated by (+) or (-) after the terminal name. For inspections between a connector and body ground, information about the ground is not shown in the illustration. |
