 |
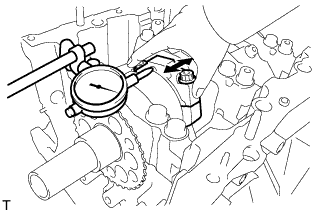
Using a dial indicator, measure the thrust clearance while moving the connecting rod back and forth.
- Standard thrust clearance:
- 0.15 to 0.40 mm (0.0059 to 0.0157 in.)
- Maximum thrust clearance:
- 0.50 mm (0.020 in.)
CYLINDER BLOCK > INSPECTION |
| 1. INSPECT CONNECTING ROD THRUST CLEARANCE |
Install the connecting rod cap .
|
Using a dial indicator, measure the thrust clearance while moving the connecting rod back and forth.
| 2. INSPECT CONNECTING ROD OIL CLEARANCE |
Clean the crank pin and bearing.
Check the crank pin and bearing for pitting and scratches.
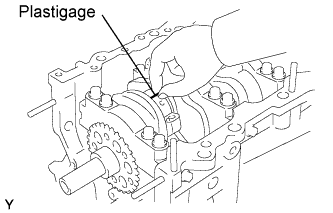 |
Lay a strip of Plastigage on the crank pin.
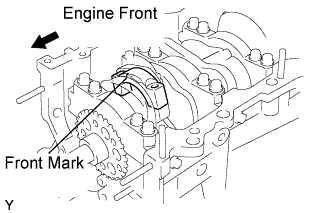 |
Ensure that the front mark of the connecting rod cap is facing forward.
Install the connecting rod cap .
Remove the 2 bolts and connecting rod cap .
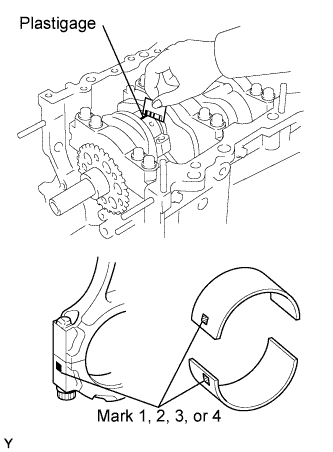 |
Measure the Plastigage at its widest point.
| Mark | Diameter |
| 1 | 56.000 to 56.006 mm (2.2047 to 2.2050 in.) |
| 2 | 56.007 to 56.012 mm (2.2050 to 2.2052 in.) |
| 3 | 56.013 to 56.018 mm (2.2052 to 2.2054 in.) |
| 4 | 56.019 to 56.024 mm (2.2055 to 2.2057 in.) |
| Mark | Thickness |
| 1 | 1.481 to 1.484 mm (0.0583 to 0.0584 in.) |
| 2 | 1.484 to 1.487 mm (0.0584 to 0.0585 in.) |
| 3 | 1.487 to 1.490 mm (0.0585 to 0.0587 in.) |
| 4 | 1.490 to 1.493 mm (0.0587 to 0.0588 in.) |
| 3. INSPECT CYLINDER BLOCK FOR WARPAGE |
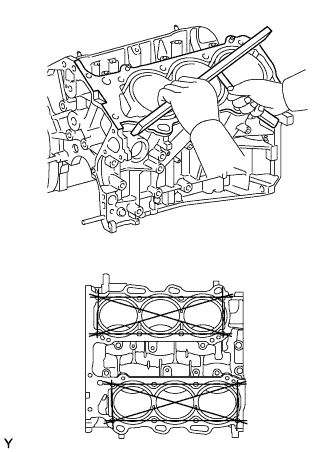 |
Using a precision straight edge and feeler gauge, measure the warpage of the contact surface of the cylinder head gasket.
| 4. INSPECT CYLINDER BORE |
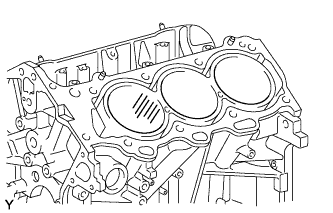 |
Visually check the cylinder for vertical scratches.
If deep scratches are present, rebore all the 6 cylinders. If necessary, replace the cylinder block.
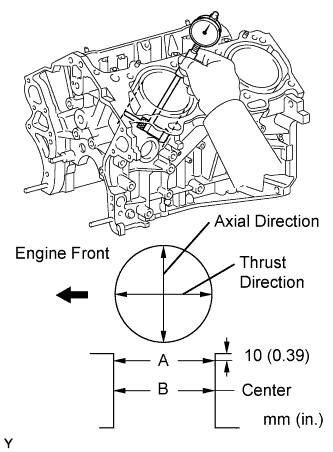 |
Using a cylinder gauge, measure the cylinder bore diameter at positions A and B in the thrust and axial directions.
| 5. INSPECT PISTON SUB-ASSEMBLY WITH PIN |
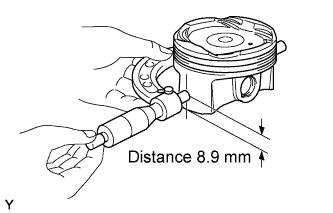 |
Using a micrometer, measure the piston diameter at right angles to the piston center line where the distance from the piston end is as specified.
| 6. INSPECT PISTON OIL CLEARANCE |
Measure the cylinder bore diameter in the thrust directions.
Subtract the piston diameter measurement from the cylinder bore diameter measurement.
| 7. INSPECT RING GROOVE CLEARANCE |
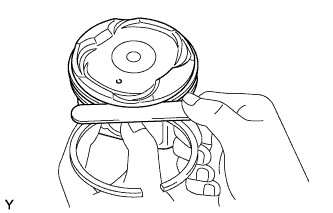 |
Using a feeler gauge, measure the clearance between a new piston ring and the wall of the ring groove.
| Item | Clearance |
| No. 1 | 0.020 to 0.070 mm (0.0008 to 0.0028 in.) |
| No. 2 | 0.020 to 0.060 mm (0.0008 to 0.0024 in.) |
| Oil | 0.070 to 0.150 mm (0.0028 to 0.0059 in.) |
| 8. INSPECT PISTON PIN OIL CLEARANCE |
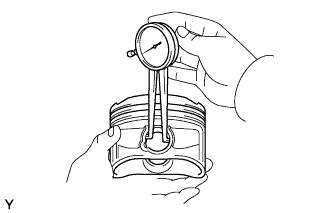 |
Using a caliper gauge, measure the inside diameter of the piston pin hole.
| Mark | Diameter |
| A | 22.001 to 22.004 mm (0.8662 to 0.8663 in.) |
| B | 22.004 to 22.007 mm (0.8663 to 0.8664 in.) |
| C | 22.007 to 22.010 mm (0.8664 to 0.8665 in.) |
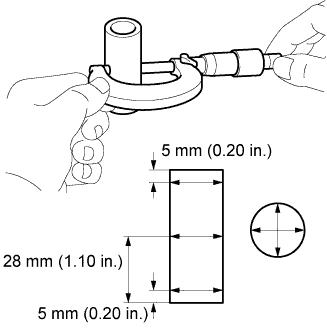 |
Using a micrometer, measure the piston pin diameter.
| Mark | Diameter |
| A | 21.997 to 22.000 mm (0.8660 to 0.8661 in.) |
| B | 22.000 to 22.003 mm (0.8661 to 0.8663 in.) |
| C | 22.003 to 22.006 mm (0.8663 to 0.8664 in.) |
Subtract the piston pin diameter measurement from the piston pin hole diameter measurement.
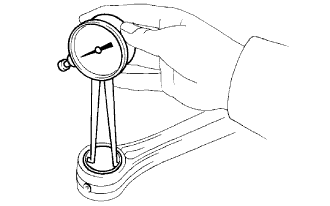 |
Using a caliper gauge, measure the inside diameter of the connecting rod bushing.
| Mark | Diameter |
| A | 22.005 to 22.008 mm (0.8663 to 0.8665 in.) |
| B | 22.009 to 22.011 mm (0.8665 to 0.8666 in.) |
| C | 22.012 to 22.014 mm (0.8666 to 0.8667 in.) |
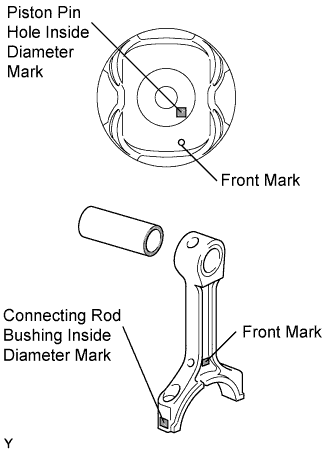 |
Subtract the piston pin diameter measurement from the bushing inside diameter measurement.
| 9. INSPECT PISTON RING END GAP |
Insert the piston ring into the cylinder bore.
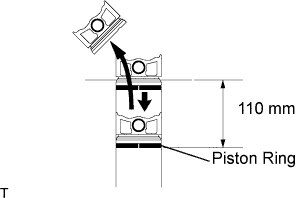 |
Using a piston, push the piston ring slightly beyond the bottom of the ring travel, 110 mm (4.33 in.) from the top of the cylinder block sub-assembly.
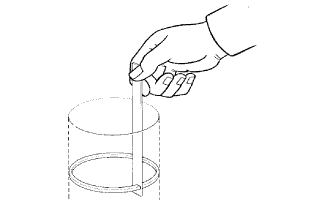 |
Using a feeler gauge, measure the end gap.
| Item | End Gap |
| No. 1 | 0.25 to 0.35 mm (0.0098 to 0.0138 in.) |
| No. 2 | 0.50 to 0.60 mm (0.0197 to 0.0236 in.) |
| Oil | 0.10 to 0.40 mm (0.0039 to 0.0157 in.) |
| Item | End Gap |
| No. 1 | 0.50 mm (0.0197 in.) |
| No. 2 | 0.85 mm (0.0335 in.) |
| Oil | 0.60 mm (0.0236 in.) |
| 10. INSPECT CRANKSHAFT THRUST CLEARANCE |
Install the crankshaft bearing cap .
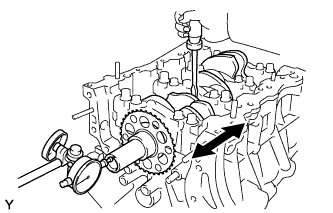 |
Using a dial indicator, measure the thrust clearance while prying the crankshaft back and forth with a screwdriver.
| 11. INSPECT CONNECTING ROD SUB-ASSEMBLY |
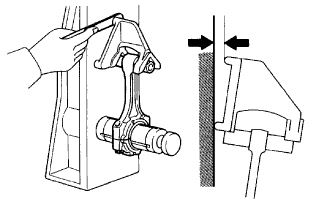 |
Using a rod aligner and feeler gauge, check the connecting rod alignment.
Check for out-of-alignment.
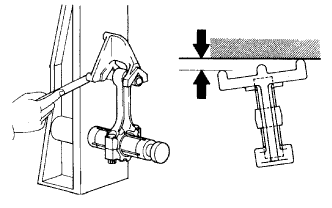 |
Check for twist.
| 12. INSPECT CONNECTING ROD BOLT |
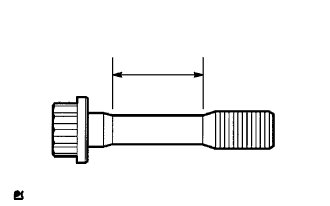 |
Using vernier calipers, measure the tension portion diameter of the bolt.
| 13. INSPECT CRANKSHAFT |
Inspect for runout.
Clean the crank journal.
Place the crankshaft on V-blocks.
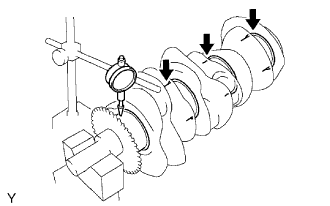 |
Using a dial indicator, measure the runout at the center journal.
Inspect the main journals.
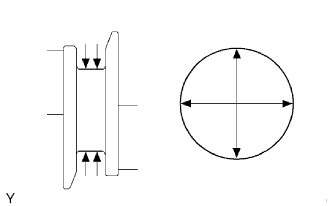 |
Using a micrometer, measure the diameter of each main journal.
Check each main journal for taper and out-of-round as shown in the illustration.
Inspect the crank pin.
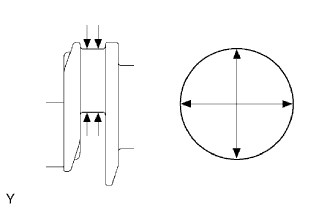 |
Using a micrometer, measure the diameter of each crank pin.
Check each crank pin for taper and out-of-round as shown in the illustration.
| 14. INSPECT CRANKSHAFT OIL CLEARANCE |
Check the crank journal and crankshaft bearing for pitting and scratches.
Install the crankshaft bearing .
Place the crankshaft on the cylinder block.
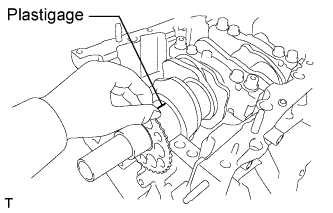 |
Lay a strip of Plastigage across each journal.
Examine the front marks and numbers to install the crankshaft bearing caps on the cylinder block.
Install the main bearing cap .
Remove the main bearing caps .
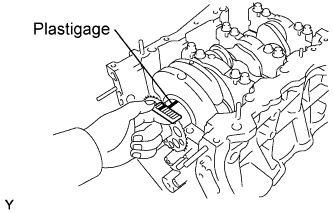 |
Measure the Plastigage at its widest point.
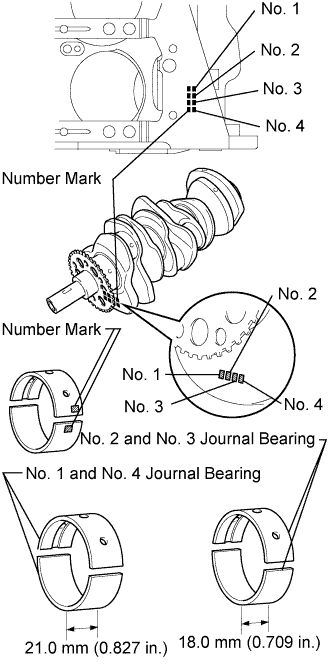 |
If replacing a bearing, replace it with one having the same number. If the number of the bearing cannot be determined, select the correct bearing by adding together the numbers imprinted on the cylinder block and crankshaft, then refer to the table below for the appropriate bearing number. There are 5 sizes of standard bearings, marked "1", "2", "3", "4" and "5" accordingly.
| Cylinder block + Crankshaft | 0 - 5 | 6 - 11 | 12 - 17 | 18 - 23 | 24 - 28 |
| Bearing to be used | "1" | "2" | "3" | "4" | "5" |
| Mark | Diameter |
| "00" | 60.999 to 61.000 mm (2.4015 to 2.4016 in.) |
| "01" | 60.998 to 60.999 mm (2.4015 to 2.4015 in.) |
| "02" | 60.997 to 60.998 mm (2.4015 to 2.4015 in.) |
| "03" | 60.996 to 60.997 mm (2.4014 to 2.4015 in.) |
| "04" | 60.995 to 60.996 mm (2.4014 to 2.4014 in.) |
| "05" | 60.994 to 60.995 mm (2.4013 to 2.4014 in.) |
| "06" | 60.993 to 60.994 mm (2.4013 to 2.4013 in.) |
| "07" | 60.992 to 60.993 mm (2.4013 to 2.4013 in.) |
| "08" | 60.991 to 60.992 mm (2.4012 to 2.4013 in.) |
| "09" | 60.990 to 60.991 mm (2.4012 to 2.4012 in.) |
| "10" | 60.989 to 60.990 mm (2.4011 to 2.4012 in.) |
| "11" | 60.988 to 60.989 mm (2.4011 to 2.4011 in.) |
| Mark | Thickness |
| "1" | 2.500 to 2.503 mm (0.0984 to 0.0985 in.) |
| "2" | 2.503 to 2.506 mm (0.0985 to 0.0987 in.) |
| "3" | 2.506 to 2.509 mm (0.0987 to 0.0988 in.) |
| "4" | 2.509 to 2.512 mm (0.0988 to 0.0989 in.) |
| "5" | 2.512 to 2.515 mm (0.0989 to 0.0990 in.) |
| Mark | Thickness |
| "1" | 2.478 to 2.481 mm (0.0976 to 0.0977 in.) |
| "2" | 2.481 to 2.484 mm (0.0977 to 0.0978 in.) |
| "3" | 2.484 to 2.487 mm (0.0978 to 0.0979 in.) |
| "4" | 2.487 to 2.490 mm (0.0979 to 0.0980 in.) |
| "5" | 2.490 to 2.493 mm (0.0980 to 0.0981 in.) |
| Mark | Thickness |
| "1" | 2.478 to 2.481 mm (0.0976 to 0.0977 in.) |
| "2" | 2.481 to 2.484 mm (0.0977 to 0.0978 in.) |
| "3" | 2.484 to 2.487 mm (0.0978 to 0.0979 in.) |
| "4" | 2.487 to 2.490 mm (0.0979 to 0.0980 in.) |
| "5" | 2.490 to 2.493 mm (0.0980 to 0.0981 in.) |
| Mark | Thickness |
| "1" | 2.500 to 2.503 mm (0.0984 to 0.0985 in.) |
| "2" | 2.503 to 2.506 mm (0.0985 to 0.0987 in.) |
| "3" | 2.506 to 2.509 mm (0.0987 to 0.0988 in.) |
| "4" | 2.509 to 2.512 mm (0.0988 to 0.0989 in.) |
| "5" | 2.512 to 2.515 mm (0.0989 to 0.0990 in.) |
| 15. INSPECT CRANKSHAFT BEARING CAP SET BOLT |
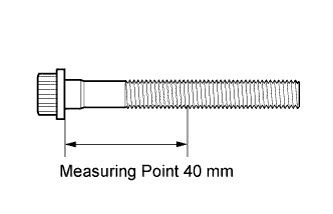 |
Using vernier calipers, measure the minimum diameter of the compressed thread at the measuring point.
| 16. INSPECT NO. 1 OIL NOZZLE SUB-ASSEMBLY |
Check the oil nozzles for damage or clogs.