Disconnect the mirror connector.
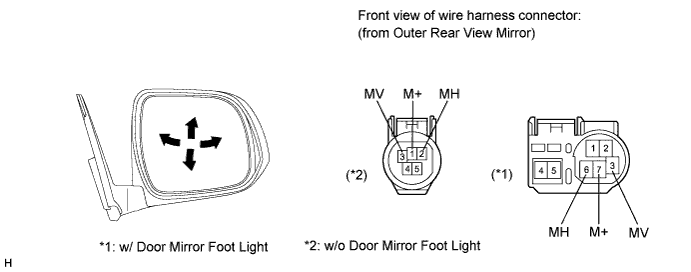
OUTER REAR VIEW MIRROR > INSPECTION |
| 1. INSPECT OUTER REAR VIEW MIRROR ASSEMBLY RH |
Disconnect the mirror connector.
Apply battery voltage and check the operation of the mirror.
| Measurement Condition | Specified Condition |
| Battery positive (+) → Terminal 3 (MV) Battery negative (-) → Terminal 7 (M+) | Turns upward |
| Battery positive (+) → Terminal 7 (M+) Battery negative (-) → Terminal 3 (MV) | Turns downward |
| Battery positive (+) → Terminal 6 (MH) Battery negative (-) → Terminal 7 (M+) | Turns left |
| Battery positive (+) → Terminal 7 (M+) Battery negative (-) → Terminal 6 (MH) | Turns right |
| Measurement Condition | Specified Condition |
| Battery positive (+) → Terminal 3 (MV) Battery negative (-) → Terminal 1 (M+) | Turns upward |
| Battery positive (+) → Terminal 1 (M+) Battery negative (-) → Terminal 3 (MV) | Turns downward |
| Battery positive (+) → Terminal 2 (MH) Battery negative (-) → Terminal 1 (M+) | Turns left |
| Battery positive (+) → Terminal 1 (M+) Battery negative (-) → Terminal 2 (MH) | Turns right |
with Mirror Heater:
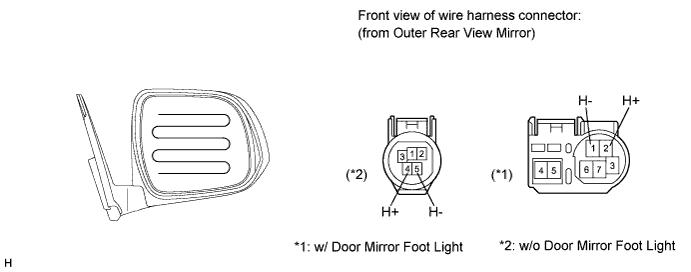
Measure the resistance according to the value(s) in the table bellow.
| Tester Connection | Condition | Specified Condition |
| 2 (H+) - 1 (H-) | Always | 3.8 to 4.8 Ω |
| Tester Connection | Condition | Specified Condition |
| 4 (H+) - 5 (H-) | Always | 3.8 to 4.8 Ω |
Connect the cable from the positive battery (+) terminal to terminal 2*1 or 4*2 and the negative battery (-) terminal to terminal 1*1 or 5*2, then check that the mirror becomes warm.
| 2. INSPECT OUTER REAR VIEW MIRROR ASSEMBLY LH |
Disconnect the mirror connector.
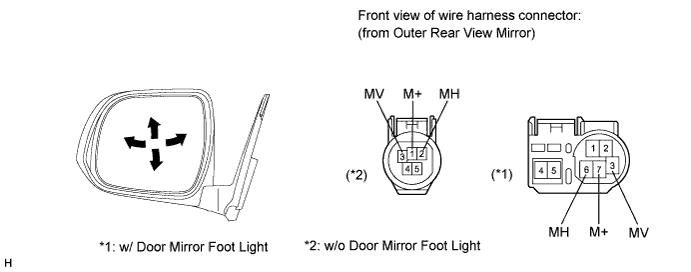
Apply battery voltage and check the operation of the mirror.
| Measurement Condition | Specified Condition |
| Battery positive (+) → Terminal 3 (MV) Battery negative (-) → Terminal 7 (M+) | Turns upward |
| Battery positive (+) → Terminal 7 (M+) Battery negative (-) → Terminal 3 (MV) | Turns downward |
| Battery positive (+) → Terminal 6 (MH) Battery negative (-) → Terminal 7 (M+) | Turns left |
| Battery positive (+) → Terminal 7 (M+) Battery negative (-) → Terminal 6 (MH) | Turns right |
| Measurement Condition | Specified Condition |
| Battery positive (+) → Terminal 3 (MV) Battery negative (-) → Terminal 1 (M+) | Turns upward |
| Battery positive (+) → Terminal 1 (M+) Battery negative (-) → Terminal 3 (MV) | Turns downward |
| Battery positive (+) → Terminal 2 (MH) Battery negative (-) → Terminal 1 (M+) | Turns left |
| Battery positive (+) → Terminal 1 (M+) Battery negative (-) → Terminal 2 (MH) | Turns right |
with Mirror Heater:
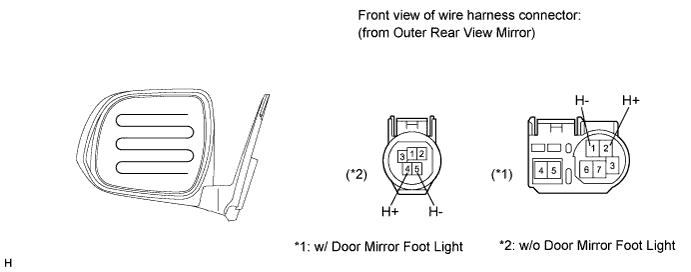
Measure the resistance according to the value(s) in the table bellow.
| Tester Connection | Condition | Specified Condition |
| 2 (H+) - 1 (H-) | Always | 3.8 to 4.8 Ω |
| Tester Connection | Condition | Specified Condition |
| 4 (H+) - 5 (H-) | Always | 3.8 to 4.8 Ω |
Connect the cable from the positive battery (+) terminal to terminal 2*1 or 4*2 and the negative battery (-) terminal to terminal 1*1 or 5*2, then check that the mirror becomes warm.