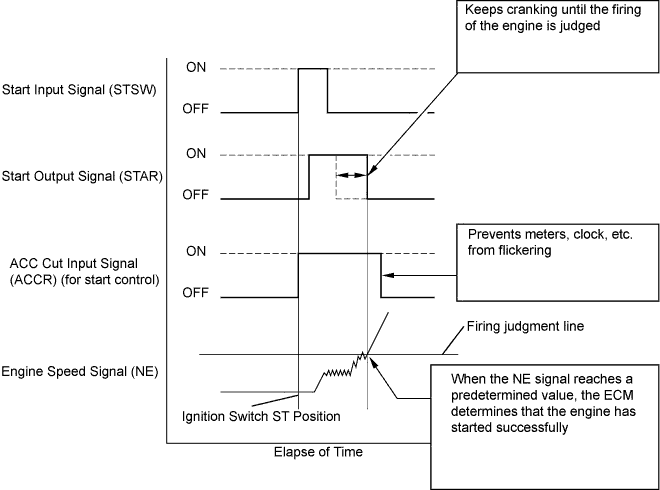
SFI SYSTEM > Cranking Holding Function Circuit |
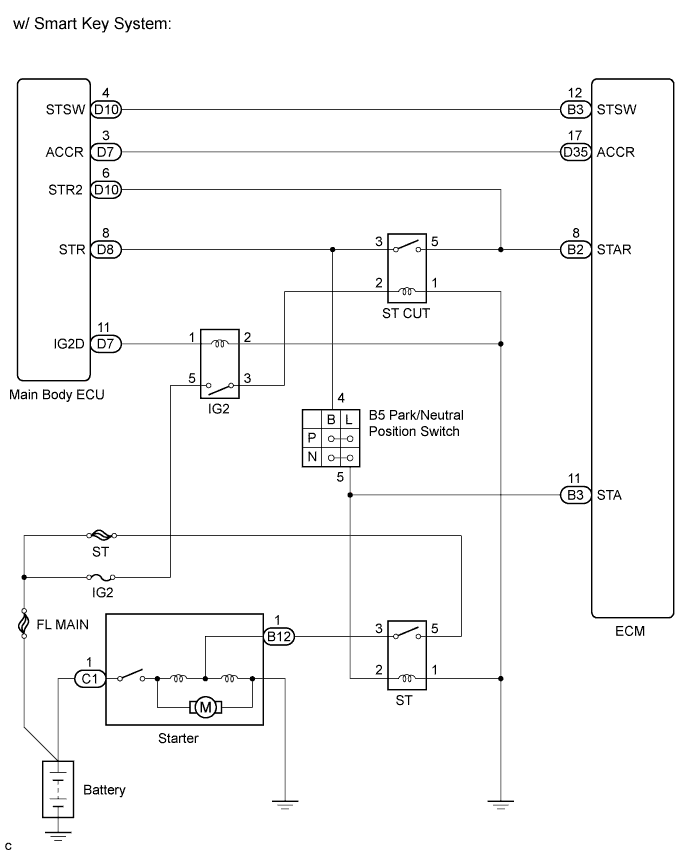
| 1.CHECK CRANKING |
When starting the engine, check whether the starter motor starts.
|
| ||||
| OK | ||
 | ||
| ||
| 2.READ VALUE USING TECHSTREAM (STA SIGNAL) |
Connect the Techstream to the DLC3.
Turn the ignition switch on (IG).
Turn the tester on.
Select the following menu items: Powertrain / Engine and ECT / Data List / Starter Signal.
Check the result when the ignition switch is turned on (IG) and when the engine is started.
| Display (Starter Signal) | Condition |
| OFF | Ignition switch on (IG) |
| ON | Engine start |
|
| ||||
| OK | |
 |
| 3.INSPECT ST RELAY |
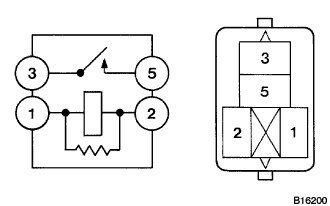 |
Remove the ST relay from the engine room relay block.
Measure the resistance according to the value(s) in the table below.
| Tester Connection | Condition | Specified Condition |
| 3 - 5 | When no battery voltage applied terminals 1 and 2 | 10 kΩ or higher |
| 3 - 5 | When battery voltage applied terminals 1 and 2 | Below 1 Ω |
Reinstall the ST relay.
|
| ||||
| OK | |
|
| 4.CHECK HARNESS AND CONNECTOR (PARK/NEUTRAL POSITION SWITCH - ST RELAY) |
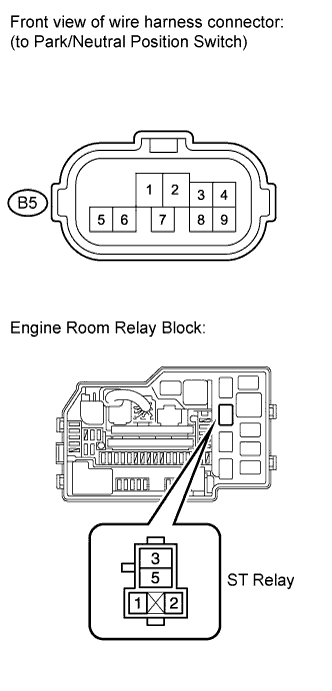 |
Disconnect the park/neutral position switch connector.
Remove the ST relay from the engine room relay block.
Measure the resistance according to the value(s) in the table below.
| Tester Connection | Condition | Specified Condition |
| B5-5 - ST relay terminal (2) | Always | Below 1 Ω |
| Tester Connection | Condition | Specified Condition |
| B5-5 or ST relay terminal (2) - Body ground | Always | 10 kΩ or higher |
Reconnect the park/neutral position switch connector.
Reinstall the ST relay.
|
| ||||
| OK | |
|
| 5.CHECK HARNESS AND CONNECTOR (ST RELAY - BODY GROUND) |
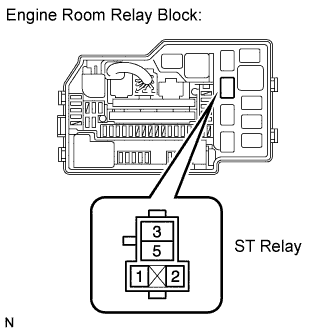 |
Remove the ST relay from the engine room relay block.
Measure the resistance according to the value(s) in the table below.
| Tester Connection | Condition | Specified Condition |
| ST relay terminal (2) - Body ground | Always | Below 1 Ω |
Reinstall the ST relay to the engine room relay block.
|
| ||||
| OK | |
|
| 6.INSPECT TERMINAL VOLTAGE (ST RELAY TERMINAL) |
|
Remove the ST relay from the engine room relay block.
Measure the voltage according to the value(s) in the table below.
| Tester Connection | Condition | Specified Condition |
| ST relay terminal (5) - Body ground | Always | 9 to 14 V |
Reinstall the ST relay to the engine room relay block.
|
| ||||
| OK | |
|
| 7.INSPECT STARTER ASSEMBLY |
Inspect the starter assembly (Click here).
|
| ||||
| OK | |
|
| 8.CHECK HARNESS AND CONNECTOR (ST RELAY - STARTER ASSEMBLY) |
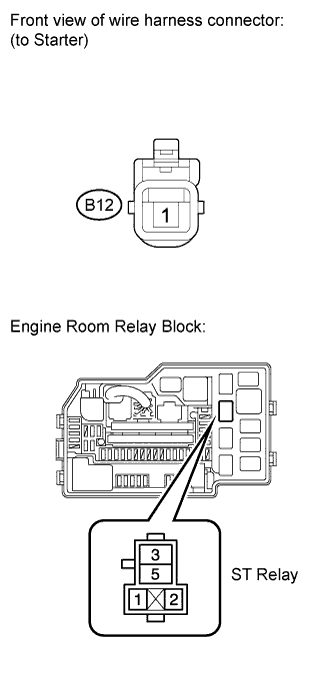 |
Remove the ST relay from the engine room relay block.
Disconnect the starter connector.
Measure the resistance according to the value(s) in the table below.
| Tester Connection | Condition | Specified Condition |
| ST relay terminal (3) - B12-1 | Always | Below 1 Ω |
| Tester Connection | Condition | Specified Condition |
| ST relay terminal (3) or B12-1 - Body ground | Always | 10 kΩ or higher |
Reconnect the starter connector.
Reinstall the ST relay.
|
| ||||
| OK | ||
| ||
| ||
| 9.INSPECT FUSIBLE LINK (ST FUSE) |
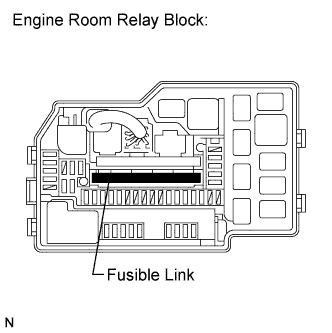 |
Remove the fusible link from the engine room relay block.
Measure the resistance according to the value(s) in the table below.
| Tester Connection | Condition | Specified Condition |
| Fusible link | Always | Below 1 Ω |
Reinstall the fusible link.
|
| ||||
| OK | ||
| ||
| ||
| 10.CHECK ECM (STAR AND STSW VOLTAGE) |
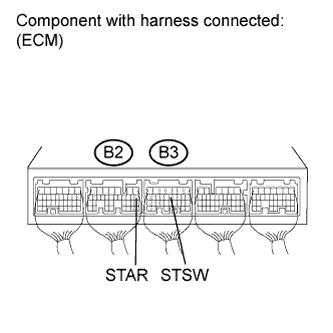 |
Measure the voltage according to the value(s) in the table below.
| Tester Connection | Condition | Specified Condition |
| B2-8 (STAR) - Body ground | Always | 9 to 14 V |
| B3-12 (STSW) - Body ground | Always | 9 to 14 V |
| Terminal STAR | Terminal STSW | Proceed to |
| 9 to 14 V | 9 to 14 V | A |
| 0 V | 9 to 14 V | B |
| 0 V | 0 V | C |
|
| ||||
|
| ||||
| A | |
|
| 11.INSPECT PARK/NEUTRAL POSITION SWITCH ASSEMBLY |
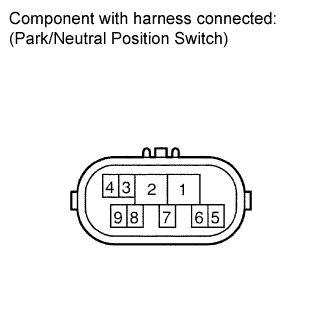 |
Inspect the park/neutral position switch.
Disconnect the park/neutral position switch connector.
Measure the resistance according to the value(s) in the table below.
| Shift Position | Tester Connection | Specified Condition |
| P | 2 - 6, 4 - 5 | Below 1 Ω |
| R | 1 - 2 | Below 1 Ω |
| N | 2 - 9, 4 - 5 | Below 1 Ω |
| D | 2 - 7 | Below 1 Ω |
| 2 | 2 - 3 | Below 1 Ω |
| L | 2 - 8 | Below 1 Ω |
| Result | Proceed To |
| OK | A |
| NG (with U151E)) | B |
| NG (with U151F) | C |
Reconnect the park/neutral position switch connector.
|
| ||||
|
| ||||
| A | |
|
| 12.CHECK HARNESS AND CONNECTOR (ECM - PARK/NEUTRAL POSITION SWITCH) |
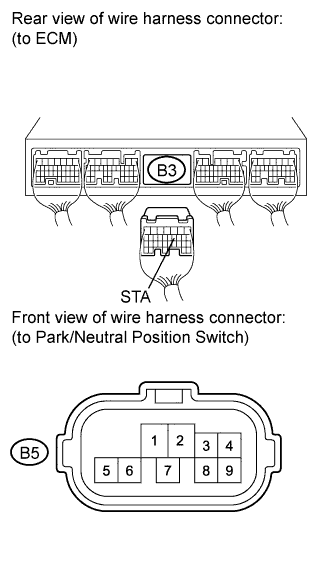 |
Disconnect the ECM connector.
Disconnect the park/neutral position switch connector.
Measure the resistance according to the value(s) in the table below.
| Tester Connection | Condition | Specified Condition |
| B3-11 (STA) - B5-5 | Always | Below 1 Ω |
| Tester Connection | Condition | Specified Condition |
| B3-11 (STA) or B5-5 - Body ground | Always | 10 kΩ or higher |
Reconnect the ECM connector.
Reconnect the park/neutral position switch connector.
|
| ||||
| OK | |
|
| 13.INSPECT RELAY (ST CUT RELAY) |
|
Remove the ST CUT relay from the engine room relay block.
Measure the resistance according to the value(s) in the table below.
| Tester Connection | Condition | Specified Condition |
| 3 - 5 | When no battery voltage applied terminals 1 and 2 | 10 kΩ or higher |
| 3 - 5 | When battery voltage applied terminals 1 and 2 | Below 1 Ω |
Reinstall the ST CUT relay.
|
| ||||
| OK | |
|
| 14.INSPECT TERMINAL VOLTAGE (ST CUT RELAY TERMINAL) |
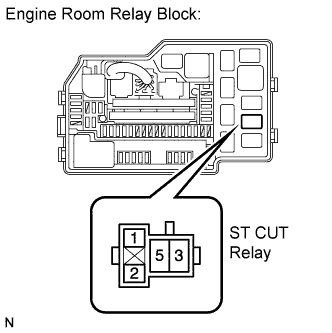 |
Remove the ST CUT relay from the engine room relay block.
Turn the ignition switch on (IG).
Measure the voltage according to the value(s) in the table below.
| Tester Connection | Switch Condition | Specified Condition |
| 2 - Body ground | Ignition switch on (IG) | 9 to 14 V |
Reinstall the ST CUT relay.
|
| ||||
| OK | ||
| ||
| ||
| 15.CHECK HARNESS AND CONNECTOR (ECM - MAIN BODY ECU) |
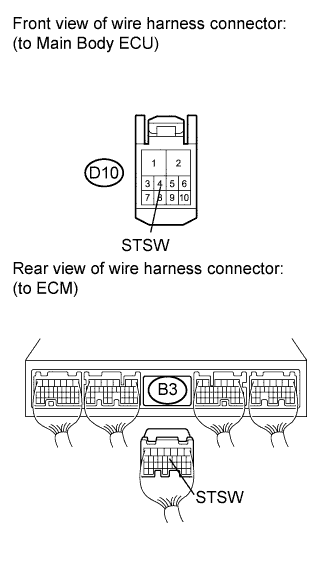 |
Disconnect the ECM connector.
Disconnect the main body ECU connector.
Measure the resistance according to the value(s) in the table below.
| Tester Connection | Condition | Specified Condition |
| B3-12 (STSW) - D10-4 (STSW) | Always | Below 1 Ω |
| Tester Connection | Condition | Specified Condition |
| B3-12 (STSW) or D10-4 (STSW) - Body ground | Always | 10 kΩ or higher |
Reconnect the ECM connector.
Reconnect the main body ECU connector.
|
| ||||
| OK | ||
| ||
| ||

