SIDE MUDGUARD > INSTALLATION |
| Item | Temperature |
| Vehicle Body | 40 to 60°C (104 to 140°F) |
| Side Mudguard | 20 to 30°C (68 to 86°F) |
| 1. INSTALL REAR DOOR OUTSIDE MOULDING SUB-ASSEMBLY |
Clean the vehicle body surface.
Using a heat light, heat the vehicle body surface.
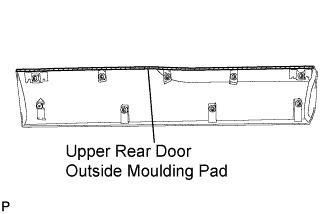
Remove the upper rear door outside moulding pad from the vehicle body.
Wipe off any tape adhesive residue with cleaner.
![]() |
Clean the rear door outside moulding sub-assembly. (If reusing the rear door outside moulding sub-assembly)
Using a heat light, heat the rear door outside moulding sub-assembly.
Remove the upper rear door outside moulding pad from the rear door outside moulding sub-assembly.
Wipe off any tape adhesive residue with cleaner.
Install a new upper rear door outside moulding pad to the rear door outside moulding sub-assembly.
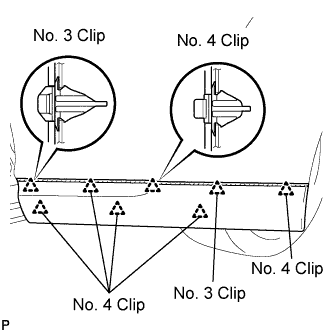
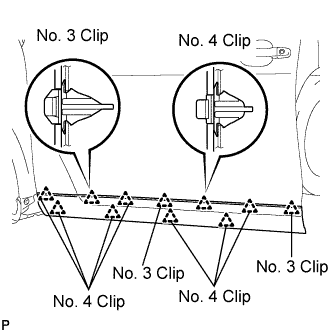
Install 2 new No. 3 clips on the rear door outside moulding sub-assembly.
Install 6 new No. 4 clips on the rear door outside moulding sub-assembly.
Install a new gasket on the rear door outside moulding sub-assembly.
![]() |
Install the rear door outside moulding sub-assembly.
Using a heat light, heat the vehicle body and rear door outside moulding sub-assembly.
Remove the release paper from the rear door outside moulding sub-assembly.
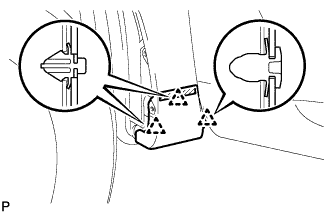
Engage the 8 clips and install the rear door outside moulding sub-assembly.
![]() |
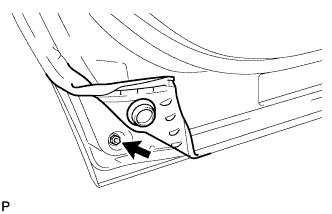
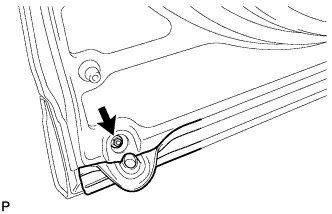
Install the nut.
Install the rear door No. 2 weatherstrip.
| 2. INSTALL FRONT DOOR OUTSIDE MOULDING SUB-ASSEMBLY |
Clean the vehicle body surface.
Using a heat light, heat the vehicle body surface.
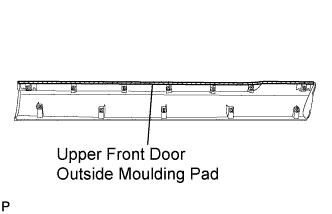
Remove the upper front door outside moulding pad from the vehicle body.
Wipe off any tape adhesive residue with cleaner.
![]() |
Clean the front door outside moulding sub-assembly. (If reusing the front door outside moulding sub-assembly)
Using a heat light, heat the front door outside moulding sub-assembly.
Remove the upper front door outside moulding pad from the front door outside moulding sub-assembly.
Wipe off any tape adhesive residue with cleaner.
Install a new upper front door outside moulding pad to the front door outside moulding sub-assembly.
Install 3 new No. 3 clips on the front door outside moulding sub-assembly.
Install 8 new No. 4 clips on the front door outside moulding sub-assembly.
Install a new gasket on the front door outside moulding sub-assembly.
![]() |
Install the front door outside moulding sub-assembly.
Using a heat light, heat the vehicle body and front door outside moulding sub-assembly.
Remove the release paper from the front door outside moulding sub-assembly.
Engage the 11 clips and install the front door outside moulding sub-assembly.
![]() |
Install the nut.
Install the front door weatherstrip.
| 3. INSTALL FRONT FENDER OUTSIDE MOULDING PAD |
![]() |
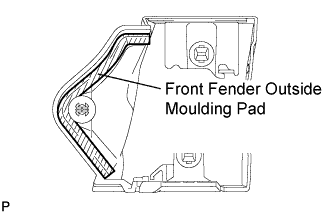
Wipe off any tape adhesive residue with cleaner.
Remove the release paper from the front fender outside moulding pad.
Install a new front fender outside moulding pad to the front fender moulding sub-assembly.
| 4. INSTALL FRONT FENDER MOULDING SUB-ASSEMBLY |
Clean the vehicle body surface.
Using a heat light, heat the vehicle body surface.
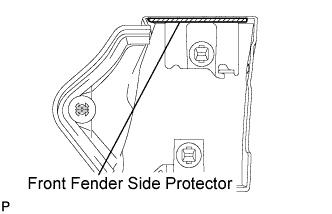
Remove the front fender side protector from the vehicle body.
Wipe off any tape adhesive residue with cleaner.
![]() |
Clean the front fender moulding sub-assembly. (If reusing the front fender moulding sub-assembly)
Using a heat light, heat the front fender moulding sub-assembly.
Remove the front fender side protector from the front fender moulding sub-assembly.
Wipe off any tape adhesive residue with cleaner.
Install a new front fender side protector to the the front fender moulding sub-assembly.
Install 2 new No. 4 clips on the front fender moulding sub-assembly.
Install a new pad on the front fender moulding sub-assembly.
![]() |
Install the front fender moulding sub-assembly.
Using a heat light, heat the vehicle body and the front fender moulding sub-assembly.
Remove the release paper from the front fender moulding sub-assembly.
Engage the 3 clips and install the front fender moulding sub-assembly.
![]() |
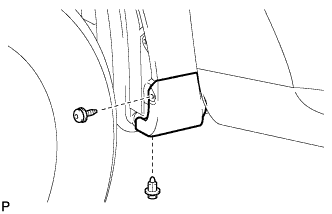
Using a 4 mm hexagon wrench, install the screw.
Install the clip.