 |
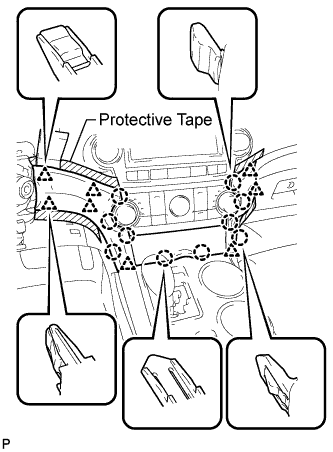
Apply protective tape to the areas shown in the illustration.
STEREO JACK ADAPTER ASSEMBLY > REMOVAL |
| 1. REMOVE CENTER INSTRUMENT CLUSTER FINISH PANEL ASSEMBLY (w/o Smart Key System) |
|
Apply protective tape to the areas shown in the illustration.
Using a moulding remover, disengage the 10 claws and 8 clips starting from the upper part of the center instrument cluster finish panel assembly.
Disconnect each connector and remove the center instrument cluster finish panel assembly.
| 2. REMOVE CENTER INSTRUMENT CLUSTER FINISH PANEL ASSEMBLY (w/ Smart Key System) |
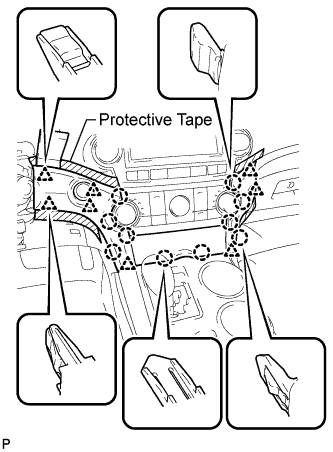 |
Apply protective tape to the areas shown in the illustration.
Using a moulding remover, disengage the 10 claws and 8 clips starting from the upper part of the center instrument cluster finish panel assembly.
Disconnect each connector and remove the center instrument cluster finish panel assembly.
| 3. REMOVE STEREO JACK ADAPTER ASSEMBLY (w/o Seat Heater System) |
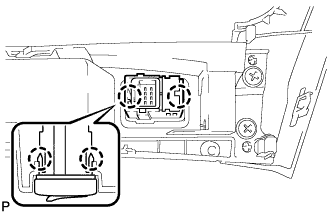 |
Disengage the 2 claws and remove the stereo jack adapter assembly.
| 4. REMOVE STEREO JACK ADAPTER ASSEMBLY (w/ Seat Heater System) |
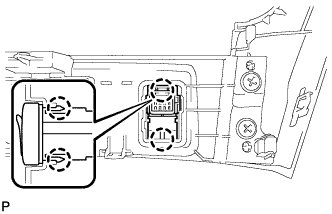 |
Disengage the 2 claws and remove the stereo jack adapter assembly.