Home › ENGINE › 3MZ-FE COOLING › RADIATOR

RADIATOR > ON-VEHICLE INSPECTION

for Preparation Click here


1. INSPECT RADIATOR CAP SUB-ASSEMBLY


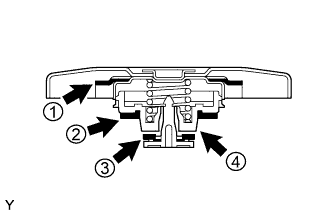
    A107446E01
  1. Measure the valve opening pressure.

    1. If there are water stains or foreign matter on rubber packings 1, 2 or 3, clean the part(s) with water and finger scouring.

    2. Check that rubber packings 1, 2 and 3 are not deformed, cracked or swollen.

    3. Check that 3 and 4 are not stuck together.

    4. Apply engine coolant to rubber packings 2 and 3 before using the radiator cap tester.


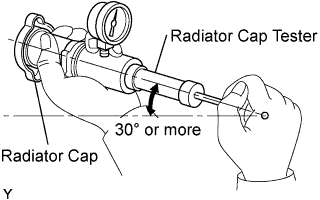
    5. A104601E03
    6. When using the cap tester, tilt it to 30° or more above the horizontal.

    7. Pump the cap tester several times, and check the maximum pressure*.

      Pump speed:
      1 pump per second

      *: Even if the cap cannot maintain the maximum pressure, it is not a defect.

      Judgment criterion:
      Item
      Specified Condition
      Standard value
      (for brand-new cap)
      93.3 to 122.7 kPa (0.95 to 1.25 kgf/cm2, 13.5 to 17.8 psi)
      Minimum standard value
      (for used cap)
      78.5 kPa (0.8 kgf/cm2, 11.4 psi)

      If the maximum pressure is less than the minimum standard value, replace the radiator cap sub-assembly.


    A106572
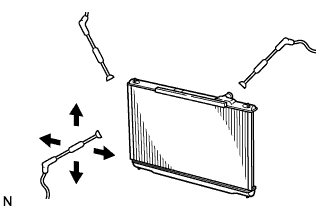
  1. Check that the radiator and condenser are not blocked with leaves, dirt, or insects. Clean the hose connections.
    If the fins are blocked, wash them with water or a steam cleaner.

    CAUTION:
    1. If the distance between the steam cleaner and core is too close, the fins may be damaged.
    2. Keep the following injection distance.
      Injection Distance
      Injection Pressure
      300 mm (11.81 in.)
      2942 to 4903 kPa (30 to 50 kgf*cm2, 427 to 711 psi)
      500 mm (19.69 in.)
      4903 to 7845 kPa (50 to 80 kgf*cm2, 711 to 1138 psi)
    3. If the fins are bent, straighten them with a screwdriver or pliers.
    4. Never apply water directly onto the electric components.

  1. Dry the fins with compressed air.