Home › HEATER & AIR CONDITIONING SYSTEM › AIR CONDITIONING › AIR CONDITIONING SYSTEM (for Automatic Air Conditioning System)

DTC    B1498/98    Communication Malfunction (A/C Inverter Local)

for Preparation Click here


DESCRIPTION

The hybrid vehicle control ECU and compressor with motor assembly transmit information to one another via a communication line. Compressor control is stopped and the DTC is output if communication information is cut off or abnormal information occurs.
The DTC is also detected if high-voltage power supplied from the inverter with converter assembly to the compressor control circuit is shut off.
The output DTC is memorized as previous trouble.

CAUTION:
  1. Wear electrically insulated gloves and pull out the service plug grip before inspection as procedures may require disconnecting high-voltage connectors. Be sure to carry the removed service plug grip to prevent other technicians from accidentally reinstalling it.
  2. Do not touch the high-voltage connectors or terminals for 5 minutes after the service plug grip is removed.
  3. When working or high voltage wiring or components, be sure to follow all safety precautions listed in the HYBRID VEHICLE CONTROL section (Click here).
  4. After removing the service plug grip, turning the power switch on (READY) may cause a malfunction. Do not turn the power switch on (READY) unless instructed by the repair manual.

NOTICE:
Depending on the timing of the power supply to the 12 V power supply circuit and high-voltage circuit when the power switch is turned on (READY), an abnormal information signal may be output, causing this DTC to be stored. If the output DTC is a code that was memorized in the past, check the fuses and wire harnesses. If there is no malfunction, erase the DTC.


DTC No.
DTC Detection Condition
Trouble Area
B1498/98
  1. Error or open in communication line between the hybrid vehicle control ECU and the compressor with motor assembly
  1. High-voltage power source is shut off.
  1. Harness or connector between hybrid vehicle control ECU, compressor with motor assembly, and body ground
  2. Hybrid vehicle control ECU
  3. Compressor with motor assembly
  4. Inverter with converter assembly
  5. Engine wire No. 4
  6. Electric vehicle fuse
  7. CAN communication system
  8. Hybrid control system

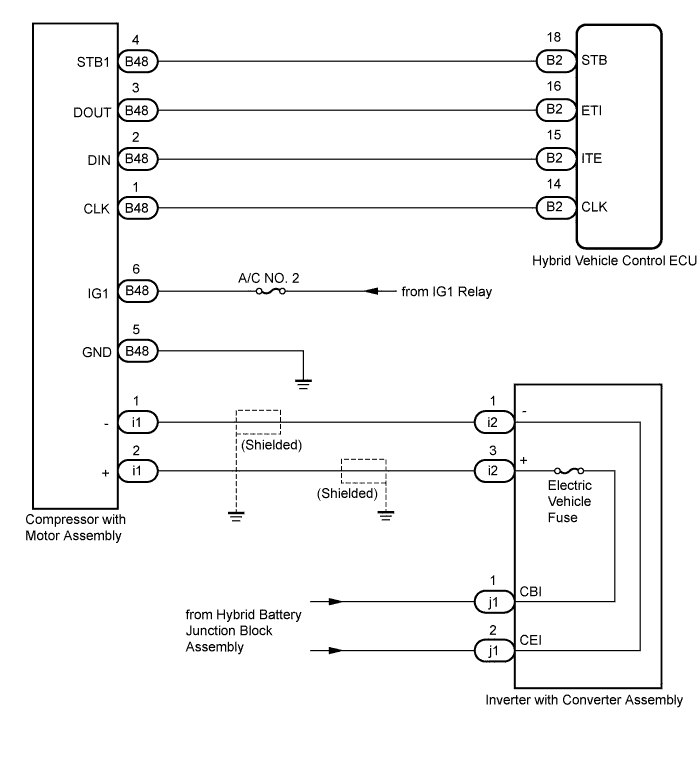
WIRING DIAGRAM


E158954E03


INSPECTION PROCEDURE

CAUTION:
  1. Wear electrically insulated gloves and pull out the service plug grip before inspection as procedures may require disconnecting high-voltage connectors. Be sure to carry the removed service plug grip to prevent other technicians from accidentally reinstalling it.
  2. Do not touch the high-voltage connectors or terminals for 5 minutes after the service plug grip is removed.
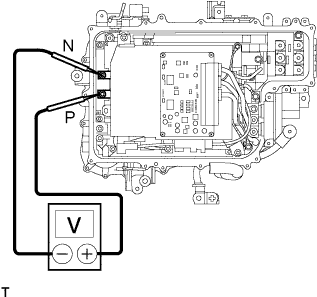
  3. Verify that the voltage of the inverter with converter assembly is OV before working inside the inverter with converter assembly.

NOTICE:
Depending on the timing of the power supply to the 12 V power supply circuit and high-voltage circuit when the power switch is turned on (READY), an abnormal information signal may be output, causing this DTC to be stored. If the output DTC is a code that was memorized in the past, check the fuses and wire harnesses. If there is no malfunction, erase the DTC.

1.CHECK CAN COMMUNICATION SYSTEM
  1. Using the Techstream, check if the CAN communication system is functioning normally.

    Result:
    Result
    Proceed to
    CAN DTC is not output
    A
    CAN DTC is output
    B


B
GO TO CAN COMMUNICATION SYSTEM (Click here)
A


2.CHECK FOR DTC
  1. Check if DTCs for the hybrid control system are output using the Techstream.


Result:

Result
Proceed to
DTC is not output
A
Only DTC P3108 is output
A
DTCs other than P3108 are output
B


B
GO TO HYBRID CONTROL SYSTEM (Click here)
A


3.INSPECT FUSE (A/C NO. 2)
  1. Remove the A/C No. 2 fuse from the instrument panel junction block.

  1. Measure the resistance according to the value(s) in the table below.

    Standard resistance:

    Tester Item
    Condition
    Specified Condition
    A/C No. 2 fuse
    Always
    Below 1 Ω


NG
REPLACE FUSE (A/C NO. 2)
OK


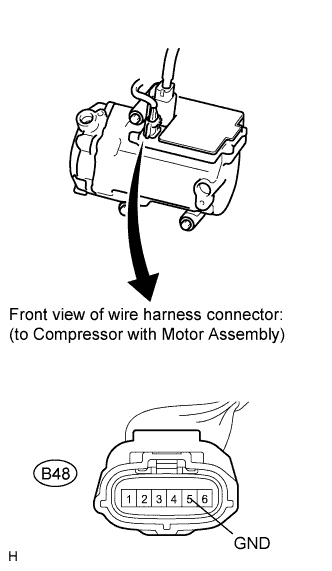
4.CHECK HARNESS AND CONNECTOR (COMPRESSOR WITH MOTOR ASSEMBLY - BODY GROUND)


    E109279E09
  1. Disconnect the connector from the compressor with motor assembly.

    CAUTION:
    Do not disconnect the connector on the high-voltage side.

  1. Measure the resistance according to the value(s) in the table below.

    Standard resistance:
    Tester Connection
    (Symbols)
    Condition
    Specified Condition
    B48-5 (GND) - Body ground
    Always
    Below 1 Ω


NG
REPAIR OR REPLACE HARNESS OR CONNECTOR
OK


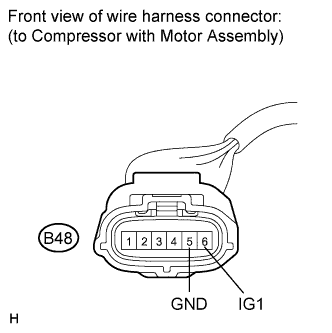
5.CHECK HARNESS AND CONNECTOR (IG1 - GND)


    E130383E05
  1. Turn the power switch on (IG).

  1. Measure the voltage according to the value(s) in the table below.

    Standard voltage:
    Tester Connection
    (Symbols)
    Switch Condition
    Specified Condition
    B48-6 (IG1) - B48-5 (GND)
    Power switch on (IG)
    11 to 14 V
    B48-6 (IG1) - B48-5 (GND)
    Power switch off
    Below 1 V


NG
REPAIR OR REPLACE HARNESS OR CONNECTOR
OK


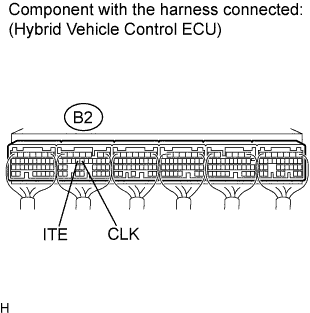
6.CHECK HARNESS AND CONNECTOR (HYBRID VEHICLE CONTROL ECU - COMPRESSOR WITH MOTOR ASSEMBLY)
  1. Disconnect the connector from the hybrid vehicle control ECU.
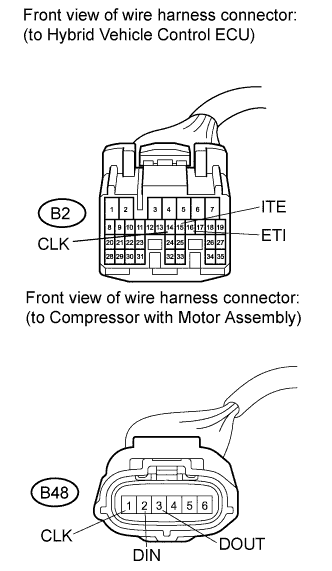


    E160222E07
  1. Measure the resistance according to the value(s) in the table below.

    Standard resistance:
    Tester Connection
    (Symbols)
    Condition
    Specified Condition
    B48-1 (CLK) - B2-14 (CLK)
    Always
    Below 1 Ω
    B48-2 (DIN) - B2-15 (ITE)
    Always
    Below 1 Ω
    B48-3 (DOUT) - B2-16 (ETI)
    Always
    Below 1 Ω
    B48-1 (CLK) - Body ground
    Always
    10 kΩ or higher
    B48-2 (DIN) - Body ground
    Always
    10 kΩ or higher
    B48-3 (DOUT) - Body ground
    Always
    10 kΩ or higher


NG
REPAIR OR REPLACE HARNESS OR CONNECTOR
OK


7.INSPECT ELECTRIC VEHICLE FUSE
  1. Turn the power switch off.

  1. Remove the service plug grip.

    CAUTION:
    1. Be sure to wear insulated gloves.
    2. Do not touch the high-voltage connectors or terminals for 5 minutes after the service plug grip is removed.

    NOTICE:
    After removing the service plug grip, turning the power switch on (READY) may cause a malfunction. Do not turn the power switch on (READY) unless instructed by the repair manual.


    A108528E01
  1. Remove the inverter cover assembly.

    CAUTION:
    1. Be sure to wear insulated gloves.
    2. Verify that the voltage of the inverter with converter assembly is 0V before working inside the inverter with converter assembly.

    NOTICE:
    Be sure to prevent foreign objects or liquid from entering the inverter with converter assembly.


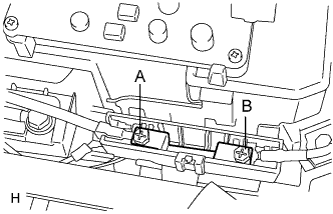
    E110725E01
  1. Check that bolts A and B are tightened securely.

  1. Measure the resistance according to the value(s) in the table below.

    Standard resistance:

    Tester Item
    (Tester Connection)
    Condition
    Specified Condition
    ELECTRIC VEHICLE fuse
    (A - B)
    Always
    Below 1 Ω


NG
REPLACE ELECTRIC VEHICLE FUSE
OK


8.INSPECT INVERTER WITH CONVERTER ASSEMBLY

CAUTION:
  1. Be sure to wear insulated gloves.
  2. Do not touch the high-voltage connectors or terminals for 5 minutes after the service plug grip is removed.


    E160598E01
  1. Disconnect the connector from the inverter with converter assembly.

  1. Measure the resistance according to the value(s) in the table below.

    Standard resistance:
    Tester Connection
    (Symbols)
    Condition
    Specified Condition
    B-3 - 1
    Always
    Below 1 Ω
    B-1 - 2
    Always
    Below 1 Ω


NG
REPLACE INVERTER WITH CONVERTER ASSEMBLY
OK


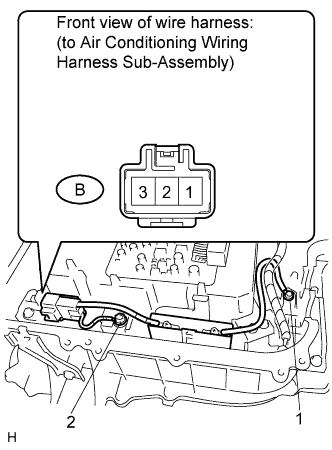
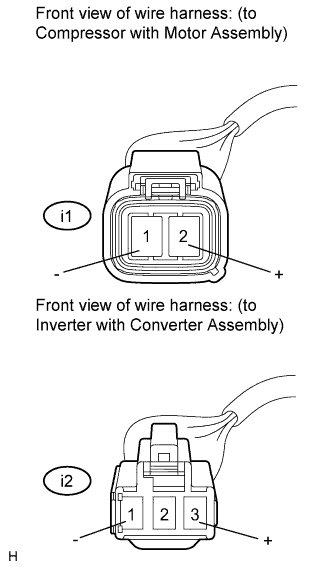
9.INSPECT NO. 4 ENGINE WIRE


    E160589E02
  1. Disconnect the connector from the No. 4 engine wire.

    CAUTION:
    Be sure to wear insulated gloves.

  1. Measure the resistance according to the value(s) in the table below.

    Standard resistance:
    Tester Connection
    (Symbols)
    Condition
    Specified Condition
    i1-1 (-) - i2-1 (-)
    Always
    Below 1 Ω
    i1-2 (+) - i2-3 (+)
    Always
    Below 1 Ω
    i1-1 (-) - i1-2 (+)
    Always
    10 kΩ or higher


NG
REPLACE NO. 4 ENGINE WIRE
OK


10.INSPECT COMPRESSOR WITH MOTOR ASSEMBLY


    E108916E21
  1. Reconnect the connector to the compressor with motor assembly.

  1. Turn the power switch on (IG).


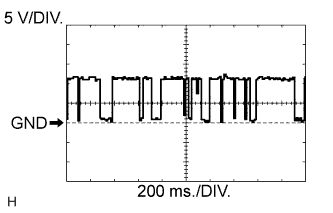
  1. Measure the waveform according to the following tables.
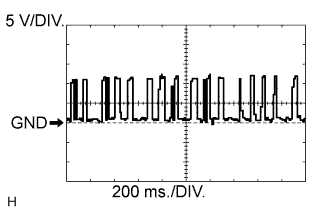


      E110722E01
    1. CLK - Body ground

      Standard:
      Tester Connection
      (Symbols)
      Switch Condition
      Specified Condition
      B2-18 (CLK) - Body ground
      Power switch on (IG)
      Pulse generation

      Item
      Contents
      Tool Setting
      5 V/DIV., 200 ms./DIV.
      Vehicle Condition
      Power switch on (IG)

      HINT:
      Waveform cycle varies with the communication contents.


    2. E110723E02
    3. ITE - Body ground

      Standard:
      Tester Connection
      (Symbols)
      Switch Condition
      Specified Condition
      B2-20 (ITE) - Body ground
      Power switch on (IG)
      Pulse generation

      Item
      Contents
      Tool Setting
      5 V/DIV., 200 ms./DIV.
      Vehicle Condition
      Power switch on (IG)

      HINT:
      Waveform cycle varies with the communication contents.


NG
REPLACE COMPRESSOR WITH MOTOR ASSEMBLY
OK

REPLACE HYBRID VEHICLE CONTROL ECU