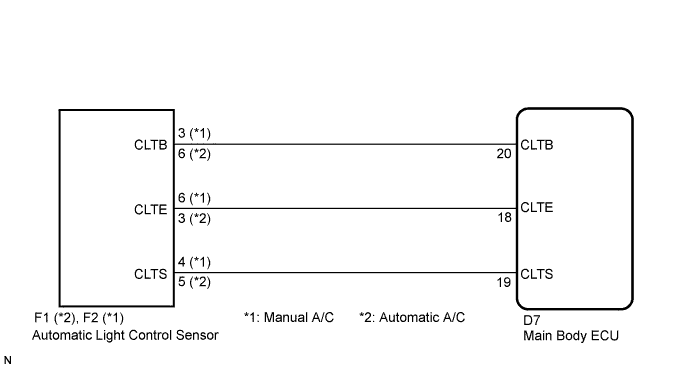
DTC B1244 Light Sensor Circuit Malfunction |
| DTC No. | DTC Detecting Condition | Trouble Area |
| B1244 |
|
|
| 1.READ VALUE USING TECHSTREAM |
Connect the Techstream to the DLC3.
Turn the power switch on (IG).
Turn the Techstream on.
Enter the following menus: Body Electrical / Main Body / Data List.
Read the display on the Techstream.
| Tester Display | Measurement Item/Range | Normal Condition | Diagnostic Note |
| Illumination Rate | Illumination rate information / 0 ms to 99.99 ms | Value is output according to ambient light levels | - |
|
| ||||
| OK | ||
 | ||
| ||
| 2.CHECK HARNESS AND CONNECTOR (MAIN BODY ECU - AUTOMATIC LIGHT CONTROL SENSOR) |
for Manual A/C
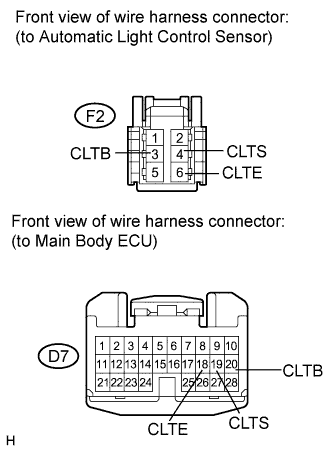 |
Disconnect the F2 automatic light control sensor connector.
Disconnect the D7 main body ECU connector.
Measure the resistance according to the value(s) in the table below.
| Tester Connection | Condition | Specified Condition |
| D7-18 (CLTE) - F2-6 (CLTE) | Always | Below 1 Ω |
| D7-19 (CLTS) - F2-4 (CLTS) | Always | Below 1 Ω |
| D7-20 (CLTB) - F2-3 (CLTB) | Always | Below 1 Ω |
| D7-18 (CLTE) - Body ground | Always | 10 kΩ or higher |
| D7-19 (CLTS) - Body ground | Always | 10 kΩ or higher |
| D7-20 (CLTB) - Body ground | Always | 10 kΩ or higher |
for Automatic A/C
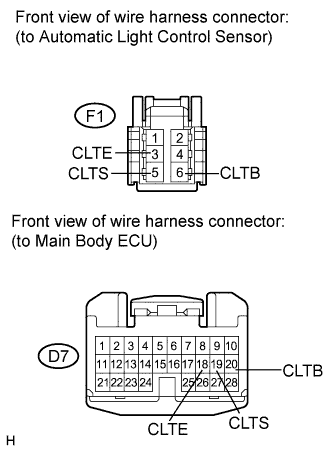 |
Disconnect the F1 automatic light control sensor connector.
Disconnect the D7 main body ECU connector.
Measure the resistance according to the value(s) in the table below.
| Tester Connection | Condition | Specified Condition |
| D7-18 (CLTE) - F1-3 (CLTE) | Always | Below 1 Ω |
| D7-19 (CLTS) - F1-5 (CLTS) | Always | Below 1 Ω |
| D7-20 (CLTB) - F1-6 (CLTB) | Always | Below 1 Ω |
| D7-18 (CLTE) - Body ground | Always | 10 kΩ or higher |
| D7-19 (CLTS) - Body ground | Always | 10 kΩ or higher |
| D7-20 (CLTB) - Body ground | Always | 10 kΩ or higher |
|
| ||||
| OK | |
 |
| 3.INSPECT MAIN BODY ECU (INSTRUMENT PANEL JUNCTION BLOCK ASSEMBLY ) |
Reconnect the main body ECU connector.
Measure the voltage and resistance according to the value(s) in the table below.
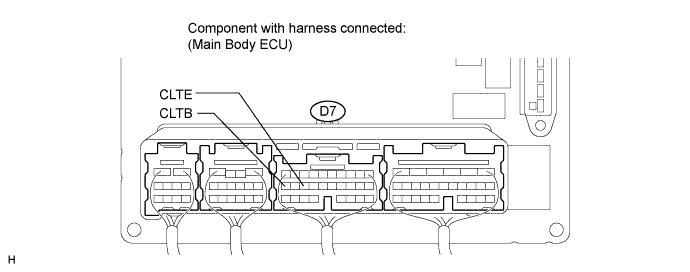
| Tester Connection | Condition | Specified Condition |
| D7-20 (CLTB) - D7-18 (CLTE) | Power switch off | Below 1 V |
| Power switch on (IG) | 11 to 14 V |
| Tester Connection | Condition | Specified Condition |
| D7-18 (CLTE) - Body ground | Always | Below 1 Ω |
|
| ||||
| OK | |
|
| 4.INSPECT AUTOMATIC LIGHT CONTROL SENSOR |
for Manual A/C:
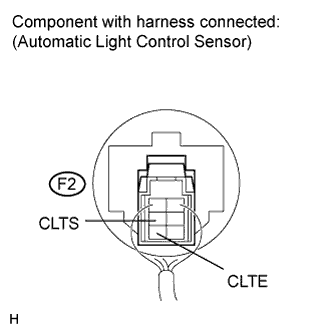 |
Reconnect the automatic light control sensor connector.
Connect an oscilloscope to the automatic light control sensor connector.
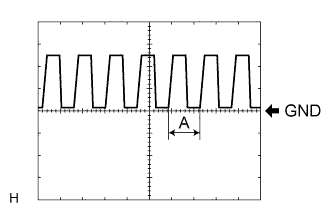 |
Check the waveform.
| Tester Connection | Tool Setting | Condition | Specified Condition |
| F2-6 (CLTE) - F2-4 (CLTS) | 5 V/DIV., 5 ms./DIV. | Power switch on (IG), light control switch in AUTO | Correct waveform is as shown |
for Automatic A/C:
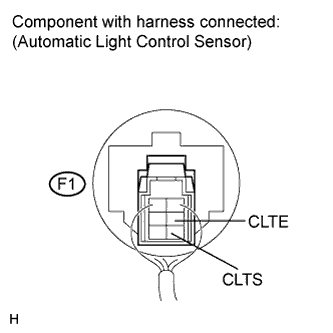 |
Reconnect the automatic light control sensor connector.
Connect an oscilloscope to the automatic light control sensor connector.
|
Check the waveform.
| Tester Connection | Tool Setting | Condition | Specified Condition |
| F1-3 (CLTE) - F1-5 (CLTS) | 5 V/DIV., 5 ms./DIV. | Power switch on (IG), light control switch in AUTO | Correct waveform is as shown |
|
| ||||
| OK | ||
| ||
| ||

