 |
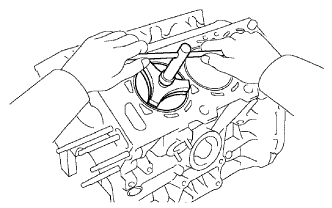
Using a ridge reamer, remove all the carbon from the top of the cylinder.
CYLINDER BLOCK > DISASSEMBLY |
| 1. REMOVE CYLINDER BLOCK WATER DRAIN COCK SUB-ASSEMBLY |
Remove the water drain cock sub-assembly from the cylinder block.
| 2. REMOVE WATER SEAL PLATE |
Remove the 2 nuts and water seal plate from the cylinder block.
| 3. REMOVE NO. 1 CYLINDER BLOCK WITH HEAD STRAIGHT SCREW PLUG |
Using a 10 mm socket hexagon wrench, remove the No. 1 straight screw plug and gasket.
| 4. REMOVE NO. 2 CYLINDER BLOCK WITH HEAD STRAIGHT SCREW PLUG |
Using a 10 mm socket hexagon wrench, remove the No. 2 straight screw plug and gasket.
| 5. REMOVE NO. 3 CYLINDER BLOCK WITH HEAD STRAIGHT SCREW PLUG |
Using a 10 mm socket hexagon wrench, remove the No. 3 straight screw plug and gasket.
| 6. REMOVE PISTON SUB-ASSEMBLY WITH CONNECTING ROD |
Check that the matchmarks on the connecting rod sub-assembly and connecting rod cap are aligned.
Remove the 2 connecting rod cap bolts.
Using the 2 removed connecting rod cap bolts, remove the connecting rod cap and lower bearing by wiggling the connecting rod cap right and left.
|
Using a ridge reamer, remove all the carbon from the top of the cylinder.
Push the piston, connecting rod assembly and upper bearing through the top of the cylinder block.
| 7. REMOVE CONNECTING ROD BEARING |
| 8. REMOVE PISTON RING SET |
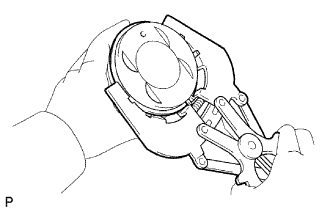 |
Using a piston ring expander, remove the 2 compression rings.
Remove the oil ring expander and 2 side rails by hand.
| 9. REMOVE PISTON SUB-ASSEMBLY WITH PIN |
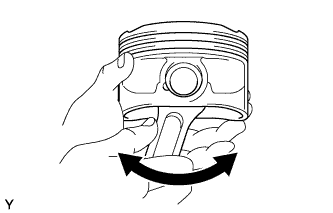 |
Check the fitting condition between the piston and piston pin.
Try to move the piston back and forth on the piston pin.
If any movement is felt, replace the piston and pin as a set.
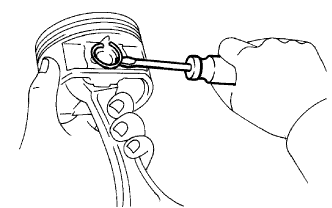 |
Disconnect the connecting rod from the piston.
Using a screwdriver, pry off the piston pin hole snap rings from the piston.
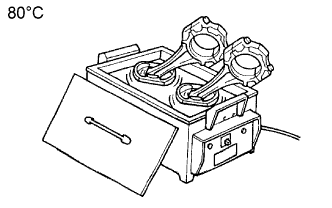 |
Gradually heat the piston to approximately 80°C (176°F).
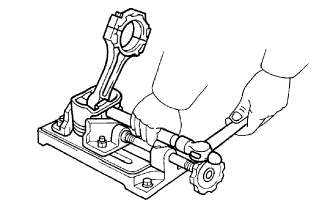 |
Using a brass bar and plastic hammer, lightly tap out the piston pin and remove the connecting rod sub-assembly.
Using a gasket scraper, remove the carbon from the piston top.
Using a groove cleaning tool or broken ring, clean the piston ring grooves.
Using solvent and a brush, thoroughly clean the piston.
| 10. REMOVE CONNECTING ROD SMALL END BUSH |
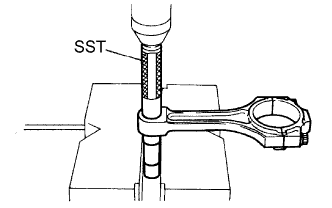 |
Using SST and a press, press out the bushing.
| 11. REMOVE CRANKSHAFT |
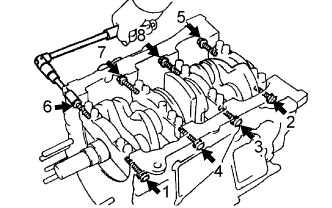 |
Using several steps, loosen and remove the 8 main bearing cap bolts and seal washers uniformly in the sequence shown in the illustration.
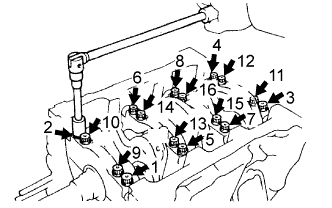 |
Using several steps, loosen and remove the 16 main bearing cap bolts uniformly in the sequence shown in the illustration.
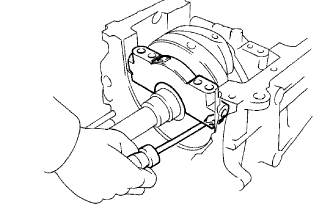 |
Using a screwdriver, pry out the main bearing caps. Remove the 4 main bearing caps and the lower bearings.
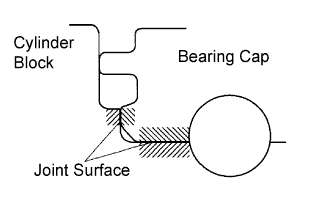 |
Check the damaged the joint surface of the cylinder block and the main bearing cap.
| 12. REMOVE CRANKSHAFT BEARING |
Remove the upper crankshaft bearing and lower crankshaft bearing.
| 13. REMOVE CRANKSHAFT THRUST WASHER SET |
Remove the crankshaft thrust washer set.
| 14. REMOVE STUD BOLTS |
| 15. REMOVE STRAIGHT PINS |
| 16. REMOVE RING PINS |