 |
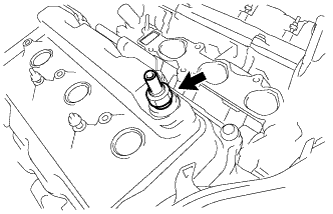
Remove the ventilation valve sub-assembly.
ENGINE UNIT > DISASSEMBLY |
| 1. REMOVE SPARK PLUG |
Remove the 6 spark plugs.
| 2. REMOVE VENTILATION VALVE SUB-ASSEMBLY |
|
Remove the ventilation valve sub-assembly.
| 3. REMOVE OIL FILLER CAP SUB-ASSEMBLY |
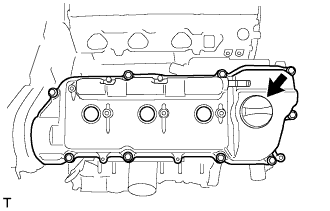 |
Remove the oil filler cap sub-assembly.
| 4. REMOVE OIL FILLER CAP GASKET |
Remove the oil filler cap gasket.
| 5. REMOVE CYLINDER HEAD COVER SUB-ASSEMBLY |
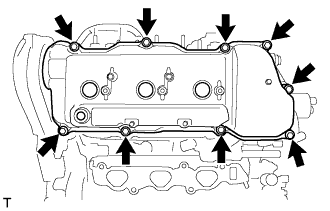 |
Remove the 9 bolts and cylinder head cover sub-assembly.
| 6. REMOVE CYLINDER HEAD COVER GASKET |
Remove the cylinder head cover gasket.
| 7. REMOVE CYLINDER HEAD COVER SUB-ASSEMBLY LH |
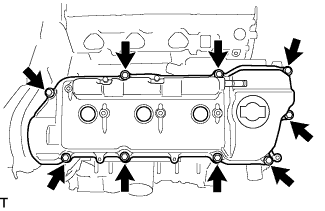 |
Remove the 9 bolts and cylinder head cover sub-assembly LH.
| 8. REMOVE NO. 2 CYLINDER HEAD COVER GASKET |
Remove the cylinder head cover gasket No. 2.
| 9. REMOVE CAMSHAFT TIMING OIL CONTROL VALVE ASSEMBLY |
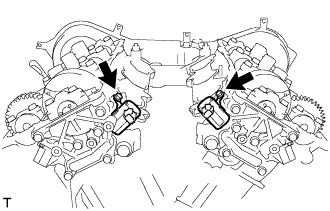 |
Remove the 2 bolts and 2 camshaft timing oil control valve assemblies from the cylinder heads.
Remove the O-ring from each camshaft timing oil control valve assembly.
| 10. REMOVE VVT SENSOR |
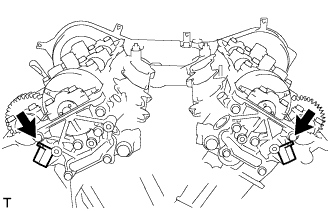 |
Remove the 2 bolts and 2 VVT sensors.
| 11. REMOVE OIL LEVEL DIPSTICK SUB-ASSEMBLY |
Remove the oil level dipstick sub-assembly from the oil level dipstick guide.
| 12. REMOVE OIL LEVEL DIPSTICK GUIDE |
Remove the bolt and oil level dipstick guide.
Remove the O-ring from the oil level dipstick guide.
| 13. REMOVE CRANKSHAFT PULLEY |
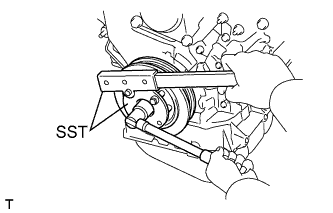 |
Using SST, loosen the pulley bolt.
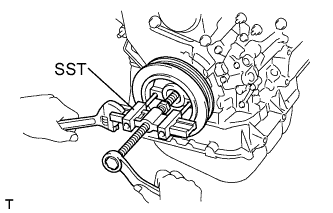 |
Using SST and the pulley bolt, remove the pulley.
| 14. REMOVE NO. 1 TIMING BELT COVER |
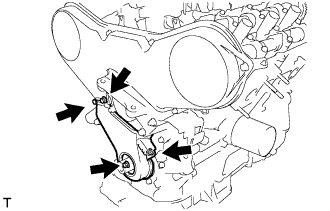 |
Remove the 4 bolts and No. 1 timing belt cover.
| 15. REMOVE NO. 2 TIMING BELT COVER |
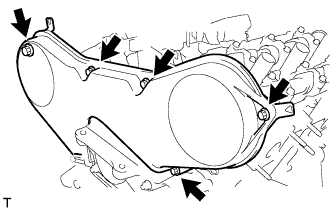 |
Remove the 5 bolts and No. 2 timing belt cover.
| 16. REMOVE ENGINE MOUNTING BRACKET RH |
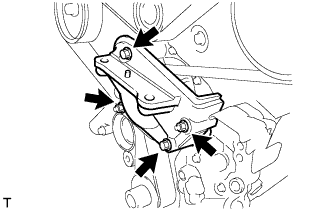 |
Remove the 2 bolts, 2 nuts, and engine mounting bracket RH from the water pump assembly.
| 17. REMOVE NO. 2 TIMING BELT GUIDE |
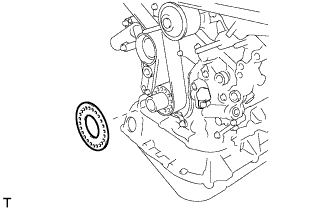 |
Remove the No. 2 timing belt guide from the crankshaft.
| 18. REMOVE TIMING BELT |
Set the No. 1 cylinder to TDC/compression.
Temporarily install the crankshaft pulley bolt and washer to the crankshaft.
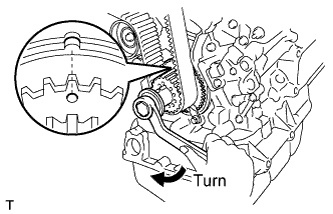 |
Turn the crankshaft clockwise, and align the timing marks of the crankshaft timing pulley with the oil pump body.
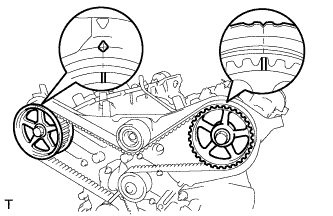 |
Check that timing marks of the camshaft timing pulleys and No. 3 timing belt cover are aligned.
Remove the crankshaft pulley bolt.
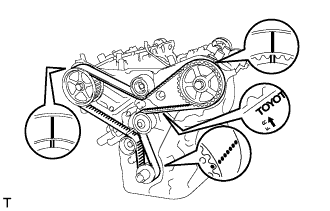 |
If reusing the timing belt, check that there are 4 installation marks on the timing belt as shown in the illustration.
If the installation marks have disappeared, put new installation marks on the timing belt before removing.
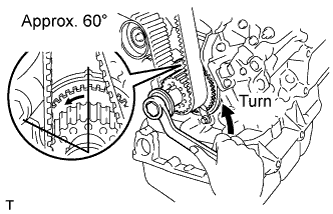 |
Set the No. 1 cylinder to approximately 60° BTDC/ compression.
Turn the crankshaft counterclockwise by approximately 60°.
Remove the timing belt tensioner.
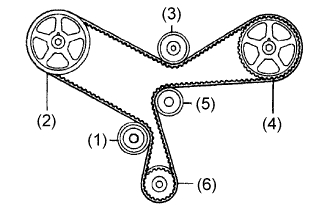 |
Remove the timing belt in the following order.
| 1st | No. 1 idler pulley |
| 2nd | RH camshaft timing pulley |
| 3rd | No. 2 idler pulley |
| 4th | LH camshaft timing pulley |
| 5th | Water pump pulley |
| 6th | Crankshaft timing pulley |
| 19. REMOVE NO. 1 TIMING BELT IDLER SUB-ASSEMBLY |
Using a 10 mm socket hexagon wrench, remove the pivot bolt, timing belt idler No. 1 and distributor drive gear plate washer.
| 20. REMOVE NO. 2 TIMING BELT IDLER SUB-ASSEMBLY |
Remove the bolt and No. 2 timing belt idler sub-assembly.
| 21. REMOVE CRANKSHAFT POSITION SENSOR |
Remove the bolt and crankshaft position sensor.
| 22. REMOVE CAMSHAFT TIMING PULLEY |
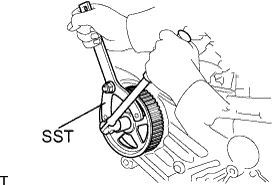 |
Using SST, remove the bolt and the RH timing pulley.
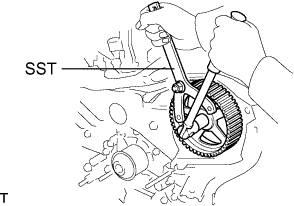 |
Using SST, remove the bolt and the LH timing pulley.
| 23. REMOVE NO. 3 TIMING BELT COVER |
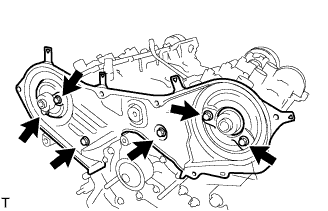 |
Remove the 6 bolts and No. 3 timing belt cover.
Remove the 6 collars and 6 bushings from the No. 3 timing belt cover.
| 24. REMOVE TIMING BELT IDLER BRACKET |
Remove the 2 bolts and timing belt idler bracket.
| 25. REMOVE CRANKSHAFT TIMING PULLEY |
Remove the bolt and the timing belt plate.
Install the pulley bolt to the crankshaft.
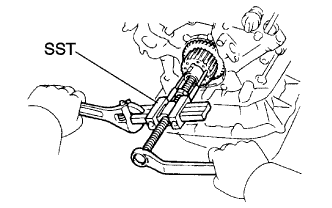 |
Using SST, remove the crankshaft timing pulley.
| 26. REMOVE WATER PUMP ASSEMBLY |
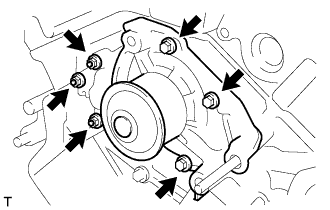 |
Remove the 3 bolts and 3 nuts, then remove the water pump and the gasket.
| 27. REMOVE CAMSHAFT |
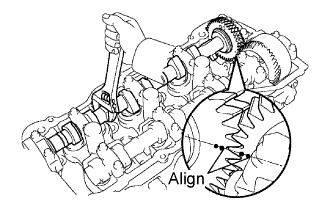 |
Align the timing marks (2-dot mark) of the camshaft drive and the driven gears by turning the camshaft with a wrench.
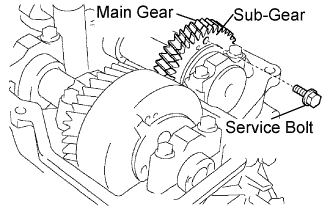 |
Secure the exhaust camshaft sub-gear to the main gear with a service bolt.
| Thread diameter | 6.0 mm (0.236 in.) |
| Thread pitch | 1.0 mm (0.039 in.) |
| Bolt length | 16 to 20 mm (0.63 to 0.79 in.) |
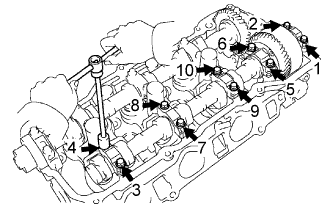 |
Using several steps, loosen and remove the 10 bearing cap bolts uniformly in the sequence shown in the illustration. Remove the 5 bearing caps and the camshaft.
| 28. REMOVE NO. 2 CAMSHAFT |
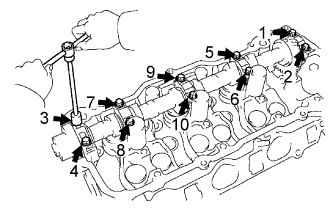 |
Using several steps, loosen and remove the 10 bearing cap bolts uniformly in the sequence shown in the illustration. Remove the 5 bearing caps and the No. 2 camshaft.
Remove the oil seal from the No. 2 camshaft.
| 29. REMOVE NO. 3 CAMSHAFT SUB-ASSEMBLY |
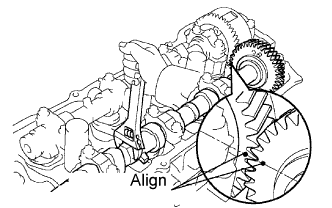 |
Align the timing marks (1-dot mark) of the camshaft drive and the driven gears by turning the camshaft with a wrench.
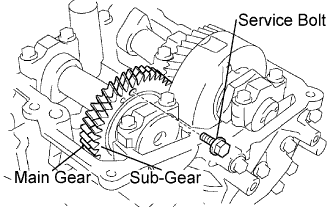 |
Secure the exhaust camshaft sub-gear to the main gear with a service bolt.
| Thread diameter | 6.0 mm (0.236 in.) |
| Thread pitch | 1.0 mm (0.039 in.) |
| Bolt length | 16 to 20 mm (0.63 to 0.79 in.) |
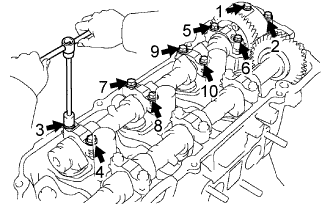 |
Using several steps, loosen and remove the 10 bearing cap bolts uniformly in the sequence shown in the illustration. Remove the 5 bearing caps and the No. 3 camshaft.
| 30. REMOVE NO. 4 CAMSHAFT SUB-ASSEMBLY |
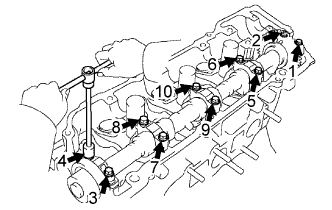 |
Using several steps, loosen and remove the 10 bearing cap bolts uniformly in the sequence shown in the illustration. Remove the 5 bearing caps and the No. 4 camshaft.
Remove the oil seal from the No. 4 camshaft.
| 31. INSPECT CAMSHAFT TIMING GEAR ASSEMBLY |
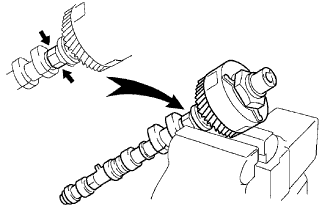 |
Clamp the camshaft in a vise on the hexagonal lobe.
Check that the VVT-i does not turn.
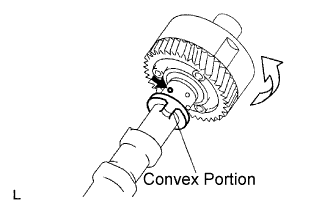 |
Cover all the oil ports with vinyl tape except the port on the advance angle side (nearest to the convex portion) shown in the illustration.
Apply about 100 kPa (1 kgf/cm2, 14 psi) of air pressure to the port on the advance angle side.
Turn the VVT-i to the advance angle side (the white arrow marked direction in the illustration) by hand.
Check that the VVT-i moves freely within about 30° range. Do not move the VVT-i unit to the most retard angle position as the lock-pin will be engaged again.
Turn the VVT-i by hand and lock it at the most retard angle position.
| 32. REMOVE CAMSHAFT TIMING GEAR ASSEMBLY |
|
Clamp the camshaft in a vise on the hexagonal lobe.
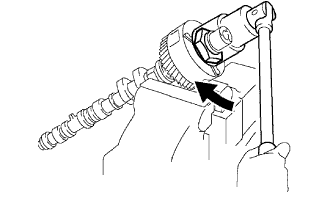 |
Using a 46 mm socket wrench, remove the lock nut by turning it clockwise.
Remove the camshaft VVT-i.
| 33. REMOVE CAMSHAFT SUB GEAR |
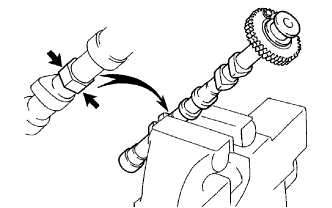 |
Clamp the camshaft in a vise on the hexagonal lobe.
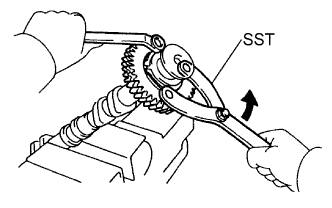 |
Using SST, turn the sub-gear counterclockwise, and remove the service bolt.
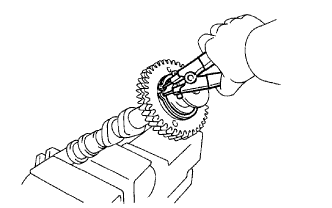 |
Using snap ring pliers, remove the snap ring.
Remove the wave washer, camshaft sub-gear and camshaft gear bolt washer.
| 34. REMOVE NO. 2 ENGINE HANGER |
Remove the 2 bolts and No. 2 engine hanger from the cylinder head.
| 35. REMOVE REAR CYLINDER HEAD COVER |
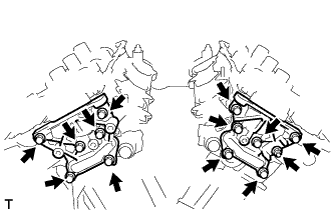 |
Remove the 12 bolts, nut and rear cylinder head cover from the cylinder head.
| 36. REMOVE OIL CONTROL VALVE FILTER |
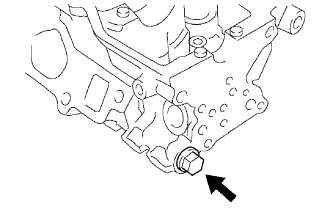 |
Remove the plug, gasket and valve filter.
| 37. REMOVE CYLINDER HEAD SUB-ASSEMBLY |
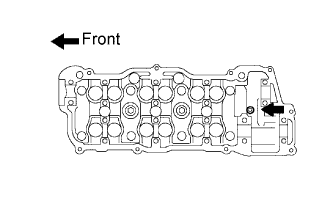 |
Using an 8 mm socket hexagon wrench, remove the hexagon bolt.
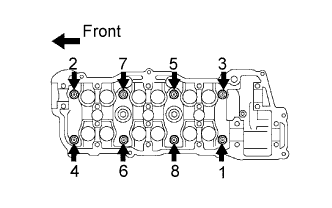 |
Using several steps, loosen the 8 cylinder head bolts uniformly in the sequence shown in the illustration. Remove the 8 cylinder head bolts and plate washers.
| 38. REMOVE CYLINDER HEAD GASKET |
Remove the cylinder head gasket from the cylinder block.
| 39. REMOVE CYLINDER HEAD LH |
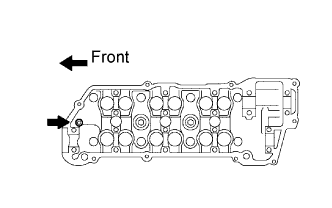 |
Using an 8 mm socket hexagon wrench, remove the hexagon bolt.
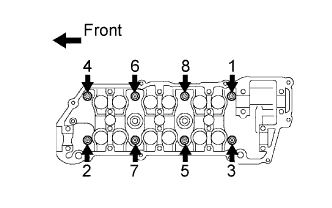 |
Using several steps, loosen the 8 cylinder head bolts uniformly in the sequence shown in the illustration. Remove the 8 cylinder head bolts and plate washers.
| 40. REMOVE NO. 2 CYLINDER HEAD GASKET |
Remove the No. 2 cylinder head gasket from the cylinder block.
| 41. REMOVE INLET WATER HOUSING |
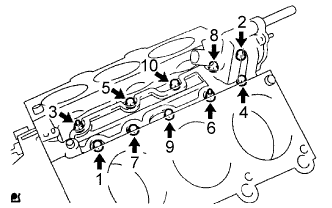 |
Remove the 8 bolts and 2 nuts, then remove the inlet water housing.
| 42. REMOVE OIL FILTER SUB-ASSEMBLY |
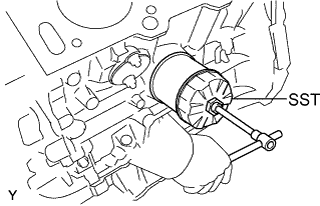 |
Using SST, remove the oil filter.
Using a 12 mm socket hexagon wrench, remove the oil filter union.
| 43. REMOVE OIL PAN DRAIN PLUG |
Remove the oil pan drain plug and gasket.
| 44. REMOVE NO. 2 OIL PAN SUB-ASSEMBLY |
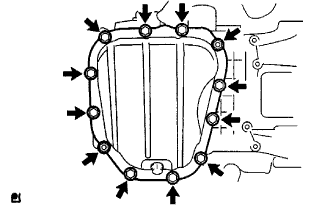 |
Remove the 10 bolts and 2 nuts.
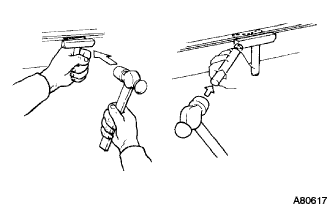 |
Insert the oil pan seal cutter blade between the oil pans. Cut through the applied sealer and remove the No. 2 oil pan sub-assembly.
| 45. REMOVE OIL STRAINER SUB-ASSEMBLY |
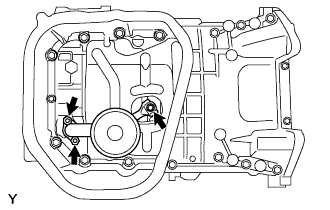 |
Remove the bolt and 2 nuts, then remove the oil strainer and the gasket.
| 46. REMOVE OIL PAN SUB-ASSEMBLY |
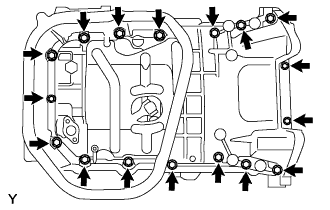 |
Loosen and remove the 17 bolts uniformly.
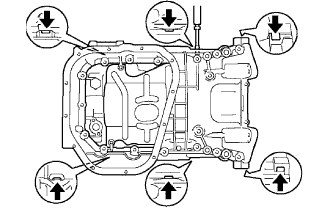 |
Using a screwdriver, remove the oil pan by prying between the cylinder block and the oil pan.
| 47. REMOVE NO. 1 OIL PAN BAFFLE PLATE |
Remove the 6 bolts and the No. 1 oil pan baffle plate from the oil pan.
| 48. REMOVE REAR ENGINE OIL SEAL RETAINER |
Remove the 6 bolts.
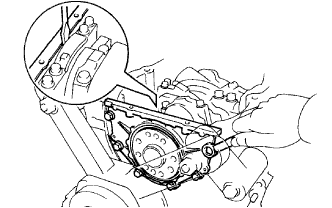 |
Using a screwdriver, remove the oil seal retainer by prying between the oil seal retainer and the main bearing cap.
| 49. REMOVE REAR ENGINE OIL SEAL |
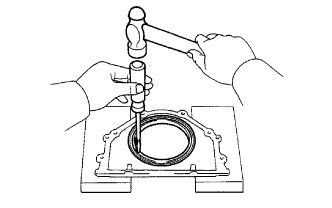 |
Using a screwdriver and a hammer, tap out the oil seal.
| 50. REMOVE OIL PUMP ASSEMBLY |
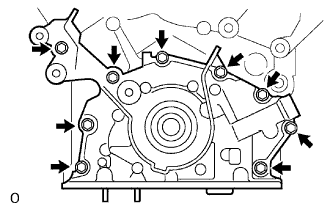 |
Remove the 9 bolts.
Using a screwdriver, remove the oil pump by prying between the oil pump and the main bearing cap.
Remove the O-ring.
| 51. REMOVE OIL PUMP SEAL |
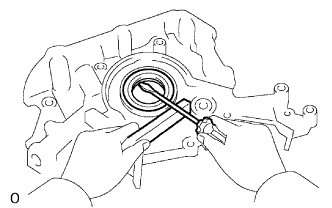 |
Using a screwdriver, pry out the oil seal.
| 52. REMOVE SPARK PLUG TUBE GASKET |
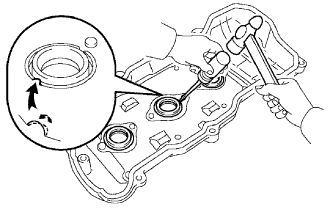 |
Bend up the tab on the ventilation baffle plate which prevents the gasket from slipping out.
Using a screwdriver and a hammer, tap out the gasket.
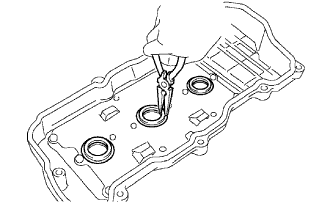 |
Using needle-nose pliers, pry out the gasket.