 |
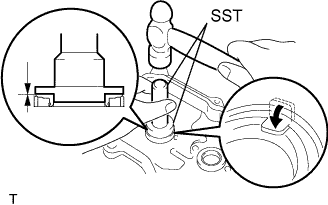
Using SST and a hammer, tap in a new gasket until its surface is flush with the upper edge of the cylinder head cover.
- SST
- 09950-60010
(09951-00430)
09950-70010 (09951-07100)
ENGINE UNIT > REASSEMBLY |
| 1. INSTALL SPARK PLUG TUBE GASKET |
|
Using SST and a hammer, tap in a new gasket until its surface is flush with the upper edge of the cylinder head cover.
Return the ventilation plate tab to its original position.
Apply a light coat of MP grease to the gasket lip.
| 2. INSTALL REAR ENGINE OIL SEAL |
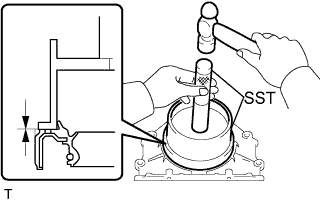 |
Using SST and a hammer, tap in a new oil seal until its surface is flush with the rear oil seal retainer edge.
Apply MP grease to the oil seal lip.
| 3. INSTALL REAR ENGINE OIL SEAL RETAINER |
Remove any old packing material from the contact surface.
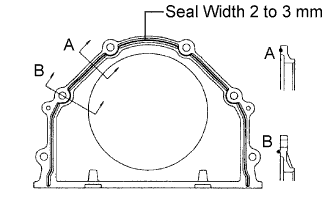 |
Apply a continuous bead of seal packing (Diameter 2 to 3 mm (0.08 to 0.12 in.)) as shown in the illustration.
Install the oil seal retainer with the 6 bolts. Tighten the bolts uniformly in several steps.
| 4. INSTALL OIL PUMP SEAL |
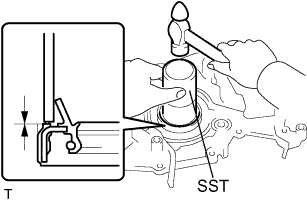 |
Using SST and a hammer, tap in a new oil seal until its surface is flush with the oil pump body edge.
Apply MP grease to the oil seal lip.
| 5. INSTALL OIL PUMP ASSEMBLY |
Remove any old packing material from the contact surface.
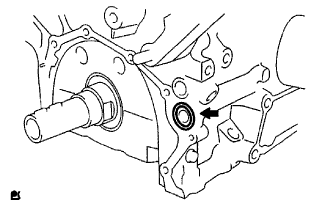 |
Apply a light coat of engine oil to a new O-ring and place it on the cylinder block.
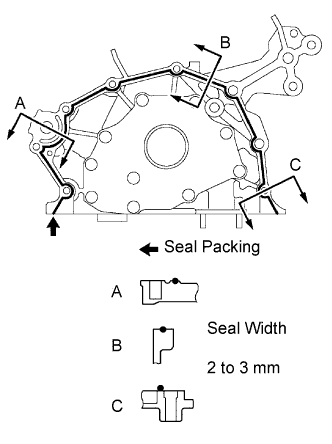 |
Apply a continuous bead of seal packing (Diameter 2 to 3 mm (0.08 to 0.12 in.)) as shown in the illustration.
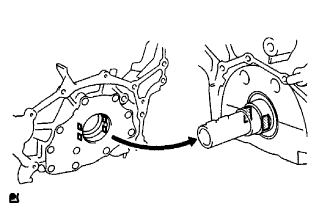 |
Align the key of the oil pump drive gear with the keyway located on the crankshaft, and slide the oil pump into place.
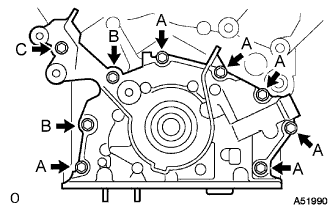 |
Install the oil pump with the 9 bolts. Tighten the bolts uniformly in several steps.
| 6. INSTALL NO. 1 OIL PAN BAFFLE PLATE |
| 7. INSTALL OIL PAN SUB-ASSEMBLY |
Remove any old seal packing from the contact surface.
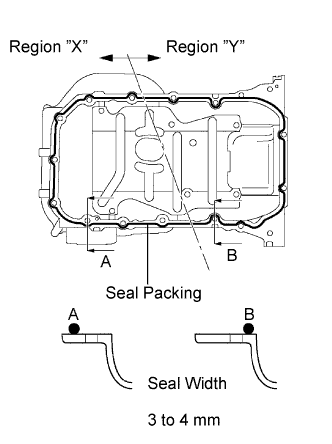 |
Apply a continuous bead of seal packing (Diameter 3 to 4 mm (0.12 to 0.16 in.)) as shown in the illustration.
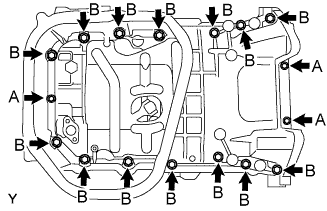 |
Install the oil pan No. 1 with the 17 bolts. Tighten the bolts uniformly in several steps.
| 8. INSTALL OIL STRAINER SUB-ASSEMBLY |
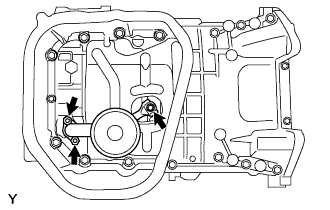 |
Install a new gasket and the oil strainer with the bolt and 2 nuts.
| 9. INSTALL NO. 2 OIL PAN SUB-ASSEMBLY |
Remove any old seal packing from the contact surface.
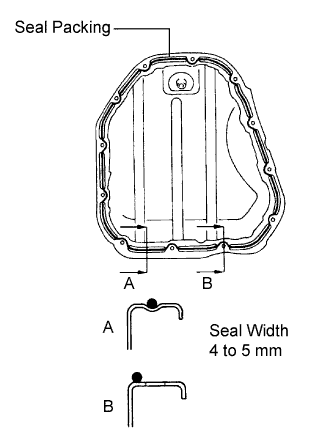 |
Apply a continuous bead of seal packing (Diameter 4 to 5 mm (0.16 to 0.20 in.)) as shown in the illustration.
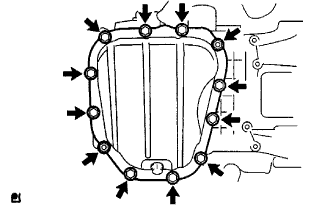 |
Install the oil pan No. 2 with the 10 bolts and 2 nuts.
| 10. INSTALL OIL PAN DRAIN PLUG |
Install the drain plug with a new gasket.
| 11. INSTALL OIL FILTER SUB-ASSEMBLY |
Using a 12 mm socket hexagon wrench, install the oil filter union.
Check and clean the oil filter installation surface.
Apply clean engine oil to the gasket of a new oil filter.
Lightly screw the oil filter into place, and tighten it until the gasket contacts the seat.
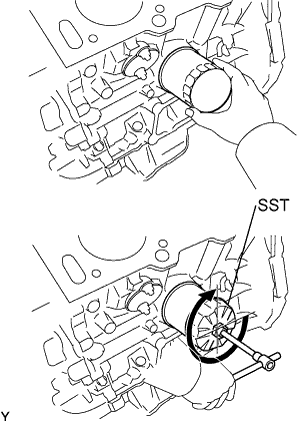 |
Using SST, tighten it an additional 3/4 turn.
| 12. INSTALL INLET WATER HOUSING |
Remove any old packing material from the contact surface.
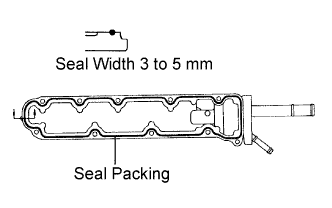 |
Apply a continuous bead of seal packing (Diameter 3 to 5 mm (0.12 to 0.20 in.)) as shown in the illustration.
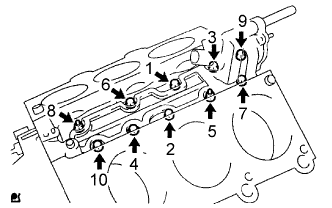 |
Install the inlet water housing with the 8 bolts and 2 nuts. Using several steps, tighten the bolts and nuts uniformly in the sequence shown in the illustration.
| 13. INSTALL CYLINDER HEAD GASKET |
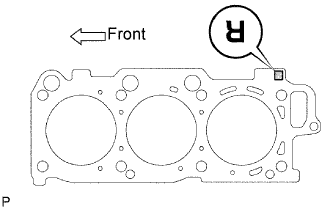 |
Place a new cylinder head gasket on the cylinder block with the R mark upward.
| 14. INSTALL CYLINDER HEAD SUB-ASSEMBLY |
Apply a light coat of engine oil to the threads of the cylinder head bolts.
Install the plate washers to the cylinder head bolts.
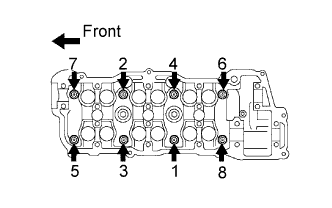 |
Using several steps, install and tighten the 8 cylinder head bolts uniformly in the sequence shown in the illustration.
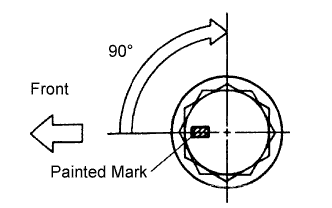 |
Mark the front side of each cylinder head bolt head with paint as shown in the illustration.
Retighten the cylinder head bolts by 90° in the same sequence as step (c).
Check that each painted mark is now at a 90° angle to the front.
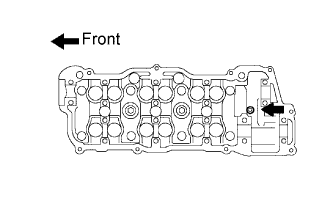 |
Using an 8 mm socket hexagon wrench, install the hexagon bolt.
| 15. INSTALL NO. 2 CYLINDER HEAD GASKET |
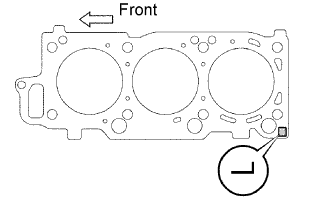 |
Place a new cylinder head gasket on the cylinder block with the L mark upward.
| 16. INSTALL CYLINDER HEAD LH |
Apply a light coat of engine oil to the threads of the cylinder head bolts.
Install the plate washers to the cylinder head bolts.
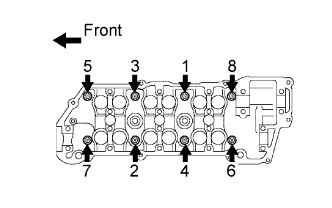 |
Using several steps, install and tighten the 8 cylinder head bolts uniformly in the sequence shown in the illustration.
|
Mark the front side of each cylinder head bolt head with paint as shown in the illustration.
Retighten the cylinder head bolts by 90° in the same sequence as step (c).
Check that each painted mark is now at a 90° angle to the front.
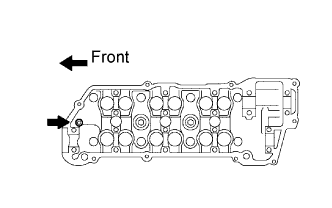 |
Using an 8 mm socket hexagon wrench, install the hexagon bolt.
| 17. INSTALL OIL CONTROL VALVE FILTER |
Check that no foreign objects are on the mesh part of the filter.
Assemble the valve filter and the plug.
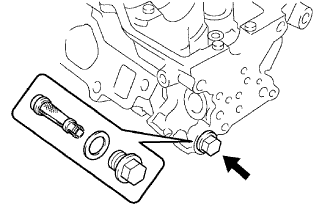 |
Install the plug with a new gasket.
| 18. INSTALL REAR CYLINDER HEAD COVER |
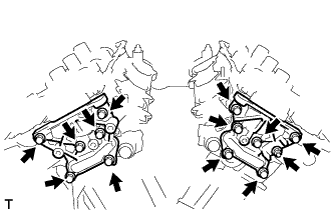 |
Install the rear cover and a new gasket with the 12 bolts and nut.
| 19. INSTALL NO. 2 ENGINE HANGER |
Install the 2 bolts and No. 2 engine hanger.
| 20. INSTALL CAMSHAFT SUB GEAR |
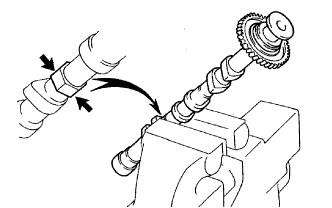 |
Clamp the camshaft in a vise on the hexagonal lobe.
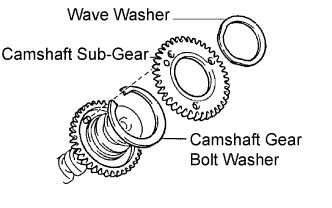 |
Install the camshaft gear bolt washer and the camshaft sub-gear.
Install the wave washer.
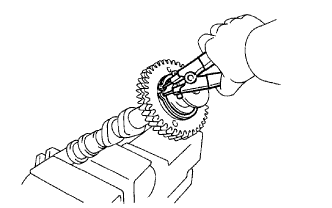 |
Using snap ring pliers, install the snap ring.
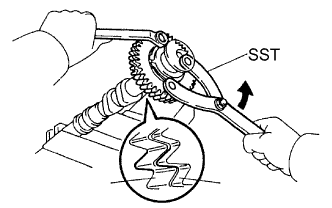 |
Using SST, align the holes of the camshaft main gear and sub-gear by turning the camshaft sub-gear counterclockwise, and temporarily install a service bolt.
Align the gear teeth of the main gear and sub-gear, and tighten the service bolt.
| 21. INSTALL CAMSHAFT TIMING GEAR ASSEMBLY |
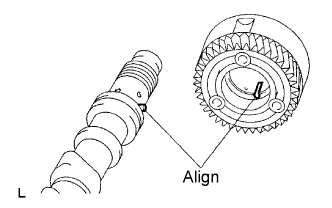 |
Align the alignment pin with the groove and install VVT-i on the camshaft.
Apply engine oil to the nut, the mounting surface of VVT-i and the screw threads.
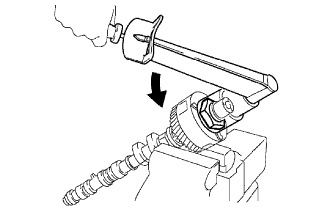 |
Using a 46 mm socket wrench, install and tighten a lock nut by turning it counterclockwise.
| 22. INSTALL NO. 2 CAMSHAFT |
Apply new engine oil to the thrust portion and journal of the camshaft.
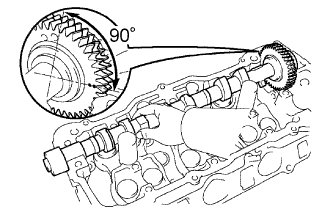 |
Place the No. 2 camshaft at a 90° angle of the timing mark (2-dot mark) on the cylinder head.
Apply MP grease to a new oil seal lip.
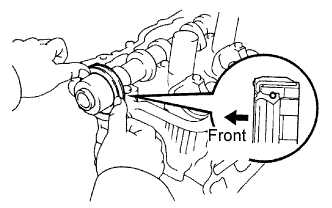 |
Install the oil seal to the camshaft.
Remove any old packing material from the contact surface.
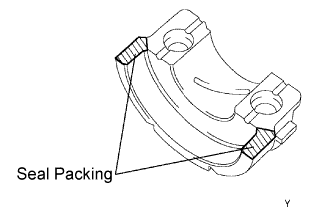 |
Apply seal packing to the No. 1 bearing cap as shown in the illustration.
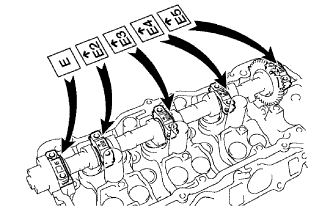 |
Install the 5 bearing caps in their proper locations.
Apply a light coat of engine oil to the threads of the bearing cap bolts.
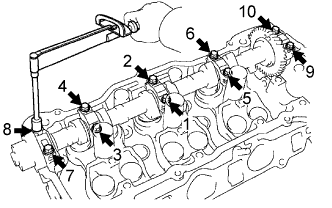 |
Using several steps, tighten the 10 bearing cap bolts uniformly in the sequence shown in the illustration.
| 23. INSTALL CAMSHAFT |
Apply new engine oil to the thrust portion and journal of the camshaft.
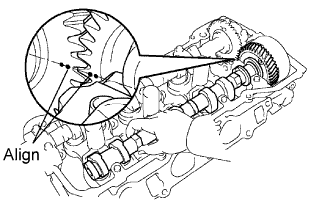 |
Align the timing marks (2-dot mark) of the camshaft drive gear with the mark on the driven gear.
Place the camshaft on the cylinder head.
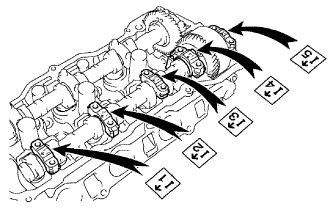 |
Install the 5 bearing caps in their proper locations.
Apply a light coat of engine oil to the threads of the bearing cap bolts.
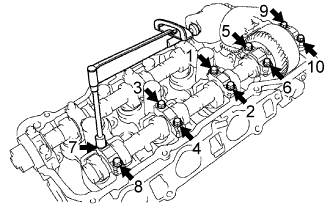 |
Using several steps, tighten the 10 bearing cap bolts uniformly in the sequence shown in the illustration.
Remove the service bolt.
| 24. INSTALL NO. 4 CAMSHAFT SUB-ASSEMBLY |
Apply new engine oil to the thrust portion and journal of the camshaft.
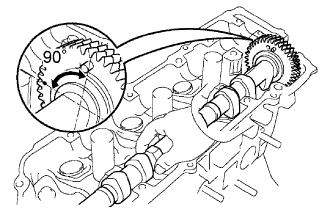 |
Place the No. 4 camshaft at a 90° angle of the timing mark (1-dot mark) on the cylinder head.
Apply MP grease to a new oil seal lip.
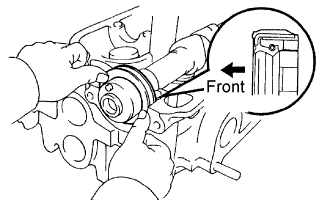 |
Install the oil seal to the camshaft.
Remove any old packing material from the contact surface.
|
Apply seal packing to the No. 1 bearing cap as shown in the illustration.
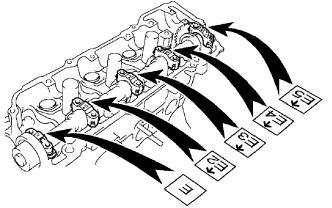 |
Install the 5 bearing caps in their proper locations.
Apply a light coat of engine oil to the threads of the bearing cap bolts.
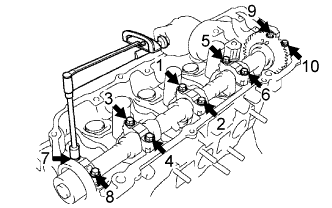 |
Using several steps, tighten the 10 bearing cap bolts uniformly in the sequence shown in the illustration.
| 25. INSTALL NO. 3 CAMSHAFT SUB-ASSEMBLY |
Apply new engine oil to the thrust portion and journal of the camshaft.
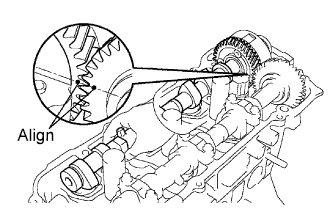 |
Align the timing marks (1-dot mark) of the camshaft drive gear with the mark on the driven gear.
Place the camshaft on the cylinder head.
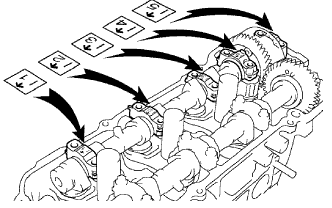 |
Install the 5 bearing caps in their proper locations.
Apply a light coat of engine oil to the threads of the bearing cap bolts.
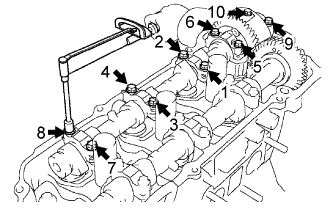 |
Using several steps, tighten the 10 bearing cap bolts uniformly in the sequence shown in the illustration.
Remove the service bolt.
| 26. INSTALL WATER PUMP ASSEMBLY |
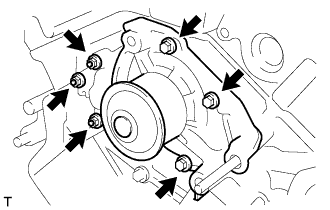 |
Install a new gasket and the water pump with the 3 bolts and 3 nuts.
| 27. INSTALL CRANKSHAFT TIMING PULLEY |
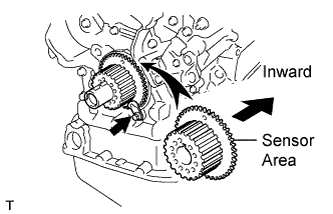 |
Align the keyway of the timing pulley with the key located on the crankshaft and slide the timing pulley into place.
Install the timing belt plate with the bolt.
| 28. INSTALL OIL LEVEL DIPSTICK GUIDE |
Apply a light coat of engine oil to a new O-ring and install it to the level dipstick guide.
Install the level dipstick guide.
| 29. INSTALL OIL LEVEL DIPSTICK SUB-ASSEMBLY |
Install the oil level dipstick sub-assembly.
| 30. INSTALL TIMING BELT IDLER BRACKET |
| 31. INSTALL NO. 3 TIMING BELT COVER |
Visually check for cracks and breaks on the gasket of the timing belt cover.
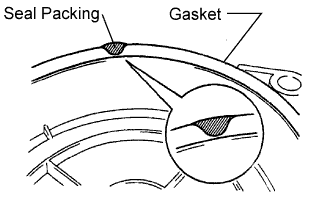 |
If the timing belt cover gasket is needed to repair, follow the procedure below.
Repair the cracks and breaks by applying the seal packing to the damaged area.
If the timing belt cover gasket is needed to replace, follow the procedure below.
Using a screwdriver and gasket scraper, remove the remaining gasket.
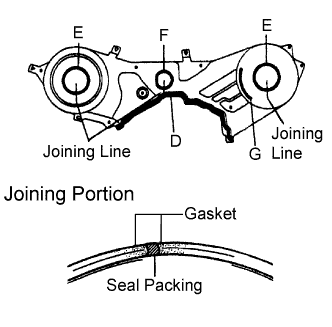 |
Remove the backing paper from a new gasket, and affix the gasket along the groove of the timing belt cover as shown in the illustration.
| Gasket | D | E | F | G |
| Length | 335 mm (13.19 in.) | 180 mm (7.09 in.) | 133 mm (5.24 in.) | 72 mm (2.83 in.) |
If there is a gap on the joint of the gasket, apply seal packing to close the gap.
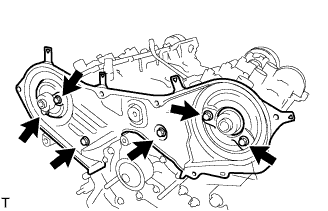 |
Install the timing belt cover with the 6 bolts.
| 32. INSTALL CAMSHAFT TIMING PULLEY |
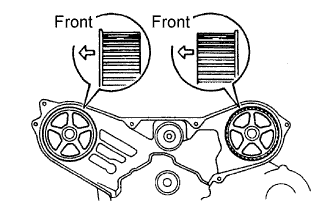 |
Paying attention to the direction of the belt guide, install the camshaft timing pulley and tighten the bolt temporarily.
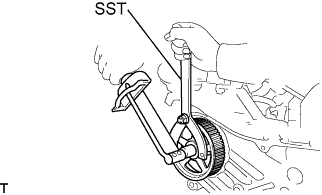 |
Using SST, tighten the RH pulley bolt.
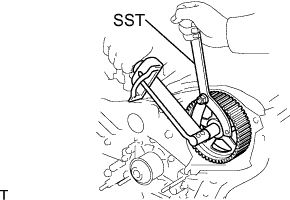 |
Using SST, tighten the LH pulley bolt.
| 33. INSTALL CRANKSHAFT POSITION SENSOR |
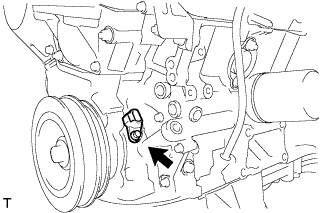 |
Install the crankshaft position sensor with the bolt.
| 34. INSTALL NO. 2 TIMING BELT IDLER SUB-ASSEMBLY |
| 35. INSTALL NO. 1 TIMING BELT IDLER SUB-ASSEMBLY |
Using a 10 mm socket hexagon wrench, install the plate washer and No. 1 timing belt idler with the pivot bolt.
| 36. INSTALL TIMING BELT |
Remove any oil or water on the pulleys, and keep them clean.
Inspect the idler pulleys.
Check that the idler pulley turns smoothly.
Visually check the seal portion of the idler pulley for oil leakage.
Inspect the water pump.
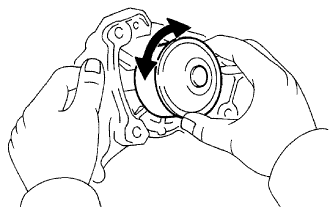 |
Turn the pulley, and check that the water pump bearing moves smoothly and does not make any noise.
Visually check the drain hole for coolant leakage.
Temporarily install the crankshaft pulley bolt and washer to the crankshaft.
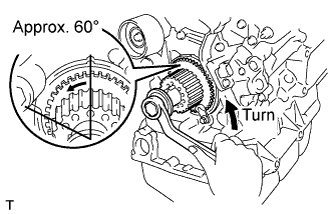 |
Turn the crankshaft counterclockwise by approximately 60°.
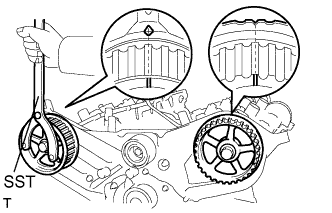 |
Using SST, turn the crankshaft pulley, and align the timing marks of the timing pulley with the No. 3 timing belt cover.
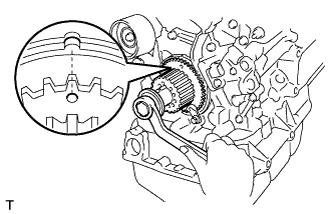 |
Turn the crankshaft, and align the timing marks of the crankshaft timing pulley with the oil pump body.
Face the front mark on the timing belt forward.
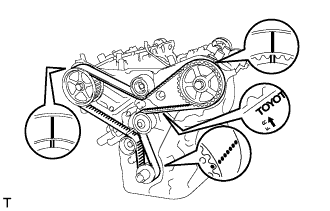 |
Align the installation mark on the timing belt with the timing mark of the crankshaft timing pulley.
Align the installation marks on the timing belt with the timing marks of the camshaft timing pulleys.
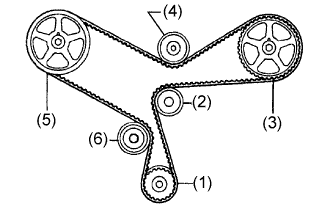 |
Install the timing belt in the following order.
| 1st | Crankshaft timing pulley |
| 2nd | Water pump pulley |
| 3rd | LH camshaft timing pulley |
| 4th | No. 2 idler pulley |
| 5th | RH camshaft timing pulley |
| 6th | No. 1 idler pulley |
| 37. INSTALL NO. 1 CHAIN TENSIONER ASSEMBLY |
Set the timing belt tensioner upright on the press.
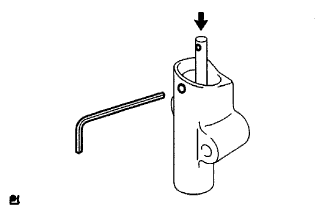 |
Slowly press in the push rod.
Align the holes of the push rod and housing, pass a 1.5 mm hexagon wrench through the holes to keep the setting position of the push rod.
Release the press.
Temporarily install the tensioner with the 2 bolts. Alternately tighten the 2 bolts.
Remove the 1.5 mm hexagon wrench from the tensioner.
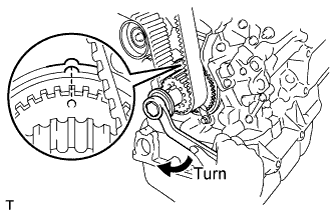 |
Turn the crankshaft 2 revolutions slowly, and align the timing mark of the crankshaft timing pulley with the oil pump body.
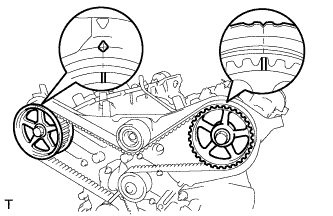 |
Check the timing marks of the RH and LH timing pulleys are aligned with the timing marks of the No. 3 timing belt cover as shown in the illustration.
Remove the crankshaft pulley bolt.
| 38. INSTALL NO. 2 TIMING BELT GUIDE |
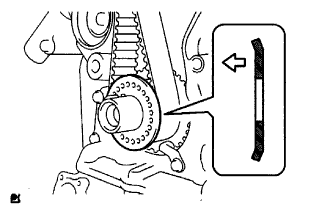 |
Install the timing belt guide with the cup side facing toward the engine front.
| 39. INSTALL ENGINE MOUNTING BRACKET RH |
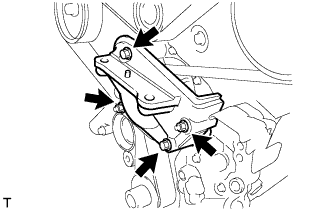 |
Install the 2 bolts, 2 nuts and engine mounting bracket RH.
| 40. INSTALL NO. 2 TIMING BELT COVER |
Visually check for cracks and breaks on the gasket of the timing belt cover.
If a trace of water is found in the visual check, replace the timing belt cover.
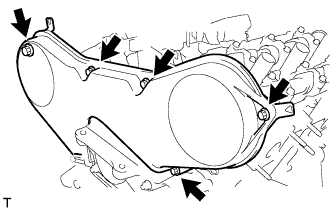 |
Install the timing belt cover with the 5 bolts.
| 41. INSTALL NO. 1 TIMING BELT COVER |
Visually check for cracks and breaks on the gasket of the timing belt cover.
If a trace of water is found in the visual check, replace the timing belt cover.
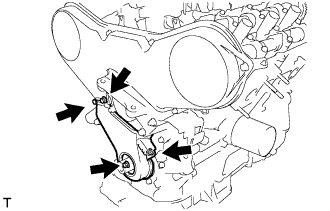 |
Install the timing belt cover with the 4 bolts.
| 42. INSTALL CRANKSHAFT PULLEY |
Align the keyway of the pulley with the key located on the crankshaft and slide the pulley into place.
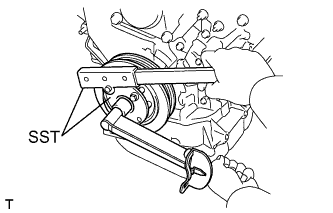 |
Using SST, install the pulley bolt.
| 43. INSTALL VVT SENSOR |
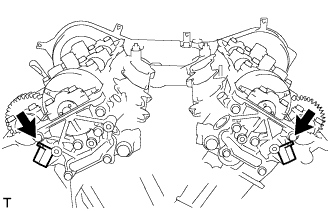 |
Install the 2 VVT sensors with the 2 bolts.
| 44. INSTALL CAMSHAFT TIMING OIL CONTROL VALVE ASSEMBLY |
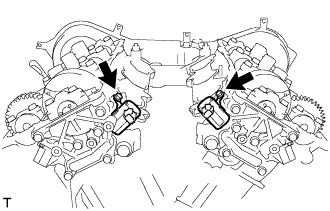 |
Install 2 new O-rings and 2 camshaft timing oil control valves with the 2 bolts.
| 45. INSPECT VALVE CLEARANCE |
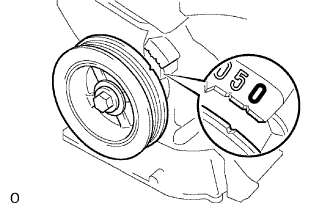 |
Turn the crankshaft pulley, and align the timing notch with the timing mark "0" of the No. 1 timing belt cover.
Check that the valve lifters on the No. 1 cylinder (IN and EX) are both loose.
If not, turn the crankshaft 1 revolution (360°) and align the mark as above.
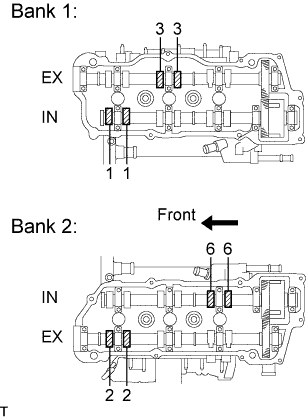 |
Check the valves indicated in the illustration.
Using a feeler gauge, measure the clearance between the valve lifter and the camshaft.
Record out-of-specification valve clearance measurements. They will be used later to determine the required replacement adjusting shim.
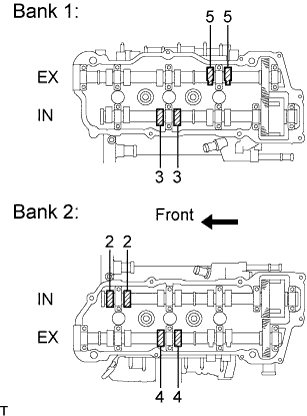 |
Turn the crankshaft 2/3 of a revolution (240°), and check the valves indicated in the illustration.
Using a feeler gauge, measure the clearance between the valve lifter and the camshaft.
Record out-of-specification valve clearance measurements. They will be used later to determine the required replacement adjusting shim.
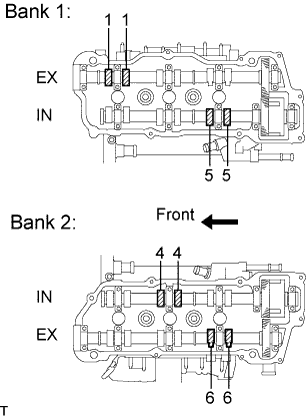 |
Turn the crankshaft 2/3 of a revolution (240°), and check the valves indicated in the illustration.
Using a feeler gauge, measure the clearance between the valve lifter and the camshaft.
Record out-of-specification valve clearance measurements. They will be used later to determine the required replacement adjusting shim.
| 46. ADJUST VALVE CLEARANCE |
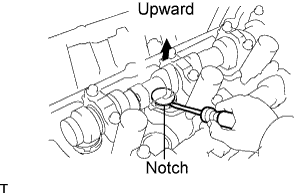 |
Turn the camshaft so that the cam lobe faces upward.
Turn the valve lifter with a screwdriver so that the notches are perpendicular to the camshaft.
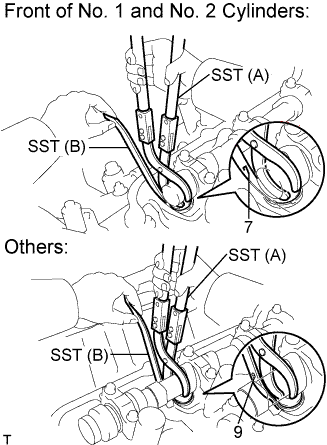 |
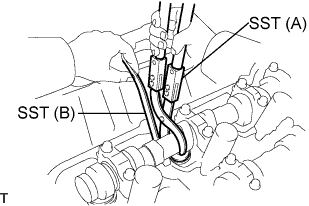
Using SST (A), press down the valve lifter and place SST (B) between the camshaft and valve lifter. Remove SST (A).
| SST A | 09248-05410 |
| SST B | 09248-05420 |
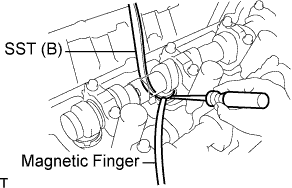 |
Using a screwdriver and magnetic pick-up tool, remove the adjusting shim.
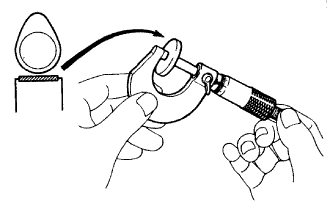 |
Using a micrometer, measure the thickness of the removed shim.
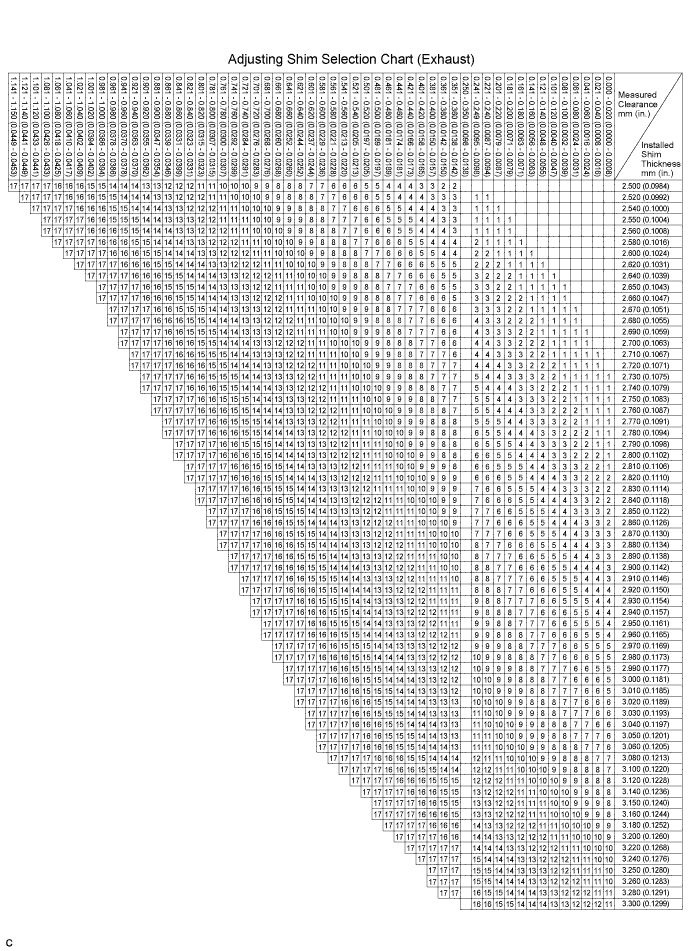
Calculate the thickness of a new shim so the valve clearance comes within the specified value.
| A | Thickness of new shim |
| B | Thickness of used shim |
| C | Measured valve clearance |
Select a new shim with a thickness as close as possible to the calculated values.
| EXAMPLE (Intake): Measured valve clearance = 0.45 mm (0.0177 in.) 0.45 mm (0.0177 in.) - 0.20 mm (0.0079 in.) = 0.25 mm (0.0098 in.) (Measured - Specification = Excess clearance) Used shim measurement = 2.80 mm (0.1102 in.) 0.25 mm (0.0098 in.) + 2.80 mm (0.1102 in.) = 3.05 mm (0.1201 in.) (Excess clearance + Used shim = Ideal new shim) Closest new shim = 3.05 mm (0.1201 in.) Select No. 12 shim |
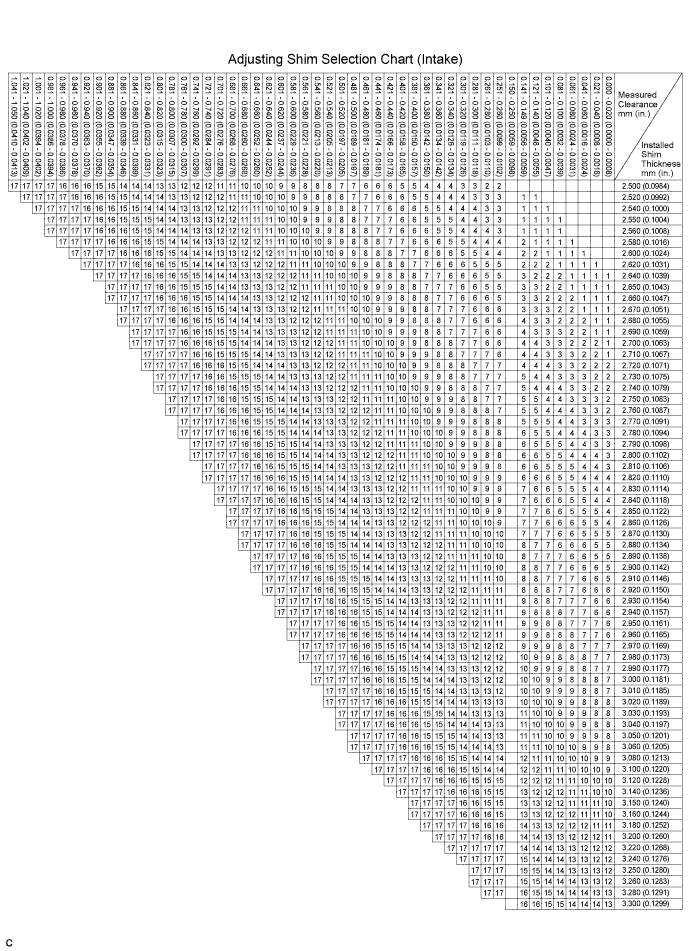
| Shim No. | Thickness | Shim No. | Thickness |
| 1 | 2.500 (0.0984) | 10 | 2.950 (0.1161) |
| 2 | 2.550 (0.1004) | 11 | 3.000 (0.1181) |
| 3 | 2.600 (0.1024) | 12 | 3.050 (0.1201) |
| 4 | 2.650 (0.1043) | 13 | 3.100 (0.1220) |
| 5 | 2.700 (0.1063) | 14 | 3.150 (0.1240) |
| 6 | 2.750 (0.1083) | 15 | 3.200 (0.1260) |
| 7 | 2.800 (0.1102) | 16 | 3.250 (0.1280) |
| 8 | 2.850 (0.1122) | 17 | 3.300 (0.1299) |
| 9 | 2.900 (0.1142) | - | - |
| Shim No. | Thickness | Shim No. | Thickness |
| 1 | 2.500 (0.0984) | 10 | 2.950 (0.1161) |
| 2 | 2.550 (0.1004) | 11 | 3.000 (0.1181) |
| 3 | 2.600 (0.1024) | 12 | 3.050 (0.1201) |
| 4 | 2.650 (0.1043) | 13 | 3.100 (0.1220) |
| 5 | 2.700 (0.1063) | 14 | 3.150 (0.1240) |
| 6 | 2.750 (0.1083) | 15 | 3.200 (0.1260) |
| 7 | 2.800 (0.1102) | 16 | 3.250 (0.1280) |
| 8 | 2.850 (0.1122) | 17 | 3.300 (0.1299) |
| 9 | 2.900 (0.1142) | - | - |
 |
Place a new adjusting shim on the valve lifter with imprinted number facing down.
Press down the valve lifter with SST (A), and remove SST (B).
Recheck the valve clearance.
| 47. INSTALL NO. 2 CYLINDER HEAD COVER GASKET |
Install a new No. 2 cylinder head cover gasket to the cylinder head cover sub-assembly LH.
| 48. INSTALL CYLINDER HEAD COVER SUB-ASSEMBLY LH |
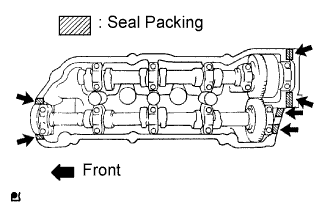 |
Apply seal packing to the cylinder head as shown in the illustration.
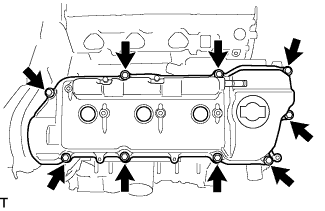 |
Install the cylinder head cover with the 9 bolts. Tighten the bolts uniformly in several steps.
| 49. INSTALL CYLINDER HEAD COVER GASKET |
Install a new cylinder head cover gasket to the cylinder head cover sub-assembly.
| 50. INSTALL CYLINDER HEAD COVER SUB-ASSEMBLY |
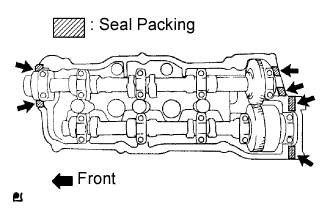 |
Apply seal packing to the cylinder head as shown in the illustration.
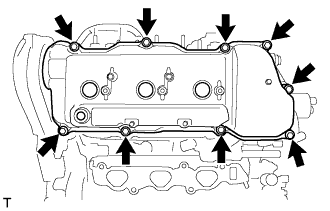 |
Install the cylinder head cover with the 9 bolts. Tighten the bolts uniformly in several steps.
| 51. INSTALL OIL FILLER CAP GASKET |
Install the oil filler cap gasket to the oil filler cap sub-assembly.
| 52. INSTALL OIL FILLER CAP SUB-ASSEMBLY |
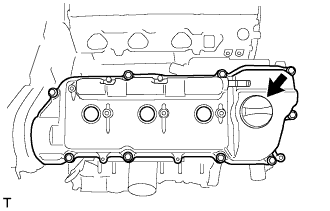 |
Install the oil filler cap sub-assembly to the cylinder head cover sub-assembly LH.
| 53. INSTALL VENTILATION VALVE SUB-ASSEMBLY |
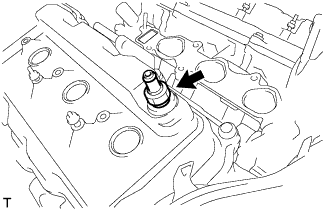 |
Install the ventilation valve sub-assembly to the cylinder head cover sub-assembly.
| 54. INSTALL SPARK PLUG |
Install the spark plug.