Home › BRAKE › BRAKE › FRONT BRAKE FLEXIBLE HOSE

FRONT BRAKE FLEXIBLE HOSE > INSTALLATION

for Preparation Click here


NOTICE:
  1. While the battery is connected, even if the power switch is off, the brake control system activates when the brake pedal is depressed or the door courtesy switch turns on. Therefore, during servicing of the brake system components, do not operate the brake pedal or open/close the doors while the battery is connected.
  2. Because the left and right hoses are not interchangeable, verify the part number when installing the flexible hoses.
  3. If the hoses are to be reused, connect them after checking the identification marks placed when each hose was disconnected.


1. INSTALL FRONT FLEXIBLE HOSE


    C165870
  1. Connect the front flexible hose to the disc brake cylinder assembly with the union bolt and a new gasket.
    Torque:
    30 N*m{ 306 kgf*cm , 22 ft.*lbf }


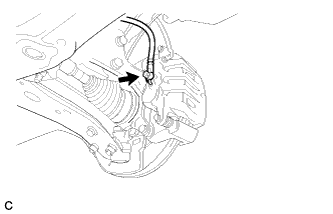
    C165382
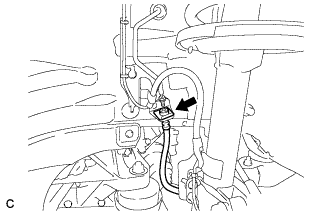
  1. Install the front flexible hose with a new clip.
    NOTICE:
    Install the clip as far as it will go.


    C165381E01
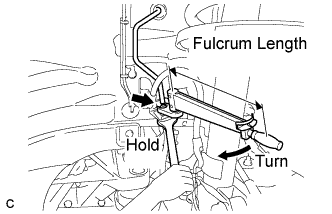
  1. Using a union nut wrench (10 mm), connect the brake line to the front flexible hose while holding the front flexible hose with a wrench.
    Torque:
    without union nut wrench:
    15 N*m{ 155 kgf*cm , 11 ft.*lbf }
    with union nut wrench:
    14 N*m{ 143 kgf*cm , 10 ft.*lbf }

    NOTICE:
    1. Do not bend or damage the brake line.
    2. Do not allow any foreign matter such as dirt and dust to enter the brake line.
    3. Use a torque wrench with a fulcrum length of 250 mm (9.84 in.).
    4. This torque value is effective when the union nut wrench is parallel to the torque wrench.


    C165383
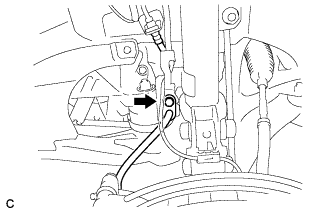
  1. Install the front flexible hose to the absorber bracket with the bolt.

    Torque:
    19 N*m{ 194 kgf*cm , 14 ft.*lbf }


2. BLEEDING PRECAUTION

CAUTION:
Be sure to read the "PRECAUTION" thoroughly before bleeding (Click here).


3. FILL RESERVOIR WITH BRAKE FLUID

NOTICE:
  1. As brake fluid may overflow when bleeding air, do not place the fluid can on the reservoir filler opening.
  2. If brake fluid leaks onto any painted surface, clean it off completely.


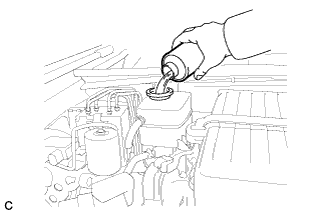
    C170594
  1. Add brake fluid into the reservoir.

    Fluid:
    SAE J1703 or FMVSS No. 116 DOT 3


4. BLEED BRAKE SYSTEM

CAUTION:
The Techstream must be used during fluid replacement. If not used, the fluid replacement will be incomplete, which is hazardous and may lead to an accident.

NOTICE:
  1. Perform fluid replacement while maintaining the brake fluid level between the MIN/MAX level on the brake fluid reservoir.
  2. As brake fluid may overflow, do not place the fluid can on the reservoir filler opening.

  1. Connect the Techstream to the DLC3 with the power switch off.

  1. Check that the parking brake is set, and turn the power switch on (IG).

  1. Enter the following menus: Chassis / ABS/VSC/TRC / Air Bleeding.

  1. Select the menu on the Techstream display based on the following list.

    Bleeding work list 
    1. Brake fluid (replacement)
    2. Front disc brake cylinder (removal, installation or replacement)
    3. Front brake flexible hose (removal, installation or replacement)
    4. Rear disc brake cylinder (removal, installation or replacement)
    5. Rear brake flexible hose (removal, installation or replacement)
    Select "Usual air bleeding" on the Techstream display.
    Air bleeding (no part replacement)
    Select "Actuator has been removed" on the Techstream display.
    1. Brake master cylinder (removal, installation or replacement)
    2. Stroke Simulator (removal, installation or replacement)
    1. Work to be performed before replacement
      1. Using the Techstream, perform accumulator zero down.
      2. Disconnect the 2 brake booster pump connectors.
    2. Select "Master Cylinder or Stroke Simulator has been removed" on the Techstream display.
    Brake master cylinder reservoir (removal, installation or replacement)
    1. Work to be performed before replacement
      1. Using the Techstream, perform accumulator zero down.
      2. Disconnect the 2 brake booster pump connectors.
    2. Work to be performed before air bleeding
      1. Using the Techstream, perform accumulator zero down.
    3. Select "Master Cylinder or Stroke Simulator has been removed" on the Techstream display.
    1. Brake actuator (removal, installation or replacement)
    2. Brake booster pump (removal, installation or replacement)
    1. Work to be performed before replacement
      1. Using the Techstream, perform accumulator zero down.
      2. Disconnect the 2 brake booster pump connectors.
    2. Work to be performed before air bleeding
      1. Using the Techstream, perform accumulator zero down.
    3. Select "Actuator has been removed" on the Techstream display.

  1. After air bleeding or replacement, tighten the bleeder plug.

    Torque:
    8.3 N*m{ 85 kgf*cm , 73 in.*lbf }


5. INSPECT FOR BRAKE FLUID LEAK


6. PERFORM ACCUMULATOR ZERO DOWN

HINT:
Using the Techstream to perform accumulator zero down causes the pressurized fluid in the actuator's accumulator to be returned to the brake fluid reservoir.


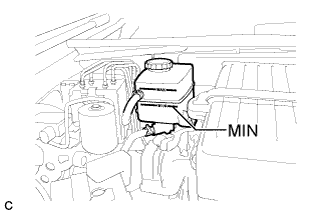
    C170593E03
  1. Drain the brake fluid in the reservoir tank near the MIN line.

  1. Connect the Techstream to the DLC3 with the power switch off.

  1. Check that the parking brake is set, and turn the power switch on (IG).

  1. Enter the following menus: Chassis / ABS/VSC/TRC / Utility / Electronically Controlled Brake system Utility / Zero Down.

  1. When the buzzer sounds, turn the power switch off.


7. INSPECT AND ADJUST FLUID LEVEL IN RESERVOIR


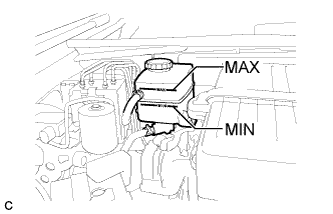
    C170593E01
  1. Inspect the fluid level. If the brake fluid level is lower than the MIN line, inspect for brake fluid leakage and brake pad. After repair or replacement, adjust the brake fluid level in the reservoir as specified below.

    Brake fluid:
    SAE J1703 or FMVSS No. 116 DOT 3

    NOTICE:
    If using a dropper to adjust the fluid amount, make sure the dropper has not been used with mineral oils, water or deteriorated brake fluid. Sealed areas may deteriorate and lead to fluid leaks, or the fluid may deteriorate and lead to decreased efficiency.


    1. Add the brake fluid to the MAX line with the power switch on (IG).

      NOTICE:
      The brake fluid level must always be adjusted to the MAX line.


8. INSTALL FRONT WHEEL

Torque:
103 N*m{ 1050 kgf*cm , 76 ft.*lbf }


9. CLEAR DTC
  1. Clear the DTCs (Click here).


10. CHECK FOR DTC
  1. Check for DTCs. If any DTC is output, perform the troubleshooting for that DTC (Click here).