STEERING COLUMN STEERING COLUMN ASSEMBLY REASSEMBLY
CAUTION / NOTICE / HINT
- NOTICE:
- ·
Do not drop the power steering ECU assembly and power steering motor assembly, strike it with tools or subject it to impacts.
·If the power steering ECU assembly and power steering motor assembly is subjected to an impact, replace it with a new one.
·Do not pull the wire harness of the electric power steering column sub-assembly.
·Do not allow any moisture to come into contact with the power steering ECU assembly and power steering motor assembly.
·Do not loosen any bolts not mentioned in the procedure.
PROCEDURE

 84052
1.INSTALL UN-LOCK WARNING SWITCH ASSEMBLY (w/o Smart Entry and Start System)
Engage the 2 claws to install the un-lock warning switch assembly to the upper steering column bracket assembly.
2.INSTALL IGNITION SWITCH LOCK CYLINDER ASSEMBLY (w/o Smart Entry and Start System)
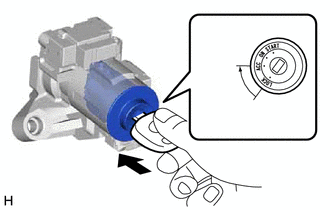
Turn the ignition switch to ACC.
Install the ignition switch lock cylinder assembly to the upper steering column bracket assembly.
Make sure that the ignition switch lock cylinder assembly is securely installed into the upper steering column bracket assembly.
85432
3.INSTALL KEY INTERLOCK SOLENOID (w/o Smart Entry and Start System)
Engage the claw to install the key interlock solenoid to the steering column upper bracket assembly.
Install the screw.
84450
4.INSTALL IGNITION OR STARTER SWITCH ASSEMBLY (w/o Smart Entry and Start System)
Install the ignition or starter switch assembly to the upper steering column bracket assembly with the 2 screws.
89782
5.INSTALL TRANSPONDER KEY COIL (w/o Smart Entry and Start System)
Engage the 2 claws to install the transponder key coil.
80960
6.INSTALL POWER STEERING MOTOR ASSEMBLY
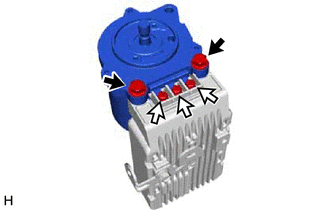

|
Bolt |

|
Terminal Bolt |
Install the power steering motor assembly to the power steering ECU assembly with the 2 bolts.
- Torque:
- 20 N*m (204 kgf*cm, 15 ft.*lbf)
Install the 3 terminal bolts.
- Torque:
- 3.2 N*m (33 kgf*cm, 28 in.*lbf)
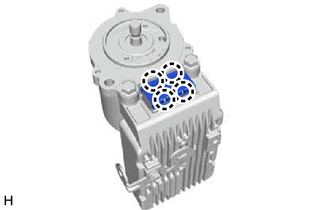
Engage the 4 claws to install a new No. 2 power steering ECU protector.
7.INSTALL POWER STEERING ECU WITH MOTOR ASSEMBLY
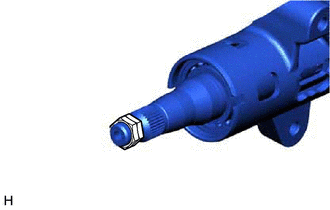
| *a | Service Nut |
Install 2 service nuts to the steering main shaft.
- Recommended Service Nut:
- Thread Diameter:
12.0 mm (0.472 in.)
- Thread Pitch:
1.25 mm (0.0492 in.)
Simultaneously rotate the service nut that was installed first counterclockwise and rotate the service nut that was installed second clockwise to lock them.
- NOTICE:
-
Do not apply excessive torque to the service nuts by using a tool such as an impact wrench.
- HINT:
-
These nuts are installed to turn the steering main shaft. They should be removed after inspecting the steering main shaft rotating torque.
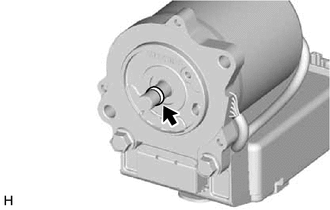
Install a new O-ring to the power steering ECU with motor assembly.
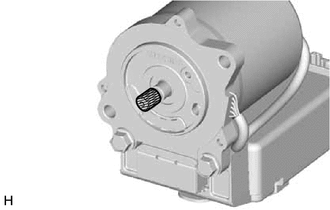

|
Grease |
Apply grease to the splines of the power steering ECU with motor assembly.
- NOTICE:
-
First wipe off the existing grease from the splines, and then apply the dedicated grease supplied with a new power steering motor assembly or electric power steering column sub-assembly.
Insert the power steering ECU with motor assembly into the splines of the electric power steering column sub-assembly.
- NOTICE:
-
Do not damage the gears.
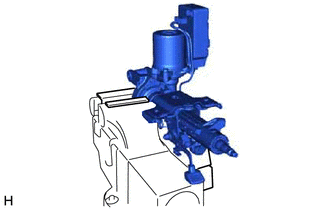
| *a | Aluminum Plate |
| *b | Wooden Block |
Secure the steering column assembly in a vise using aluminum plates and wooden blocks as shown in the illustration.
- NOTICE:
- ·
Do not overtighten the vise, as the steering column assembly may become deformed.
·Secure the steering column assembly so that the power steering motor assembly is directly upright.
·Support the steering column assembly with a wooden block or similar item to ensure that it does not fall.
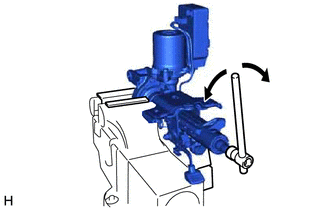
Temporarily install the power steering ECU with motor assembly to the electric power steering column sub-assembly with the 2 bolts while rotating the steering main shaft at approximately 4 rpm.
- NOTICE:
-
When temporarily installing the 2 bolts to the power steering motor assembly, do not tighten them all the way down.
Rotate the steering main shaft 120 to 240 degrees at approximately 4 rpm.
Rotate the steering main shaft 180 degrees clockwise and counterclockwise at approximately 4 rpm and repeat this operation 2 or 3 times to align the power steering ECU with motor assembly.
Tighten the 2 bolts.
- Torque:
- 20 N*m (204 kgf*cm, 15 ft.*lbf)
- NOTICE:
-
Make sure not to move the power steering motor assembly after adjusting the axis.
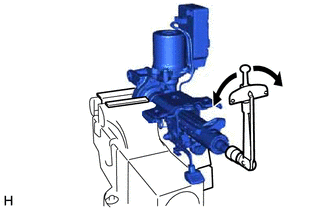
Measure the turning torque of the steering main shaft.
- Preload:
1.3 to 2.0 N*m (14 to 20 kgf*cm, 12 to 17 in.*lbf)
- NOTICE:
-
Ensure that there is no abnormal resistance during rotation.
If the torque is not as specified, readjust the axis of the power steering ECU with motor assembly.
Remove the 2 service nuts from the steering main shaft.
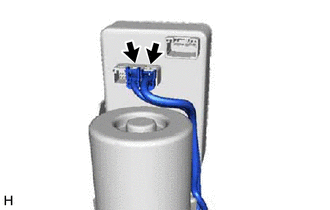
Connect the 2 connectors to the power steering ECU assembly.
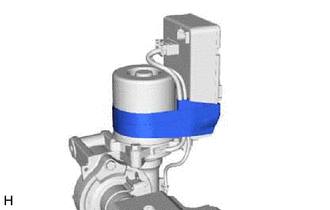
| *a | Start position of tape |
Apply new tape.
- HINT:
- ·
Wrap the power steering motor wire harness and torque sensor wire harness with tape 2 times from the start position of the tape shown in the illustration (for LHD).
·Wrap the power steering motor assembly and power steering ECU assembly with tape more than 3 times.
F1901
8.INSTALL ECU WIRE SUB-ASSEMBLY
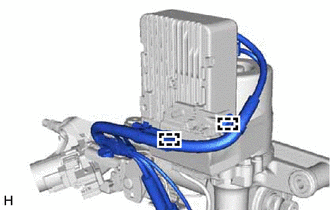
Engage the 2 wire harness clamps to install a new ECU wire sub-assembly.
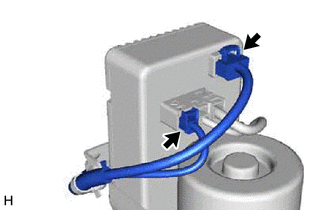
Connect the 2 connectors to the power steering ECU assembly.
8965A
9.INSTALL POWER STEERING ECU PROTECTOR
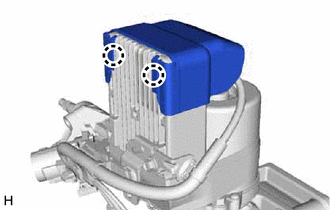
Engage the 2 claws to install a new power steering ECU protector to the power steering ECU assembly.
45220
10.INSTALL STEERING INTERMEDIATE SHAFT ASSEMBLY
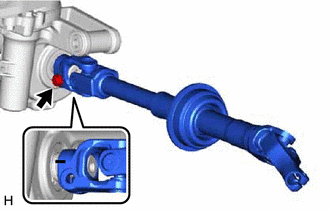
| *a | Matchmark |
Align the matchmarks on the steering intermediate shaft assembly and steering column assembly.
Install the steering intermediate shaft assembly to the steering column assembly.
Install a new bolt.
- Torque:
- 35.3 N*m (360 kgf*cm, 26 ft.*lbf)
45020A
11.INSTALL STEERING LOCK ACTUATOR ASSEMBLY (w/ Smart Entry and Start System)
- HINT:
-
When replacing the steering lock actuator assembly, refer to the service bulletin.
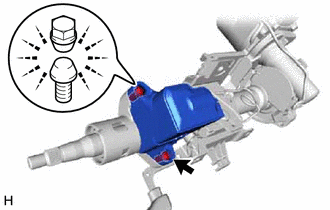
Temporarily install the steering lock actuator assembly with 2 new steering lock set bolts.
Tighten the 2 steering lock set bolts until the bolt head breaks off.
12.INSTALL UPPER STEERING COLUMN BRACKET WITH SWITCH ASSEMBLY (w/o Smart Entry and Start System)
- HINT:
-
Perform the same procedure as the steering lock actuator assembly.