WINDOW / GLASS REAR POWER WINDOW SWITCH INSPECTION
PROCEDURE

 84810D
1.INSPECT REAR POWER WINDOW REGULATOR SWITCH ASSEMBLY (for LH Door) (w/ Jam Protection Function)
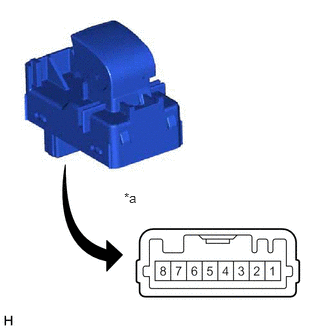
| *a | Component without harness connected
(Rear Power Window Regulator Switch Assembly (for LH Door)) |
Check the switch function.
Measure the resistance according to the value(s) in the table below.
- Standard Resistance:
Tester Connection Condition Specified Condition 5 - 7 Auto up or manual up position Below 1 Ω 4 - 7 Auto down or manual down position Below 1 Ω 7 - 8 Auto up or auto down position Below 1 Ω 4 - 5 Off 10 kΩ or higher
If the result is not as specified, replace the rear power window regulator switch assembly (for LH door).
| *a | Component without harness connected
(Rear Power Window Regulator Switch Assembly (for LH Door)) |
Check that the LED illuminates.
Apply battery voltage to the rear power window regulator switch assembly and check that the LED illuminates.
- OK:
Battery Connection Specified Condition Battery positive (+) → 3
Battery negative (-) → 1LED illuminates
If the result is not as specified, replace the rear power window regulator switch assembly (for LH door).
84810D
2.INSPECT REAR POWER WINDOW REGULATOR SWITCH ASSEMBLY (for LH Door) (w/o Jam Protection Function)
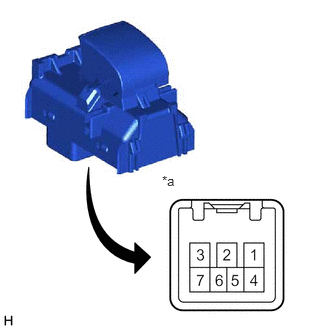
| *a | Component without harness connected
(Rear Power Window Regulator Switch Assembly (for LH Door)) |
Check the switch function.
Measure the resistance according to the value(s) in the table below.
- Standard Resistance:
Tester Connection Condition Specified Condition 2 - 7 Up Below 1 Ω 1 - 4 Up Below 1 Ω 3 - 7 Off Below 1 Ω 1 - 4 Off Below 1 Ω 3 - 7 Down Below 1 Ω 1 - 2 Down Below 1 Ω
If the result is not as specified, replace the rear power window regulator switch assembly (for LH door).
| *a | Component without harness connected
(Rear Power Window Regulator Switch Assembly (for LH Door)) |
Check that the LED illuminates.
Apply battery voltage to the rear power window regulator switch assembly and check that the LED illuminates.
- OK:
Battery Connection Specified Condition Battery positive (+) → 6
Battery negative (-) → 5LED illuminates
If the result is not as specified, replace the rear power window regulator switch assembly (for LH door).
84810D
3.INSPECT REAR POWER WINDOW REGULATOR SWITCH ASSEMBLY (for RH Door) (w/ Jam Protection Function)
| *a | Component without harness connected
(Rear Power Window Regulator Switch Assembly (for RH Door)) |
Check the switch function.
Measure the resistance according to the value(s) in the table below.
- Standard Resistance:
Tester Connection Condition Specified Condition 5 - 7 Auto up or manual up position Below 1 Ω 4 - 7 Auto down or manual down position Below 1 Ω 7 - 8 Auto up or auto down position Below 1 Ω 4 - 5 Off 10 kΩ or higher
If the result is not as specified, replace the rear power window regulator switch assembly (for RH door).
| *a | Component without harness connected
(Rear Power Window Regulator Switch Assembly (for RH Door)) |
Check that the LED illuminates.
Apply battery voltage to the rear power window regulator switch assembly and check that the LED illuminates.
- OK:
Battery Connection Specified Condition Battery positive (+) → 3
Battery negative (-) → 1LED illuminates
If the result is not as specified, replace the rear power window regulator switch assembly (for RH door).
84810D
4.INSPECT REAR POWER WINDOW REGULATOR SWITCH ASSEMBLY (for RH Door) (w/o Jam Protection Function)
| *a | Component without harness connected
(Rear Power Window Regulator Switch Assembly (for RH Door)) |
Check the switch function.
Measure the resistance according to the value(s) in the table below.
- Standard Resistance:
Tester Connection Condition Specified Condition 2 - 7 Up Below 1 Ω 1 - 4 Up Below 1 Ω 3 - 7 Off Below 1 Ω 1 - 4 Off Below 1 Ω 3 - 7 Down Below 1 Ω 1 - 2 Down Below 1 Ω
If the result is not as specified, replace the rear power window regulator switch assembly (for RH door).
| *a | Component without harness connected
(Rear Power Window Regulator Switch Assembly (for RH Door)) |
Check that the LED illuminates.
Apply battery voltage to the rear power window regulator switch assembly and check that the LED illuminates.
- OK:
Battery Connection Specified Condition Battery positive (+) → 6
Battery negative (-) → 5LED illuminates
If the result is not as specified, replace the rear power window regulator switch assembly (for RH door).