U660E AUTOMATIC TRANSMISSION / TRANSAXLE VALVE BODY ASSEMBLY INSTALLATION
PROCEDURE

 35418
1.INSTALL MANUAL VALVE
Coat the manual valve with ATF and install it to the transmission valve body assembly.
35410
2.INSTALL TRANSMISSION VALVE BODY ASSEMBLY
Coat the O-ring of the transmission wire with ATF.
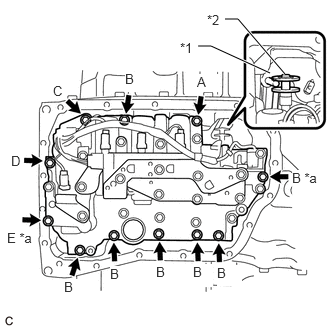
| *1 | Manual Valve Lever Shaft Sub-assembly |
| *2 | Manual Valve |
| *a | Positioning Bolt |
Insert the pin of the manual valve lever shaft sub-assembly into the groove on the end of the manual valve and install the transmission valve body assembly to the transaxle case sub-assembly with the 11 bolts.
- Torque:
- 10.8 N*m (110 kgf*cm, 8 ft.*lbf)
- Bolt Length:
- Bolt (A):
25 mm (0.984 in.)
- Bolt (B):
30 mm (1.18 in.)
- Bolt (C):
35 mm (1.38 in.)
- Bolt (D):
45 mm (1.77 in.)
- Bolt (E):
55 mm (2.17 in.)
- NOTICE:
- ·
When installing the transmission valve body assembly, be careful not to allow the transmission revolution sensor and transaxle case sub-assembly to interfere with each other.
·First, temporarily tighten the bolts marked *a in the illustration because they are positioning bolts.
35330
3.INSTALL VALVE BODY OIL STRAINER ASSEMBLY
Coat a new O-ring with ATF and install it to the valve body oil strainer assembly.
- NOTICE:
-
Ensure that the O-ring is not twisted or pinched.
Install the valve body oil strainer assembly to the transmission valve body assembly with the 2 bolts.
- Torque:
- 10.8 N*m (110 kgf*cm, 8 ft.*lbf)
35106D
4.INSTALL AUTOMATIC TRANSAXLE OIL PAN SUB-ASSEMBLY
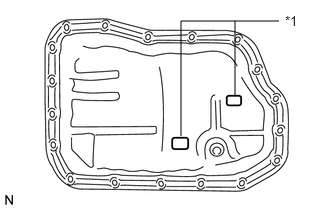
| *1 | Transmission Oil Cleaner Magnet |
Install the 2 transmission oil cleaner magnets to the automatic transaxle oil pan sub-assembly as shown in the illustration.
Install a new automatic transaxle oil pan gasket to the automatic transaxle oil pan sub-assembly.
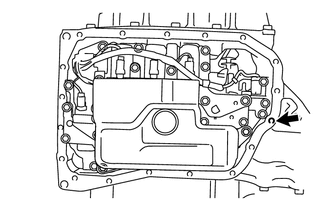
Clean and degrease the bolt and the bolt hole in the automatic transaxle assembly.
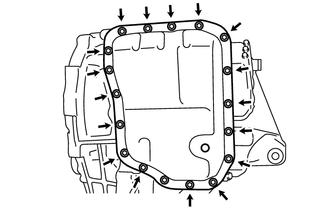
Install the automatic transaxle oil pan sub-assembly with automatic transaxle oil pan gasket to the transaxle case with the 17 bolts.
- NOTICE:
-
Completely remove any oil or grease from the contact surfaces of the transaxle case and automatic transaxle oil pan sub-assembly with automatic transaxle oil pan gasket before installation.
- Torque:
- 7.5 N*m (76 kgf*cm, 66 in.*lbf)
Apply adhesive to the bolt.
- Adhesive:
Toyota Genuine Adhesive 1324, Three Bond 1324 or equivalent
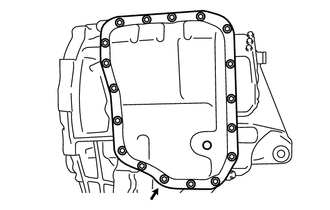
Install the bolt.
- Torque:
- 7.0 N*m (71 kgf*cm, 62 in.*lbf)
- NOTICE:
-
In order to ensure proper sealing of the automatic transaxle oil pan sub-assembly bolt, apply adhesive to the bolt and install it within 10 minutes of adhesive application.
32000
5.INSTALL TORQUE CONVERTER ASSEMBLY
30500
6.INSTALL AUTOMATIC TRANSAXLE ASSEMBLY