DOOR / HATCH POWER BACK DOOR DRIVE UNIT INSTALLATION
CAUTION / NOTICE / HINT
- HINT:
- ·
Use the same procedure for the RH side and LH side.
·The following procedure is for the LH side.
PROCEDURE

 68920
1.INSTALL POWER BACK DOOR UNIT SET ASSEMBLY
- NOTICE:
-
Do not apply any horizontal load to the power back door unit set assembly in order to prevent it rod from deforming.
Clean the bolt hole on the vehicle body and back door panel.
Clean the bolt threads of the bolt.
Apply adhesive to the threads of the bolt.
- Adhesive:
Toyota Genuine Adhesive 1324, Three Bond 1324 or equivalent
When replacing the power back door unit set assembly:
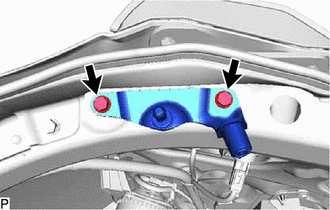
Install a new back door damper stay lower bracket with the 2 bolts.
- Torque:
- 8.0 N*m (82 kgf*cm, 71 in.*lbf)
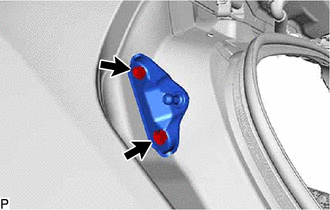
Install a new back door damper stay upper bracket with the 2 bolts.
- Torque:
- 8.0 N*m (82 kgf*cm, 71 in.*lbf)
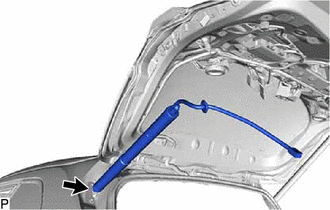
Install the power back door unit set assembly to back door damper stay upper bracket.
- NOTICE:
-
Install the power back door unit set assembly while supporting the back door by hand.
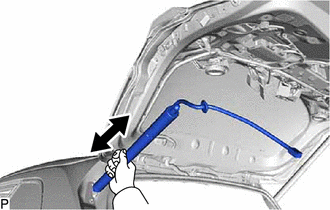
Check that the power back door unit set assembly is securely engaged to the ball joint and cannot be pulled off by pushing and pulling it as shown in the illustration.
- NOTICE:
-
Check the power back door unit set assembly while supporting the back door by hand.
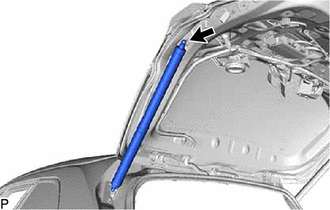
Install the power back door unit set assembly to back door damper stay lower bracket.
- NOTICE:
-
Install the power back door unit set assembly while supporting the back door by hand.
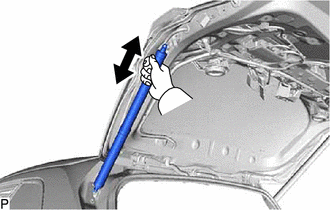
Check that the power back door unit set assembly is securely engaged to the ball joint and cannot be pulled off by pushing and pulling it as shown in the illustration.
- NOTICE:
-
Check the power back door unit set assembly while supporting the back door by hand.
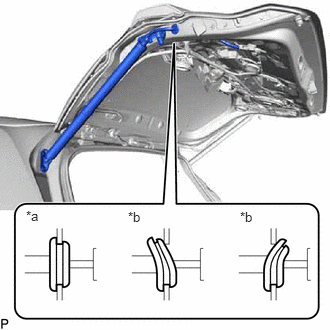
| *a | Correct |
| *b | Incorrect |
Engage the grommet.
Connect the connector.
Initialize power back door system.
Click hereVehicle Exterior>DOOR / HATCH>POWER BACK DOOR SYSTEM>INITIALIZATION
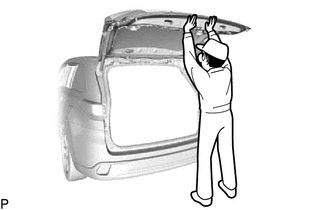
Hold the back door fully open by hand and press the back door control switch.
Make sure that the power back door unit set assembly does not come off of either ball joint.
When reusing the power back door unit set assembly:
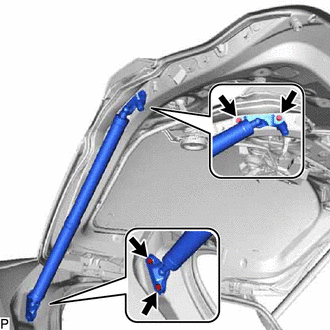
Install the power back door unit set assembly with the 4 bolts.
- NOTICE:
-
Install the power back door unit set assembly while supporting the back door by hand.
- Torque:
- 8.0 N*m (82 kgf*cm, 71 in.*lbf)
| *a | Correct |
| *b | Incorrect |
Engage the grommet.
Connect the connector.
64780A
2.INSTALL BACK DOOR TRIM PANEL ASSEMBLY
67766
3.INSTALL NO. 2 BACK DOOR SERVICE HOLE COVER
67765A
4.INSTALL NO. 1 BACK DOOR SERVICE HOLE COVER
64798
5.INSTALL BACK DOOR LOCK COVER (for Glass Hatch Type)
64792
6.INSTALL BACK DOOR TRIM COVER LH
64791C
7.INSTALL BACK DOOR TRIM COVER RH
- HINT:
-
Use the same procedure as for the LH side.
64783A
8.INSTALL BACK WINDOW UPPER TRIM PANEL
9.INITIALIZE POWER BACK DOOR SYSTEM
10.INSPECT POWER BACK DOOR SYSTEM