2GR-FE FUEL FUEL PUMP INSTALLATION
PROCEDURE

 77020A
1.INSTALL FUEL SUCTION TUBE WITH PUMP AND GAUGE ASSEMBLY
Install a new fuel suction tube set gasket to the fuel tank assembly.
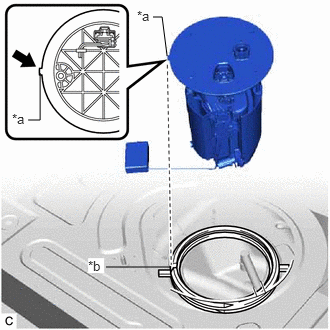
| *a | Protrusion |
| *b | Notch |
Set the fuel suction tube with pump and gauge assembly to the fuel tank assembly.
- NOTICE:
-
Make sure that the fuel sender gauge arm does not bend.
- HINT:
-
Align the protrusion of the fuel suction tube with pump and gauge assembly with the notch of the tank suction tube support.
77144
2.INSTALL FUEL PUMP GAUGE RETAINER
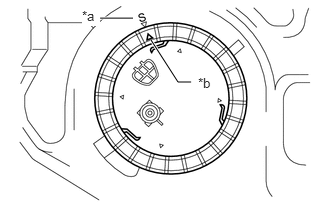
| *a | "S" Mark |
| *b | Triangle Mark |
Align the triangle mark on new fuel pump gauge retainer with the "S" mark on the fuel tank assembly while pushing down the fuel suction tube with pump and gauge assembly, attach the fuel pump gauge retainer.
Install SST (fuel pump retainer tool assy) to the fuel pump gauge retainer.
Insert 2 SST (claw) between the service hole and fuel pump gauge retainer, and adjust the position so that the protrusions of the fuel pump gauge retainer are aligned with the grooves of SST (claw) as shown in the illustration.
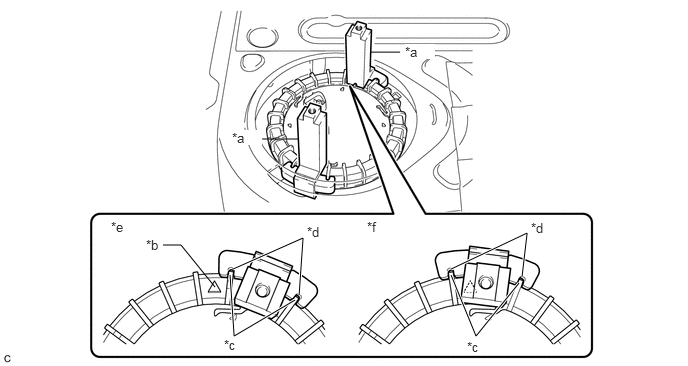
| *a | SST (Claw) | *b | Triangle Mark |
| *c | Protrusion of Fuel Pump Gauge Retainer | *d | Groove of SST (Claw) |
| *e | Correct | *f | Incorrect |
- SST
- 09808-14040 (09882-14040)
- NOTICE:
-
Ensure that SST (claw) does not cover the triangle mark of the fuel pump gauge retainer.
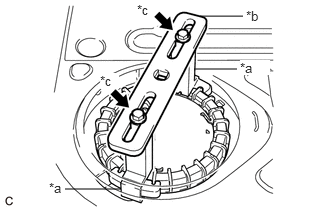
| *a | SST (Claw) |
| *b | SST (Plate) |
| *c | SST (Bolt and Washer Set) |
While ensuring that SST (plate) is centered, install SST (plate) to 2 SST (claw) with the 2 SST (bolt and washer set).
- SST
- 09808-14040 (09881-14040, 09883-14040)
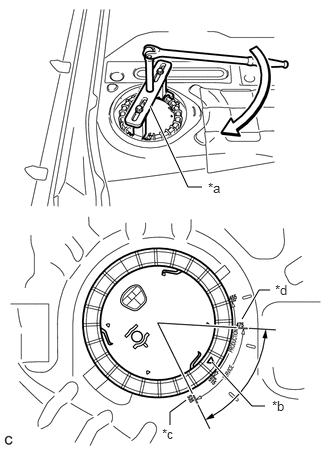
| *a | SST (Fuel Pump Retainer Tool Assy) |
| *b | Triangle Mark |
| *c | "535" Mark |
| *d | "475" Mark |
While lightly pushing down on SST (fuel pump retainer tool assy), tighten the fuel pump gauge retainer by 1 and a half turns so that the triangle mark on the fuel pump gauge retainer is positioned between the "475" and "535" marks on the fuel tank assembly.
- NOTICE:
- ·
Do not use any tools other than specified in this operation as this may result in damage to the fuel pump gauge retainer or fuel tank assembly.
·Do not push down on SST (fuel pump retainer tool assy) excessively as this may make the fuel pump gauge retainer hard to rotate, and may damage components.
·Make sure to turn the breaker bar horizontally. If it is turned at an angle, SST (fuel pump retainer tool assy) may come off.
·Do not spin SST (fuel pump retainer tool assy) too fast or use an impact wrench as this may damage components.
·If SST (fuel pump retainer tool assy) comes off of the fuel pump gauge retainer, loosen the SST (bolt and washer set) and reinstall SST (fuel pump retainer tool assy).
- HINT:
-
While pushing down SST (fuel pump retainer tool assy), turn the fuel pump gauge retainer clockwise to tighten. Make sure that the detent of the tank suction tube support does not move out of the groove of the fuel tank assembly.
77209F
3.CONNECT FUEL TANK MAIN TUBE SUB-ASSEMBLY
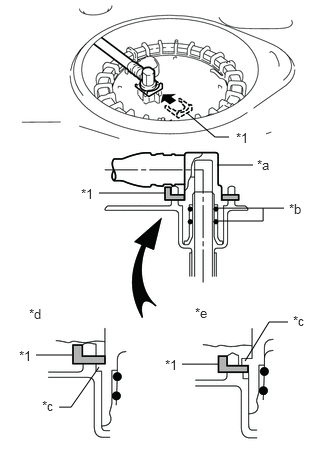
| *1 | Tube Joint Clip |
| *a | Fuel Tube Joint |
| *b | O-ring |
| *c | Collar |
| *d | Correct |
| *e | Incorrect |
Push the fuel tube joint onto the plug of the fuel suction plate sub-assembly, then install the tube joint clip.
- NOTICE:
- ·
Check that there are no scratches or foreign matter around the connecting parts of the fuel tube joint and plug before performing this work.
·Check that the fuel tube joint is securely inserted to the end.
·Check that the tube joint clip is on the collar of the fuel tube joint.
·After installing the tube joint clip, check that the fuel tank main tube sub-assembly is securely connected by pulling on it.
4. CHECK AIRTIGHTNESS
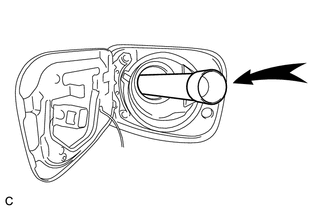
After installing the fuel suction tube with pump and gauge assembly, check for fuel leaks by first applying soapy water to the area where the fuel suction plate sub-assembly and fuel pump gauge retainer contact, and then blow forcefully into the fuel inlet area through a flexible pouring spout or similar tube.
Blow forcefully until the reverse flow prevention valve inside the fuel inlet activates.
- NOTICE:
-
Be careful not to inhale any fuel vapor.
- HINT:
-
There should be a faintly audible sound when the reverse flow prevention valve operates.
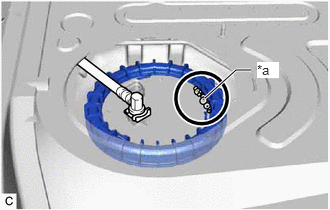
| *a | Air Bubbles |
If improper installation of the fuel suction tube with pump and gauge assembly, etc. has resulted in a condition where fuel will leak, air will leak out as shown in the illustration.
- NOTICE:
-
If air leaks out, recheck the installation condition, and replace the used fuel pump gauge retainer and fuel suction tube set gasket with new ones. Also, make sure to fully wipe away the soapy water. (Any remaining soapy water can cause the fuel suction tube set gasket to slip and result in an improper seal.)
58325E
5.INSTALL REAR FLOOR SERVICE HOLE COVER
Connect the fuel pump connector.
Install the rear floor service hole cover with new butyl tape.
Install the front floor carpet.
64740C
6.INSTALL DECK TRIM SIDE PANEL ASSEMBLY LH
66311
7.INSTALL ROPE HOOK (for LH Side)
64725F
8.INSTALL NO. 1 LUGGAGE COMPARTMENT TRIM HOOK (for LH Side)
64974
9.INSTALL DECK TRIM POCKET COVER (for LH Side)
73570
10.CONNECT REAR NO. 2 SEAT OUTER BELT ASSEMBLY LH
64735
11.INSTALL DECK TRIM SIDE SERVICE HOLE COVER
64715E
12.INSTALL NO. 2 DECK SIDE TRIM COVER
73370C
13.CONNECT REAR NO. 1 SEAT OUTER BELT ASSEMBLY LH
64713F
14.INSTALL FRONT DECK SIDE TRIM COVER LH
64730B
15.INSTALL DECK TRIM SIDE PANEL ASSEMBLY RH
66311
16.INSTALL ROPE HOOK (for RH Side)
64725F
17.INSTALL NO. 1 LUGGAGE COMPARTMENT TRIM HOOK (for RH Side)
64974
18.INSTALL DECK TRIM POCKET COVER (for RH Side)
81240
19.INSTALL NO. 1 ROOM LIGHT ASSEMBLY
62627D
20.INSTALL SIDE TRIM COVER RH (w/o Rear Automatic Air Conditioning System)
88625T
21.INSTALL COOLER (NO. 2 ROOM TEMP. SENSOR) THERMISTOR
73560
22.CONNECT REAR NO. 2 SEAT OUTER BELT ASSEMBLY RH
73297E
23.INSTALL DECK TRIM SIDE BELT HOLE COVER RH
64714H
24.INSTALL NO. 1 DECK SIDE TRIM COVER
73360C
25.CONNECT REAR NO. 1 SEAT OUTER BELT ASSEMBLY RH
64712F
26.INSTALL FRONT DECK SIDE TRIM COVER RH
27.INSTALL REAR DOOR OPENING TRIM WEATHERSTRIP LH
67918A
28.INSTALL REAR DOOR SCUFF PLATE LH
29.INSTALL REAR DOOR OPENING TRIM WEATHERSTRIP RH
67917A
30.INSTALL REAR DOOR SCUFF PLATE RH
31.INSTALL REAR NO. 2 SEAT ASSEMBLY
64910J
32.INSTALL TONNEAU COVER ASSEMBLY
58387B
33.INSTALL REAR FLOOR FINISH PLATE
64993
34.INSTALL REAR DECK FLOOR BOX
64742C
35.INSTALL DECK SIDE TRIM BOX LH
58409A
36.INSTALL NO. 3 DECK BOARD SUB-ASSEMBLY
58410B
37.INSTALL DECK BOARD ASSEMBLY
38.INSTALL REAR NO. 1 SEAT ASSEMBLY
for 60/40 Split Seat Type LH Side: Click hereVehicle Interior>SEAT>REAR NO. 1 SEAT ASSEMBLY(for 60/40 Split Seat Type LH Side)>INSTALLATION
for 60/40 Split Seat Type RH Side: Click hereVehicle Interior>SEAT>REAR NO. 1 SEAT ASSEMBLY(for 60/40 Split Seat Type RH Side)>INSTALLATION
39.CONNECT CABLE TO NEGATIVE BATTERY TERMINAL
- NOTICE:
-
When disconnecting the cable, some systems need to be initialized after the cable is reconnected.
-
Click hereGeneral>INTRODUCTION>REPAIR INSTRUCTION>INITIALIZATION
40.INSPECT FOR FUEL LEAK
41.PERFORM INITIALIZATION
Perform "Inspection After Repair" after replacing the fuel pump.
Click hereEngine / Hybrid System>2GR-FE ENGINE CONTROL>SFI SYSTEM>INITIALIZATION