EXTERIOR PANELS / TRIM ROOF RACK INSTALLATION
CAUTION / NOTICE / HINT
- HINT:
- ·
Use the same procedure for the RH side and LH side.
·The following procedure is for the LH side.
PROCEDURE

 63489
1.INSTALL REAR ROOF RACK LEG CUSHION
Clean the roof rack.
Remove any double-sided tape from the roof rack.
Wipe off any tape adhesive residue with cleaner.
Install a new rear roof rack leg cushion.
Remove the release paper from the new rear roof rack leg cushion.
- HINT:
-
After removing the release paper, keep the exposed adhesive free from foreign matter.
Engage the 2 guides and attach the double-sided tape to install the rear roof rack leg cushion.
63487A
2.INSTALL FRONT ROOF RACK LEG CUSHION
Clean the roof rack.
Remove any double-sided tape from the roof rack.
Wipe off any tape adhesive residue with cleaner.
Install a new front roof rack leg cushion.
Remove the release paper from the new front roof rack leg cushion.
- HINT:
-
After removing the release paper, keep the exposed adhesive free from foreign matter.
Engage the 2 guides and attach the double-sided tape to install the front roof rack leg cushion.
3.INSTALL NO. 3 ROOF CARRIER PROTECTOR
Clean the roof rack.
Remove any double-sided tape from the roof rack.
Wipe off any tape adhesive residue with cleaner.
Install a new No. 3 roof carrier protector.
Remove the release paper from the new No. 3 roof carrier protector.
- HINT:
-
After removing the release paper, keep the exposed adhesive free from foreign matter.
Install the No. 3 roof carrier protector as shown in the illustration.
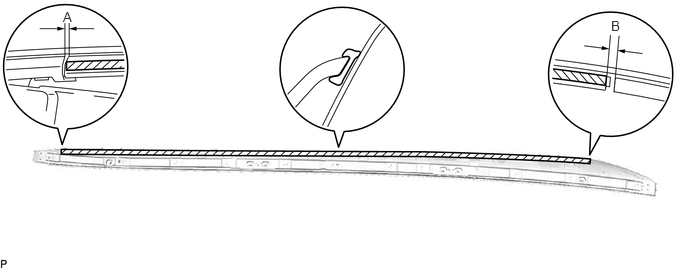
- Standard Measurement:
Area Measurement Area Measurement A 0 to 1.0 mm (0 to 0.0393 in.) B 0 to 1.0 mm (0 to 0.0393 in.)
4.INSTALL NO. 1 ROOF CARRIER PROTECTOR
Clean the roof rack.
Remove any double-sided tape from the roof rack.
Wipe off any tape adhesive residue with cleaner.
Install a new No. 1 roof carrier protector.
Remove the release paper from the new No. 1 roof carrier protector.
- HINT:
-
After removing the release paper, keep the exposed adhesive free from foreign matter.
Install the No. 1 roof carrier protector as shown in the illustration.
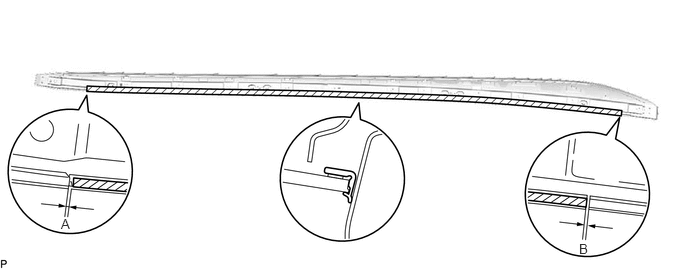
- Standard Measurement:
Area Measurement Area Measurement A 0 to 1.0 mm (0 to 0.0393 in.) B 0 to 1.0 mm (0 to 0.0393 in.)
63470B
5.INSTALL ROOF RACK ASSEMBLY
Install 6 new No. 2 roof carrier seals.
Install the roof rack assembly with 6 new bolts.
- Torque:
- 32 N*m (326 kgf*cm, 24 ft.*lbf)
75633F
6.INSTALL NO. 2 ROOF SIDE GARNISH LID
- HINT:
-
Use the same procedure for all the No. 2 roof side garnish lids.
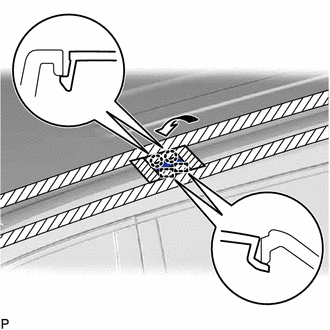
Engage the 2 guides.
Engage the 2 claws to install the No. 2 roof side garnish lid as shown in the illustration.
75631K
7.INSTALL NO. 1 ROOF SIDE GARNISH LID
- HINT:
-
Use the same procedure for all the No. 1 roof side garnish lids.
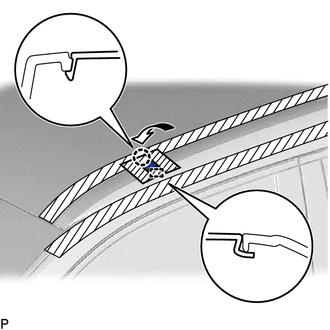
Engage the guide.
Engage the claw to install the No. 1 roof side garnish lid as shown in the illustration.