AXLE AND DIFFERENTIAL REAR DIFFERENTIAL CARRIER ASSEMBLY REASSEMBLY
CAUTION / NOTICE / HINT
- HINT:
-
Use an overhaul stand as necessary.
PROCEDURE

 1.INSTALL DIFFERENTIAL RING GEAR
Clean the contact surfaces of the differential case and differential ring gear.
Heat the differential ring gear in boiling water.
Carefully remove the differential ring gear from the boiling water.
- CAUTION:
-
Do not burn yourself.
Secure the rear differential case sub-assembly between aluminum plates in a vise.
- NOTICE:
-
Do not overtighten the vise.
After the moisture on the differential ring gear has completely evaporated, quickly install the differential ring gear to the rear differential case sub-assembly.
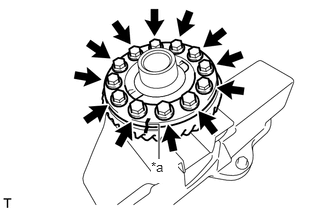
| *a | Matchmark |
Align the matchmarks on the rear differential case sub-assembly and differential ring gear, and install the differential ring gear.
Temporarily install 12 new rear differential case bolts to which thread lock has been applied.
- Adhesive:
Toyota Genuine Adhesive 1360K, Three Bond 1360K or equivalent.
After the ring gear has cooled sufficiently, tighten the 12 new rear differential case bolts.
- Torque:
- 98.6 N*m (1005 kgf*cm, 73 ft.*lbf)
- NOTICE:
- ·
New rear differential case bolts should be used every time the differential ring gear is installed.
·Install the new rear differential case bolts by tightening diametrically opposite bolts uniformly in several passes.
·Tighten the rear differential case bolts after the differential ring gear has cooled down sufficiently.
·Do not allow any oil to contact the rear differential case bolt, differential ring gear threads or differential case seating surface.
41301A
2.INSTALL REAR DIFFERENTIAL CASE BEARING (for LH Side)
- NOTICE:
-
New bearings are coated with anti-rust oil. If using new bearings, do not wash it off.
- HINT:
-
Perform this step only when replacing the rear differential case bearing or rear differential case sub-assembly.
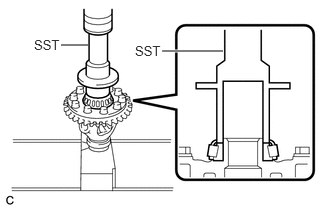
Using SST and a press, install a new rear differential case bearing (LH side inner race) to the rear differential case sub-assembly.
- SST
- 09223-46011
- NOTICE:
-
Replace the inner and outer races as a set.
41301A
3.INSTALL REAR DIFFERENTIAL CASE BEARING (for RH Side)
- NOTICE:
-
New bearings are coated with anti-rust oil. If using new bearings, do not wash it off.
- HINT:
-
Perform this step only when replacing the rear differential case bearing or rear differential case sub-assembly.
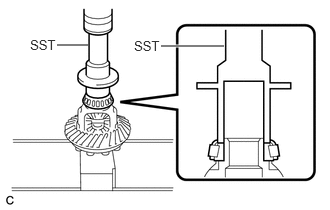
Using SST and a press, install the rear differential case bearing (RH side inner race) to the rear differential case sub-assembly.
- SST
- 09223-46011
- NOTICE:
-
Replace the inner and outer races as a set.
4.INSTALL STRAIGHT PIN
Using a plastic hammer, install the 4 straight pins to the rear differential carrier.
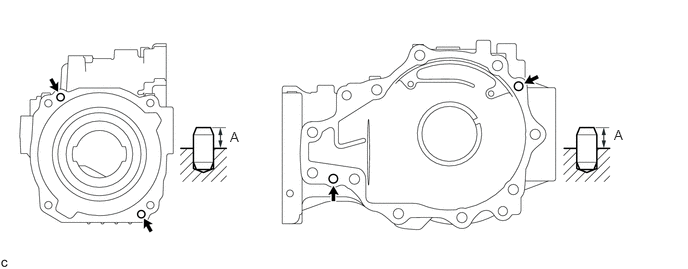
- Protrusion (A):
8 to 9 mm (0.315 to 0.354 in.)
41201A
5.INSTALL REAR DRIVE PINION REAR BEARING
- NOTICE:
-
New bearings are coated with anti-rust oil. If using new bearings, do not wash it off.
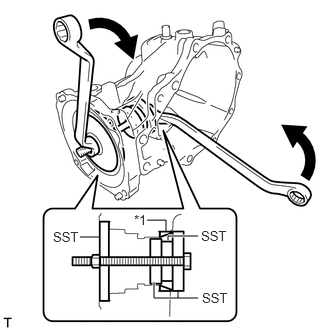
| *1 | Rear Drive Pinion Rear Tapered Roller Bearing (Outer Race) |
Using SST, bolt, nuts and washers, install the rear drive pinion rear tapered roller bearing (outer race) to the rear differential carrier.
- SST
- 09950-60010 (09951-00500, 09951-00530)
09950-60020 (09951-00680, 09951-00890)
- HINT:
-
Use M12 x P1.5 bolts with shaft lengths of 124 mm (4.88 in.) and M12 x P1.5 nuts for installation.
41201B
6.INSTALL REAR DRIVE PINION FRONT BEARING
- NOTICE:
-
New bearings are coated with anti-rust oil. If using new bearings, do not wash it off.
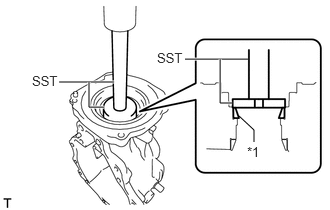
| *1 | Rear Drive Pinion Front Tapered Roller Bearing (Outer Race) |
Using SST and a press, install the rear drive pinion front tapered roller bearing (outer race) to the rear differential carrier.
- SST
- 09950-60010 (09951-00610)
09950-70010 (09951-07150)
41201A
7.INSTALL REAR DRIVE PINION REAR BEARING
- NOTICE:
-
New bearings are coated with anti-rust oil. If using new bearings, do not wash it off.
Install the rear differential drive pinion plate washer to the differential drive pinion.
- NOTICE:
-
Install each rear differential drive pinion plate washer to the position it was removed from.
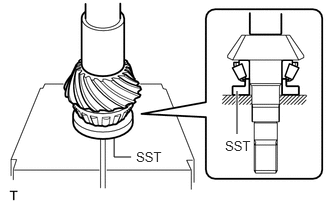
Using SST and a press, install the rear drive pinion rear tapered roller bearing (inner race) to the differential drive pinion.
- SST
- 09506-30012
41301A
8.INSTALL REAR DIFFERENTIAL CASE BEARING (for LH Side)
- NOTICE:
-
New bearings are coated with anti-rust oil. If using new bearings, do not wash it off.
- HINT:
-
Replace the rear differential case bearing (LH side outer race) when removing the rear differential case bearing (LH side inner race) from the rear differential case sub-assembly.
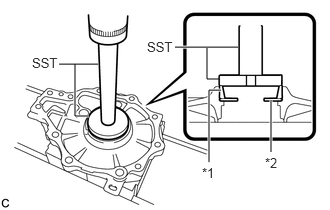
| *1 | Rear Differential Case Bearing (Outer Race) |
| *2 | Rear Differential Side Gear Shaft Plate Washer |
Using SST and a press, install the rear differential side gear shaft plate washer and a new rear differential case bearing (LH side outer race) to the differential side bearing retainer.
- SST
- 09950-60020 (09951-00680)
09950-70010 (09951-07150)
- NOTICE:
- ·
Install each rear differential side gear shaft plate washer to the position it was removed from.
·Replace the inner and outer races as a set.
·Install the rear drive shaft oil seal LH after performing the tooth contact inspection and backlash adjustment.
41301A
9.INSTALL REAR DIFFERENTIAL CASE BEARING (for RH Side)
- NOTICE:
-
New bearings are coated with anti-rust oil. If using new bearings, do not wash it off.
- HINT:
-
Replace the rear differential case bearing (RH side outer race) when removing the rear differential case bearing (RH side inner race) from the rear differential case sub-assembly.
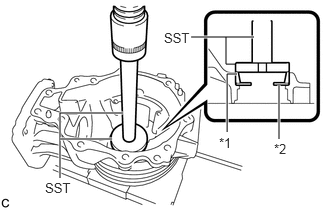
| *1 | Rear Differential Case Bearing (Outer Race) |
| *2 | Rear Differential Side Gear Shaft Plate Washer |
Using SST and a press, install the rear differential side gear shaft plate washer and the rear differential case bearing (RH side outer race) to the rear differential carrier.
- SST
- 09950-60020 (09951-00680)
09950-70010 (09951-07150)
- NOTICE:
- ·
Install each rear differential side gear shaft plate washer to the position it was removed from.
·Replace the inner and outer races as a set.
·Install the rear drive shaft oil seal RH after performing the tooth contact inspection and backlash adjustment.
10.ADJUST DIFFERENTIAL DRIVE PINION PRELOAD
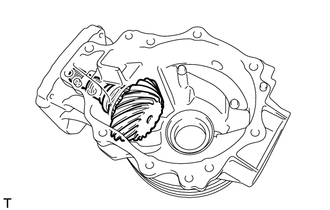
Install the differential drive pinion with rear drive pinion rear tapered roller bearing (inner race) to the rear differential carrier.
Apply hypoid gear oil LSD to the threads of a new rear drive pinion nut and its seating surface.
Install the rear drive pinion front tapered roller bearing (inner race) and rear drive pinion nut to the differential drive pinion.
- NOTICE:
-
New bearings are coated with anti-rust oil. If using new bearings, do not wash it off.
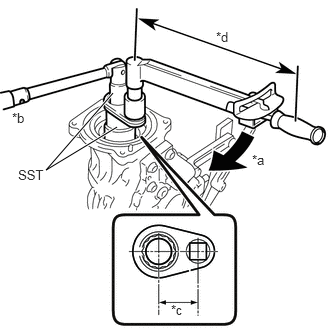
| *a | Turn |
| *b | Hold |
| *c | Fulcrum length of SST: 50 mm (1.97 in.) |
| *d | Fulcrum length of torque wrench: 750 mm (2.46 ft.) |
Using SST, gradually tighten the rear drive pinion nut until the specified preload is reached. Do not exceed the torque limit shown below.
- SST
- 09556-16011
09564-16020
- Torque:
- without SST [Torque wrench (N*m (kgf*cm, ft.*lbf))]:
321 N*m (3273 kgf*cm, 237 ft.*lbf) or less
- with SST [Reading of torque wrench (N*m (kgf*cm, ft.*lbf))]:
301 N*m (3069 kgf*cm, 222 ft.*lbf) or less
- NOTICE:
- ·
Tighten the rear drive pinion nut gradually. Never tighten it excessively.
·This torque value is effective when SST is parallel to the torque wrench.
·The "with SST" torque value is effective when using SST with a fulcrum length of 50 mm (1.97 in.).
·The "with SST" torque value is effective when using a torque wrench with a fulcrum length of 750 mm (2.46 ft.).
·If using a torque wrench with a different length, or connecting the torque wrench and SST at an angle, refer to the alternate torque values.
Click hereGeneral>INTRODUCTION>REPAIR INSTRUCTION>PRECAUTION
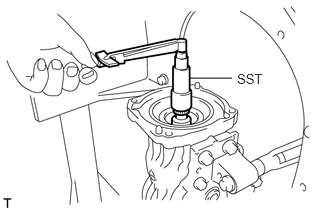
Using SST and a torque wrench, measure the preload (starting torque) of the differential drive pinion.
- SST
- 09556-16011
- Standard Drive Pinion Preload (Starting Torque):
- New Bearing:
1.83 to 3.04 N*m (19 to 30 kgf*cm, 17 to 26 in.*lbf)
- Reused Bearing:
1.51 to 2.52 N*m (16 to 25 kgf*cm, 14 to 22 in.*lbf)
- HINT:
-
For a more accurate measurement, rotate the bearing forward and backward before inspection.
11.INSTALL REAR DIFFERENTIAL CASE ASSEMBLY
Using a scraper and wire brush, remove the seal packing from the rear differential carrier and differential side bearing retainer.
- NOTICE:
- ·
Do not damage the contact surface.
·Be sure to completely remove all seal packing from the rear differential carrier and differential side bearing retainer.
·Do not allow the removed seal packing to enter the rear differential carrier.
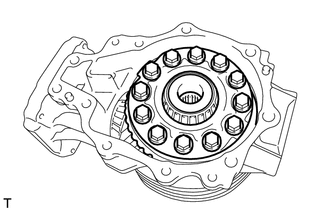
Install the rear differential case assembly to the rear differential carrier.
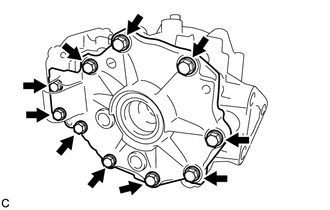
Install the differential side bearing retainer to the rear differential carrier with the 10 bolts.
- Torque:
- 42.2 N*m (430 kgf*cm, 31 ft.*lbf)
12.INSPECT DIFFERENTIAL RING GEAR BACKLASH
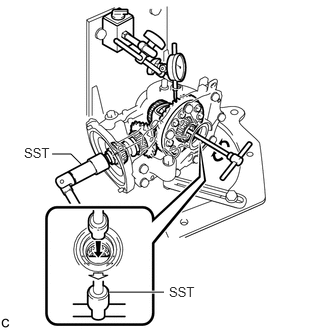
Insert a dial indicator and magnetic base through the rear differential filler plug hole, and set it perpendicular to a differential ring gear tooth tip.
Using SST, hold the differential drive pinion in place.
- SST
- 09556-16011
Using SST, rotate the rear differential case assembly forward and backward, and measure the backlash.
- SST
- 09564-32011
- Backlash:
0.13 to 0.25 mm (0.00512 to 0.00984 in.)
- HINT:
-
Measure at 3 or more areas on the circumference of the differential ring gear.
If the result is not within the specified range, select rear differential side gear shaft plate washers that are thicker or thinner as necessary. Adjust the thickness of the left and right rear differential side gear shaft plate washers in equal increments. Then install the rear differential case bearing (outer race).
- HINT:
- ·
Adjust the thickness of the LH and RH rear differential side gear shaft plate washers by the same amount each time until the backlash is within the standard range. If the thickness on the LH side is increased, decrease the thickness on the RH side, and if the thickness on the LH side is decreased, increase the thickness on the RH side.
·When the backlash is smaller than the specified value, select a thick rear differential side gear shaft plate washer for the RH side and thin rear differential side gear shaft plate washer for the LH side.
·When the backlash is larger than the specified value, select a thin rear differential side gear shaft plate washer for the RH side and thick rear differential side gear shaft plate washer for the LH side.
- Rear Differential Side Gear Shaft Plate Washer:
Mark Thickness Mark Thickness 75 1.74 to 1.76 mm (0.0686 to 0.0692 in.) 96 2.34 to 2.36 mm (0.0922 to 0.0929 in.) 76 1.77 to 1.79 mm (0.0697 to 0.0704 in.) 97 2.37 to 2.39 mm (0.0934 to 0.0940 in.) 77 1.80 to 1.82 mm (0.0709 to 0.0716 in.) 98 2.40 to 2.42 mm (0.0945 to 0.0952 in.) 78 1.83 to 1.85 mm (0.0721 to 0.0728 in.) 99 2.43 to 2.45 mm (0.0957 to 0.0964 in.) 79 1.86 to 1.88 mm (0.0733 to 0.0740 in.) 00 2.46 to 2.48 mm (0.0969 to 0.0976 in.) 80 1.89 to 1.91 mm (0.0745 to 0.0751 in.) 01 2.49 to 2.51 mm (0.0981 to 0.0988 in.) 81 1.92 to 1.94 mm (0.0756 to 0.0763 in.) 02 2.52 to 2.54 mm (0.0993 to 0.0999 in.) 82 1.95 to 1.97 mm (0.0768 to 0.0775 in.) 03 2.55 to 2.57 mm (0.1004 to 0.1011 in.) 83 1.98 to 2.00 mm (0.0780 to 0.0787 in.) 04 2.58 to 2.60 mm (0.1016 to 0.1023 in.) 84 2.01 to 2.03 mm (0.0792 to 0.0799 in.) 05 2.61 to 2.63 mm (0.1028 to 0.1035 in.) 85 2.04 to 2.06 mm (0.0804 to 0.0811 in.) 06 2.64 to 2.66 mm (0.1040 to 0.1047 in.) 86 2.07 to 2.09 mm (0.0815 to 0.0822 in.) 07 2.67 to 2.69 mm (0.1052 to 0.1059 in.) 88 2.10 to 2.12 mm (0.0827 to 0.0834 in.) 08 2.70 to 2.72 mm (0.1063 to 0.1070 in.) 89 2.13 to 2.15 mm (0.0839 to 0.0846 in.) 09 2.73 to 2.75 mm (0.1075 to 0.1082 in.) 90 2.16 to 2.18 mm (0.0851 to 0.0858 in.) 10 2.76 to 2.78 mm (0.1087 to 0.1094 in.) 91 2.19 to 2.21 mm (0.0863 to 0.0870 in.) 11 2.79 to 2.81 mm (0.1099 to 0.1106 in.) 92 2.22 to 2.24 mm (0.0875 to 0.0881 in.) 12 2.82 to 2.84 mm (0.1111 to 0.1118 in.) 93 2.25 to 2.27 mm (0.0886 to 0.0893 in.) 13 2.85 to 2.87 mm (0.1123 to 0.1129 in.) 94 2.28 to 2.30 mm (0.0898 to 0.0905 in.) 14 2.88 to 2.90 mm (0.1134 to 0.1141 in.) 95 2.31 to 2.33 mm (0.0910 to 0.0917 in.) - -
13.ADJUST TOOTH CONTACT BETWEEN RING GEAR AND DRIVE PINION
Remove the 10 bolts and the differential side bearing retainer.
Remove the rear differential case assembly from the rear differential carrier.
Coat 3 or 4 teeth at 4 different positions on the differential ring gear with Prussian blue.
Install the rear differential case assembly to the rear differential carrier.
Install the differential side bearing retainer with the 10 bolts.
- Torque:
- 42.2 N*m (430 kgf*cm, 31 ft.*lbf)
Turn the differential drive pinion at least 10 times.
Remove the 10 bolts and the differential side bearing retainer.
Remove the rear differential case assembly from the rear differential carrier.
Inspect the tooth contact pattern.
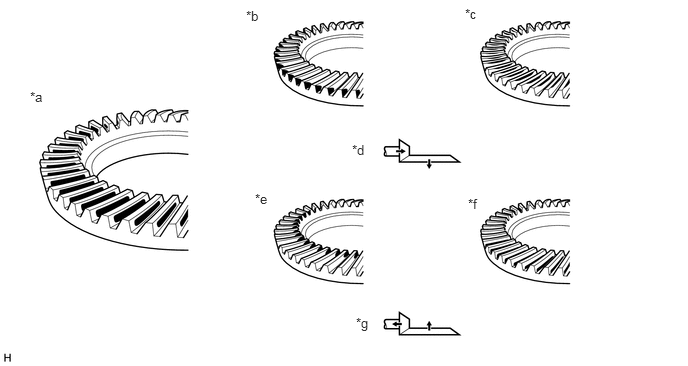
| *a | Proper Contact | *b | Heel Contact |
| *c | Face Contact | *d | Select washers that will bring the drive pinion closer to the ring gear |
| *e | Toe Contact | *f | Flank Contact |
| *g | Select washers that will bring the drive pinion away from the ring gear | - | - |
- HINT:
-
Check the tooth contact pattern at 2 or more positions on the circumference of the differential ring gear.
Perform the following procedure for face or flank contact:
If the result is not within the specified range, select rear differential side gear shaft plate washers that are thicker or thinner as necessary. Adjust the thickness of the left and right rear differential side gear shaft plate washers in equal increments. Then install the rear differential case bearing (outer race).
Repeat the differential ring gear and differential drive pinion tooth contact pattern inspection.
- HINT:
-
If the tooth contact pattern is not correct, reselect rear differential side gear shaft plate washers and reinspect the tooth contact pattern.
Repeat the differential ring gear and differential drive pinion backlash inspection.
- HINT:
-
If the differential ring gear and differential drive pinion backlash are not as specified, reselect the rear differential drive pinion plate washer and then readjust the differential drive pinion preload, differential ring gear and differential drive pinion backlash and reinspect the tooth contact pattern.
Perform the following procedure for heel or toe contact:
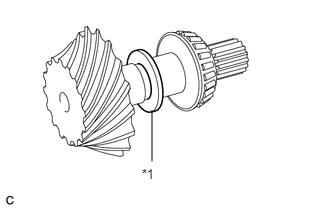
| *1 | Rear Differential Drive Pinion Plate Washer |
Select a rear differential drive pinion plate washer again and install the rear drive pinion rear tapered roller bearing (inner race).
- Rear Differential Drive Pinion Plate Washer:
Mark Thickness Mark Thickness 41 1.695 to 1.705 mm (0.0667 to 0.0671 in.) 73 1.975 to 1.985 mm (0.0778 to 0.0781 in.) 43 1.715 to 1.725 mm (0.0675 to 0.0679 in.) 75 1.995 to 2.005 mm (0.0785 to 0.0789 in.) 45 1.735 to 1.745 mm (0.0683 to 0.0687 in.) 77 2.015 to 2.025 mm (0.0793 to 0.0797 in.) 47 1.755 to 1.765 mm (0.0690 to 0.0695 in.) 79 2.035 to 2.045 mm (0.0801 to 0.0805 in.) 49 1.775 to 1.785 mm (0.0699 to 0.0703 in.) 81 2.055 to 2.065 mm (0.0809 to 0.0813 in.) 51 1.795 to 1.805 mm (0.0707 to 0.0711 in.) 83 2.075 to 2.085 mm (0.0817 to 0.0821 in.) 53 1.815 to 1.825 mm (0.0715 to 0.0719 in.) 85 2.095 to 2.105 mm (0.0825 to 0.0829 in.) 55 1.835 to 1.845 mm (0.0722 to 0.0726 in.) 87 2.115 to 2.125 mm (0.0833 to 0.0837 in.) 57 1.855 to 1.865 mm (0.0730 to 0.0734 in.) 89 2.135 to 2.145 mm (0.0841 to 0.0844 in.) 59 1.875 to 1.885 mm (0.0738 to 0.0742 in.) 91 2.155 to 2.165 mm (0.0848 to 0.0852 in.) 61 1.895 to 1.905 mm (0.0746 to 0.0750 in.) 93 2.175 to 2.185 mm (0.0856 to 0.0860 in.) 63 1.915 to 1.925 mm (0.0754 to 0.0758 in.) 95 2.195 to 2.205 mm (0.0864 to 0.0868 in.) 65 1.935 to 1.945 mm (0.0762 to 0.0766 in.) 97 2.215 to 2.225 mm (0.0873 to 0.0875 in.) 71 1.955 to 1.965 mm (0.0770 to 0.0774 in.) 99 2.235 to 2.245 mm (0.0880 to 0.0883 in.)
Readjust the differential drive pinion preload, differential ring gear and differential drive pinion backlash and reinspect the tooth contact pattern.
14.INSPECT TOTAL PRELOAD
Using SST and a torque wrench, measure the total preload (starting torque) with the teeth of the differential drive pinion and differential ring gear in contact.
- SST
- 09556-16011
- Standard Total Preload (Starting Torque):
- New Bearing:
3.12 to 5.86 N*m (32 to 59 kgf*cm, 28 to 51 in.*lbf)
- Reused Bearing:
2.80 to 5.34 N*m (29 to 54 kgf*cm, 25 to 47 in.*lbf)
- HINT:
-
For a more accurate measurement, rotate the rear differential case bearing forward and backward before measuring.
If the results are not within the specification, perform the procedure below:
Select a thicker or thinner rear differential side gear shaft plate washer for the RH side, and then install the rear differential case bearing outer race (RH side only).
Repeat the total preload measurement.
Repeat the differential ring gear and differential drive pinion backlash inspection.
Repeat the differential ring gear and differential drive pinion tooth contact pattern inspection.
15.REMOVE DIFFERENTIAL SIDE BEARING RETAINER
Remove the 10 bolts and differential side bearing retainer.
16.REMOVE REAR DIFFERENTIAL CASE ASSEMBLY
Remove the rear differential case assembly from the rear differential carrier.
17.REMOVE DIFFERENTIAL DRIVE PINION
Remove the differential drive pinion from the rear differential carrier.
41231
18.INSTALL REAR DIFFERENTIAL DRIVE PINION BEARING SPACER
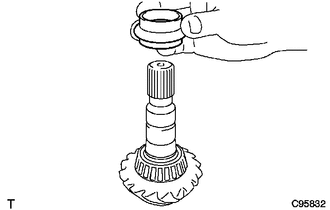
Install a new rear differential drive pinion bearing spacer to the differential drive pinion.
- HINT:
-
Face the smaller inside diameter towards the front of the vehicle.
41214
19.INSTALL REAR DIFFERENTIAL DRIVE PINION OIL SLINGER
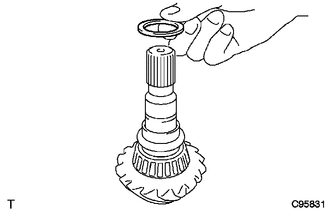
Install the rear differential drive pinion oil slinger to the differential drive pinion.
20.INSTALL DIFFERENTIAL DRIVE PINION
Install the differential drive pinion to the rear differential carrier.
Install the differential side bearing retainer with the 10 bolts.
- Torque:
- 42.2 N*m (430 kgf*cm, 31 ft.*lbf)
41204B
21.TEMPORARILY TIGHTEN REAR DRIVE PINION NUT
Apply hypoid gear oil LSD to the threads of the rear drive pinion nut and its seating surface.
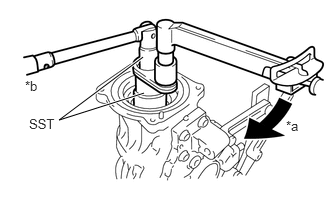
| *a | Turn |
| *b | Hold |
Using SST, temporarily install the rear drive pinion nut to the differential drive pinion.
- SST
- 09556-16011
09564-16020
Using SST and a torque wrench, inspect the differential drive pinion preload (starting torque).
- SST
- 09556-16011
- Standard Drive Pinion Preload (Starting Torque):
- New Bearing:
1.83 to 3.04 N*m (19 to 30 kgf*cm, 17 to 26 in.*lbf)
- Reused Bearing:
1.51 to 2.52 N*m (16 to 25 kgf*cm, 14 to 22 in.*lbf)
- HINT:
-
For a more accurate measurement, rotate the bearing forward and backward before adjustment.
| *a | Turn |
| *b | Hold |
| *c | Fulcrum length of SST: 50 mm (1.97 in.) |
| *d | Fulcrum length of torque wrench: 750 mm (2.46 ft.) |
If the preload is insufficient, use SST to tighten the rear drive pinion nut 5° to 10° at a time. Measure the drive pinion preload and repeat the adjustment as necessary until the preload matches the specified torque.
- SST
- 09556-16011
09564-16020
- Torque:
- without SST [Torque wrench (N*m (kgf*cm, ft.*lbf))]:
321 N*m (3273 kgf*cm, 237 ft.*lbf) or less
- with SST [Reading of torque wrench (N*m (kgf*cm, ft.*lbf))]:
301 N*m (3069 kgf*cm, 222 ft.*lbf) or less
- NOTICE:
- ·
Tighten the rear drive pinion nut gradually. Never tighten it excessively.
·This torque value is effective when SST is parallel to the torque wrench.
·The "with SST" torque value is effective when using SST with a fulcrum length of 50 mm (1.97 in.).
·The "with SST" torque value is effective when using a torque wrench with a fulcrum length of 750 mm (2.46 ft.).
·If using a torque wrench with a different length, or connecting the torque wrench and SST at an angle, refer to the alternate torque values.
Click hereGeneral>INTRODUCTION>REPAIR INSTRUCTION>PRECAUTION
If the tightening torque of the rear drive pinion nut exceeds the specified torque but the preload is still insufficient, remove the rear drive pinion nut. Then check if the rear drive pinion nut and differential drive pinion screw threads are damaged.
If no damage is found, replace the rear differential drive pinion bearing spacer, apply hypoid gear oil LSD to rear drive pinion nut threads and repeat the procedure above.
22.REMOVE DIFFERENTIAL SIDE BEARING RETAINER
Remove the 10 bolts and differential side bearing retainer.
41183
23.INSTALL REAR DIFFERENTIAL BREATHER PLUG OIL DEFLECTOR
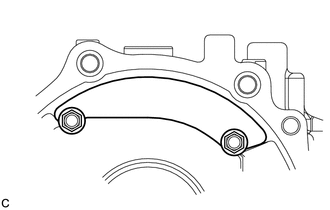
Install the rear differential breather plug oil deflector with the 2 bolts.
- Torque:
- 6.5 N*m (66 kgf*cm, 58 in.*lbf)
24.INSTALL REAR DIFFERENTIAL CASE ASSEMBLY
Install the rear differential case assembly to the rear differential carrier.
25.INSTALL DIFFERENTIAL SIDE BEARING RETAINER
Install the differential side bearing retainer to the rear differential carrier with the 10 bolts.
- Torque:
- 42.2 N*m (430 kgf*cm, 31 ft.*lbf)
26.INSPECT DIFFERENTIAL RING GEAR BACKLASH
Insert a dial indicator and magnetic base through the rear differential filler plug hole, and set it perpendicular to a differential ring gear tooth tip.
Using SST, hold the differential drive pinion in place.
- SST
- 09556-16011
Using SST, rotate the rear differential case assembly forward and backward, and measure the backlash.
- SST
- 09564-32011
- Backlash:
0.13 to 0.25 mm (0.00512 to 0.00984 in.)
If the backlash is not within the specification, adjust the side bearing preload or repair as necessary.
- HINT:
-
Measure at 3 or more areas on the circumference of the differential ring gear.
27.INSPECT TOTAL PRELOAD
Using SST and a torque wrench, measure the total preload (starting torque) with the teeth of the differential drive pinion and differential ring gear in contact.
- SST
- 09556-16011
- Standard Total Preload (Starting Torque):
- New Bearing:
3.12 to 5.86 N*m (32 to 59 kgf*cm, 28 to 51 in.*lbf)
- Reused Bearing:
2.80 to 5.34 N*m (29 to 54 kgf*cm, 25 to 47 in.*lbf)
- HINT:
-
For a more accurate measurement, rotate the rear differential case bearing forward and backward before measuring.
If the results are not within the specification, perform the procedure below:
Select a thicker or thinner rear differential side gear shaft plate washer for the RH side, and then install the rear differential case bearing outer race (RH side only).
Repeat the total preload measurement.
Repeat the differential ring gear and differential drive pinion backlash inspection.
Repeat the differential ring gear and differential drive pinion tooth contact pattern inspection.
28.INSTALL DIFFERENTIAL SIDE BEARING RETAINER
Remove the 10 bolts and differential side bearing retainer.
Using a non-residue solvent, remove grease and oil from the contact surfaces of the rear differential carrier and differential side bearing retainer.
- NOTICE:
-
Do not damage the contact surface.
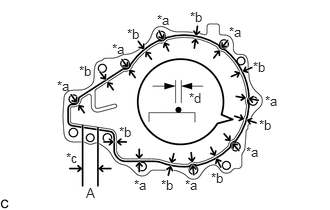
| *a | 2.0 mm (0.0787 in.) |
| *b | 3.0 mm (0.118 in.) |
| *c | 20 mm (0.787 in.) |
| *d | 2 to 3 mm (0.0787 to 0.118 in.) |
Apply seal packing to the areas indicated in the illustration of the rear differential carrier.
- Seal Packing:
Toyota Genuine Seal Packing 1281, Three Bond 1281 or equivalent
- NOTICE:
- ·
Start applying seal packing within range (A).
·Make sure that the clearance from the center of the bead is within 1 mm (0.0394 in.).
·Apply seal packing in a continuous bead 2 to 3 mm (0.0787 to 0.118 in.) in diameter.
·If there is an area where seal packing is not applied in a continuous bead, be sure to apply seal packing by overlapping the ends of the bead at least 10 mm (0.394 in.).
·Stop applying seal packing after allowing it to overlap with the beginning of the bead by at least 10 mm (0.394 in.) within range (A) in the illustration.
·Install the differential side bearing retainer within 3 minutes after applying seal packing. If the differential side bearing retainer is not installed within 3 minutes after applying seal packing, completely remove and then reapply seal packing.
Install the differential side bearing retainer to the rear differential carrier with the 10 bolts.
- Torque:
- 42.2 N*m (430 kgf*cm, 31 ft.*lbf)
- NOTICE:
-
After installing the differential side bearing retainer, do not add oil or drive the vehicle for at least 1 hour. In addition, avoid sudden acceleration and deceleration for a minimum of 12 hours.
29.INSPECT TOTAL PRELOAD
Using SST and a torque wrench, measure the total preload (starting torque) with the teeth of the differential drive pinion and differential ring gear in contact.
- SST
- 09556-16011
- Standard Total Preload (Starting Torque):
- New Bearing:
3.12 to 5.86 N*m (32 to 59 kgf*cm, 28 to 51 in.*lbf)
- Reused Bearing:
2.80 to 5.34 N*m (29 to 54 kgf*cm, 25 to 47 in.*lbf)
- HINT:
-
For a more accurate measurement, rotate the rear differential case bearing forward and backward before measuring.
30.INSPECT DIFFERENTIAL RING GEAR BACKLASH
Insert a dial indicator and magnetic base through the rear differential filler plug hole, and set it perpendicular to a differential ring gear tooth tip.
Using SST, hold the differential drive pinion in place.
- SST
- 09556-16011
Using SST, rotate the rear differential case assembly forward and backward, and measure the backlash.
- SST
- 09564-32011
- Backlash:
0.13 to 0.25 mm (0.00512 to 0.00984 in.)
If the backlash is not within the specification, adjust the side bearing preload or repair as necessary.
- HINT:
-
Measure at 3 or more areas on the circumference of the differential ring gear.
41204B
31.INSTALL REAR DRIVE PINION NUT
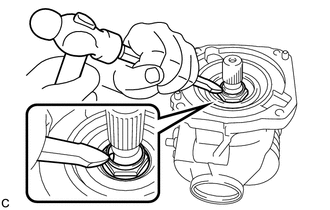
Using a chisel and a hammer, stake the rear drive pinion nut as shown in the illustration.
41410D
32.INSTALL DIAPHRAGM OIL SEAL
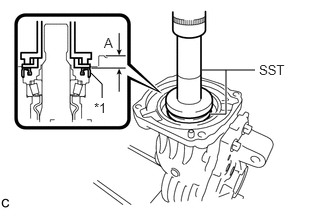
| *1 | Diaphragm Oil Seal |
Using SST and a press, install a new diaphragm oil seal into the rear differential carrier assembly.
- SST
- 09506-35010
09554-22010
- Standard Distance (A):
0.7 to 1.3 mm (0.0276 to 0.0511 in.)
- NOTICE:
- ·
Install the diaphragm oil seal uniformly.
·Press fit the diaphragm oil seal straight.
Apply a light coat of MP grease to the lip of the new diaphragm oil seal.
42340D
33.INSTALL REAR DRIVE SHAFT OIL SEAL LH
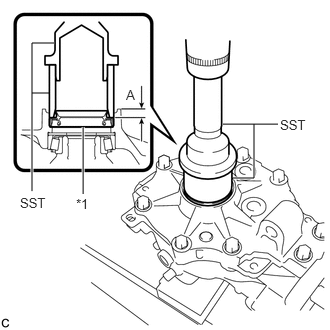
| *1 | Rear Drive Shaft Oil Seal LH |
Using SST and a press, install a new rear drive shaft oil seal LH into the differential side bearing retainer.
- SST
- 09223-46011
09631-32020
- Standard Distance (A):
8.2 to 8.8 mm (0.323 to 0.346 in.)
- NOTICE:
- ·
Install the rear drive shaft oil seal LH uniformly.
·Press fit the rear drive shaft oil seal LH straight.
Apply a light coat of MP grease to the lip of the new rear drive shaft oil seal LH.
42330G
34.INSTALL REAR DRIVE SHAFT OIL SEAL RH
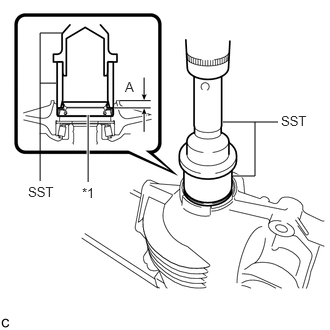
| *1 | Rear Drive Shaft Oil Seal RH |
Using SST and a press, install a new rear drive shaft oil seal RH into the rear differential carrier.
- SST
- 09223-46011
09631-32020
- Standard Distance (A):
8.2 to 8.8 mm (0.323 to 0.346 in.)
- NOTICE:
- ·
Install the rear drive shaft oil seal RH uniformly.
·Press fit the rear drive shaft oil seal RH straight.
Apply a light coat of MP grease to the lip of the new rear drive shaft oil seal RH.
41330H
35.INSTALL TRANSMISSION COUPLING SPACER
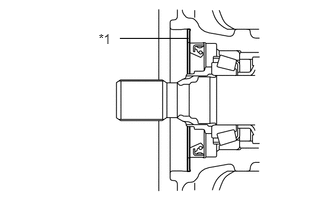
| *1 | Transmission Coupling Spacer |
Install the transmission coupling spacer to the rear differential carrier assembly.
- NOTICE:
-
Keep the transmission coupling spacer free of oil and foreign matter.
41330E
36.INSTALL TRANSMISSION COUPLING CONICAL SPRING WASHER
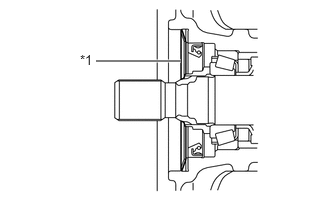
| *1 | Transmission Coupling Conical Spring Washer |
Install the transmission coupling conical spring washer to the rear differential carrier assembly as shown in the illustration.
- NOTICE:
-
Keep the transmission coupling conical spring washer free of oil and foreign matter.
41252
37.INSTALL REAR DIFFERENTIAL DUST DEFLECTOR
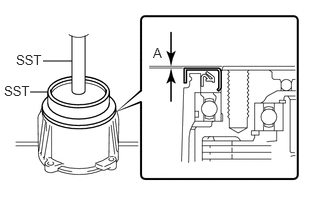
Using SST and a press, install the rear differential dust deflector.
- SST
- 09223-15030
09950-70010 (09951-07150)
- Standard Distance (A):
0 to 0.6 mm (0 to 0.0236 in.)
- NOTICE:
-
Do not damage the end surface of the electro magnetic control coupling sub-assembly.
- HINT:
-
If the end surface of the electro magnetic control coupling sub-assembly is damaged while installing the rear differential dust deflector, replace the electro magnetic control coupling sub-assembly with a new one.
38.INSTALL STUD BOLT
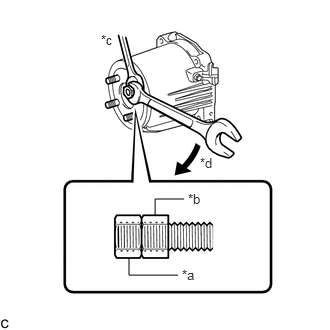
| *a | Upper Nut |
| *b | Lower Nut |
| *c | Hold |
| *d | Turn |
Temporarily install 4 new stud bolts to the electro magnetic control coupling sub-assembly.
Install 2 service nuts to the stud bolt.
- Recommended Service Nut:
- Thread Diameter:
10 mm (0.394 in.)
- Thread Pitch:
1.0 mm (0.0394 in.)
Lock the upper nut using the lower nut.
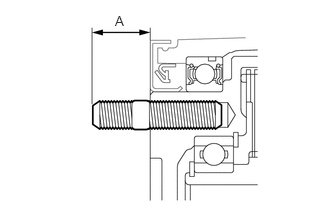
Turn the upper nut and tighten the other 3 stud bolts to the electro magnetic control coupling sub-assembly in the same way.
- Torque:
- 9.8 N*m (100 kgf*cm, 87 in.*lbf)
- Standard Distance (A):
22.55 to 25.85 mm (0.888 to 1.017 in.)
- NOTICE:
-
Prevent foreign matter from entering the electro magnetic control coupling sub-assembly.
- HINT:
-
If the threads of the electro magnetic control coupling sub-assembly are damaged while installing the stud bolt, replace the electro magnetic control coupling sub-assembly with a new one.
41303
39.INSTALL ELECTRO MAGNETIC CONTROL COUPLING SUB-ASSEMBLY
Using a scraper and wire brush, remove the seal packing from the rear differential carrier assembly and electro magnetic control coupling sub-assembly.
- NOTICE:
- ·
Do not damage the contact surface.
·Be sure to completely remove all seal packing from the rear differential carrier assembly and electro magnetic control coupling sub-assembly.
·Do not allow the removed seal packing to enter the rear differential carrier assembly and electro magnetic control coupling sub-assembly.
Using a non-residue solvent, remove grease and oil from the contact surfaces of the rear differential carrier assembly and the electro magnetic control coupling sub-assembly.
- NOTICE:
-
Do not damage the contact surface.
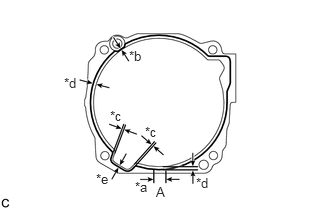
| *a | 20 mm (0.787 in.) |
| *b | 1.0 mm (0.0394 in.) |
| *c | 1.4 mm (0.0551 in.) |
| *d | 3.0 mm (0.118 in.) |
| *e | 2.0 mm (0.0787 in.) |
Apply seal packing to the areas indicated in the illustration of the rear differential carrier assembly.
- Seal Packing:
Toyota Genuine Seal Packing 1280G, Three Bond 1280G or equivalent
- NOTICE:
- ·
Start applying seal packing within range (A).
·Make sure that the clearance from the center of the bead is within 1 mm (0.0394 in.).
·Apply seal packing in a continuous bead 2 to 3 mm (0.0787 to 0.118 in.) in diameter.
·If there is an area where seal packing is not applied in a continuous bead, be sure to apply seal packing by overlapping the ends of the bead at least 10 mm (0.394 in.).
·Stop applying seal packing after allowing it to overlap with the beginning of the bead by at least 10 mm (0.394 in.) within range (A) in the illustration.
·Install the electro magnetic control coupling sub-assembly within 3 minutes after applying seal packing. If the electro magnetic control coupling sub-assembly is not installed within 3 minutes after applying seal packing, completely remove and then reapply seal packing.
·After installing the electro magnetic control coupling sub-assembly, do not immediately add oil or drive the vehicle for at least 1 hour.
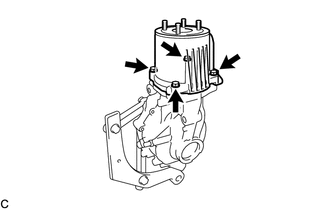
Install the electro magnetic control coupling sub-assembly with the 4 bolts.
- Torque:
- 19.6 N*m (200 kgf*cm, 14 ft.*lbf)
- NOTICE:
- ·
Do not damage the diaphragm oil seal.
·Do not damage the contact surface of the rear differential carrier assembly and electro magnetic control coupling sub-assembly.
41108C
40.INSTALL REAR DIFFERENTIAL CARRIER COVER BREATHER PLUG
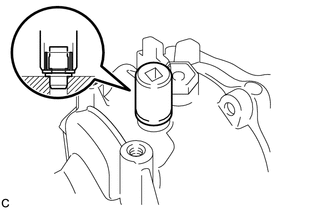
Using a socket wrench, service nut and a hammer, install the rear differential carrier cover breather plug to the rear differential carrier.
- NOTICE:
-
Tap the rear differential carrier cover breather plug in until the flange meets the edge of the rear differential carrier sub-assembly.
- HINT:
- ·
Use a service nut with an inner diameter of 13 mm (0.512 in.) and a socket wrench appropriate for the service nut.
·Tap in the rear differential carrier cover breather plug until it sits flush with the rear differential carrier assembly.
41303
41.INSPECT RUNOUT OF ELECTRO MAGNETIC CONTROL COUPLING SUB-ASSEMBLY
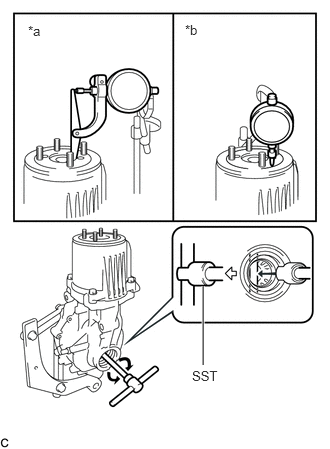
| *a | Vertical Runout |
| *b | Lateral Runout |
Install a dial indicator and magnetic base perpendicular to the inner side of the electro magnetic control coupling sub-assembly as shown in the illustration.
Using SST, rotate the electro magnetic control coupling sub-assembly forward and backward, and measure the vertical runout.
- SST
- 09564-32011
- Maximum Runout:
0.06 mm (0.00236 in.)
If the runout is greater than the maximum value, replace the electro magnetic control coupling sub-assembly.
Install a dial indicator and magnetic base perpendicular to the electro magnetic control coupling sub-assembly as shown in the illustration.
Using SST, rotate the electro magnetic control coupling sub-assembly forward and backward, and measure the lateral runout.
- SST
- 09564-32011
- Maximum Runout:
0.07 mm (0.00276 in.)
If the runout is greater than the maximum value, replace the electro magnetic control coupling sub-assembly.
41110H
42.INSTALL REAR DIFFERENTIAL FILLER PLUG
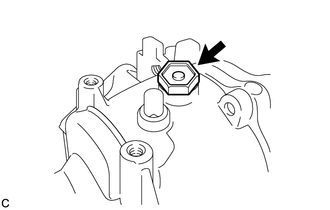
Install a new gasket and the rear differential filler plug.
- Torque:
- 49 N*m (500 kgf*cm, 36 ft.*lbf)
43.INSTALL CONNECTOR BRACKET
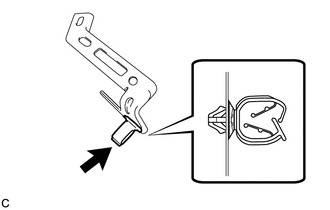
Install a new clamp to the connector bracket as shown in the illustration.
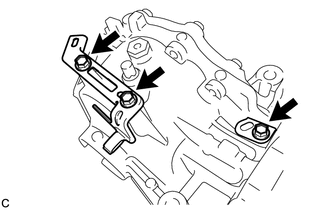
Install the 2 connector brackets with the 3 bolts.
- Torque:
- 19.6 N*m (200 kgf*cm, 14 ft.*lbf)
44.INSTALL ELECTRO MAGNETIC CONTROL COUPLING WIRE HARNESS
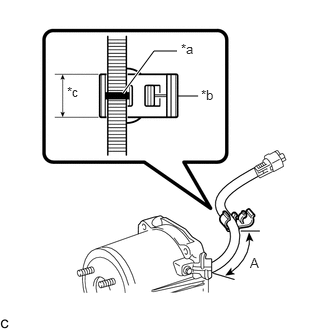
| *a | Identification Mark |
| *b | Clamp |
| *c | Width of Clamp |
Install a new clamp to the electro magnetic control coupling wire harness as shown in the illustration.
- Standard Distance (A):
84 to 90 mm (3.31 to 3.54 in.)
- NOTICE:
-
Be sure to align the clamp with the identification mark.
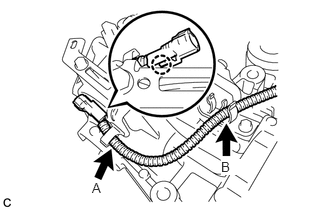
Engage the claw to install the electro magnetic control coupling wire harness connector.
Install the electro magnetic control coupling wire harness to the clamp (A).
Install the clamp (B) to the connector bracket.
- NOTICE:
-
Do not damage the electro magnetic control coupling wire harness.