2GR-FKS COOLING THERMOSTAT INSPECTION
PROCEDURE

 16031
1.INSPECT WATER INLET WITH THERMOSTAT SUB-ASSEMBLY
Check the valve opening.
- HINT:
-
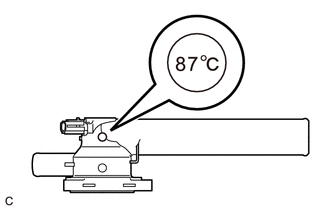
-
The valve opening temperature is inscribed on the water inlet with thermostat sub-assembly.
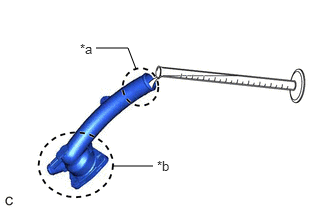
| *a | Inlet Pipe Side |
| *b | Valve Side |
Add 15 cc (0.9 cu. in.) of water to the water inlet with thermostat sub-assembly from the inlet pipe side.
Confirm that water does not flow out from the valve side of the water inlet with thermostat sub-assembly.
If water flows out from the valve side of the water inlet with thermostat sub-assembly, replace the water inlet with thermostat sub-assembly with a new one.
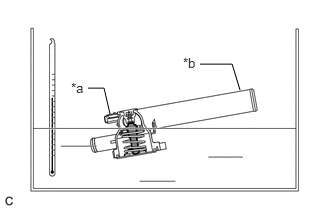
| *a | Connector |
| *b | Inlet Pipe |

|
Temperature Sensor |
Immerse the water inlet with thermostat sub-assembly in water that is between 92°C (198°F) and 96°C (205°F) for 5 minutes or more.
- NOTICE:
- ·
Do not allow any water to come into contact with the connector of the water inlet with thermostat sub-assembly.
·Make sure that the end of the inlet pipe of the water inlet with thermostat sub-assembly is not facing downward.
·Make sure to immerse the water inlet with thermostat sub-assembly in the water as shown in the illustration.
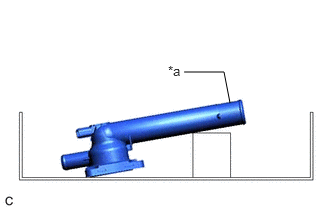
| *a | Inlet Pipe |
Leave the water inlet with thermostat sub-assembly at ambient temperature for 5 minutes so that the valve closes.
- NOTICE:
-
Make sure that the end of the inlet pipe of the water inlet with thermostat sub-assembly is not facing downward.
Check that the water that was added to the water inlet with thermostat sub-assembly has completely flowed out.
If the water that was added to the water inlet with thermostat sub-assembly has not completely flowed out, replace the water inlet with thermostat sub-assembly with a new one.
Check the resistance of the temperature sensor.
Measure the resistance according to the value(s) in the table below.
- Standard Resistance:
Tester Connection Condition Specified Condition 1 - 2 Always 10.6 to 14.2 Ω
If the result is not as specified, replace the water inlet with thermostat sub-assembly.