WINDOW / GLASS HEATED WINDSHIELD DEFROSTER SYSTEM Heated Windshield Defroster System does not operate
DESCRIPTION
When the front window deicer switch is operated, the operation signal is transmitted to the air conditioning amplifier assembly directly. When the air conditioning amplifier assembly receives the signal, it turns on the HWD NO. 1 relay, HWD NO. 2 relay and DEICER relay to operate the heated windshield defroster system.
WIRING DIAGRAM
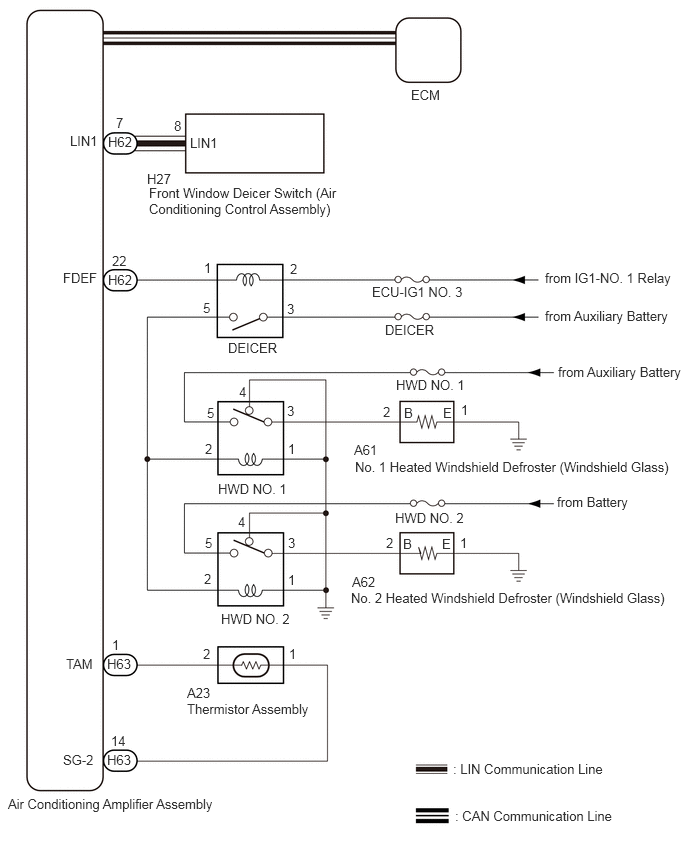
CAUTION / NOTICE / HINT
- NOTICE:
- ·
Inspect the fuses for circuits related to this system before performing the following procedure.
·If the battery voltage becomes low, battery load control will operate in order to ensure sufficient power is supplied to the power steering system. In this case, the heated windshield defroster system may not operate.
·The heated windshield defroster system uses the CAN communication system. First, confirm that there are no malfunctions in the communication system by checking the communication function of the CAN communication system. Refer to the How to Proceed with Troubleshooting procedure
·If the ambient temperature is 4.5°C (40°F) or higher, or if a malfunction of the ambient temperature sensor (thermistor assembly) is detected, the DEICER relay will be deactivated and the front window deicer switch indicator light will blink.
PROCEDURE
Clear the DTCs.
- Body Electrical > Air Conditioner > Clear DTCs
- 50002 121
Recheck for DTCs.
- Body Electrical > Air Conditioner > Trouble Codes
- 50001 121
- Result:
Result Proceed to DTC B1412 is output A DTC B1412 is not output B
A
B
Perform the Active Test according to the display on the GTS.
- Body Electrical > Air Conditioner > Active Test
-
Tester Display Measurement Item Control Range Diagnostic Note HWD Relay Heated windshield defroster (windshield glass) OFF or ON -
- Body Electrical > Air Conditioner > Active Test
-
Tester Display HWD Relay - 50004 121 102
- OK:
The heated windshield defroster system operates normally.
- Result:
Result Proceed to OK A NG (Both No. 1 and No. 2 heated windshield defroster does not warm up.) B NG (Only No. 1 heated windshield defroster does not warm up.) C NG (Only No. 2 heated windshield defroster does not warm up.) D
A
B
C
D
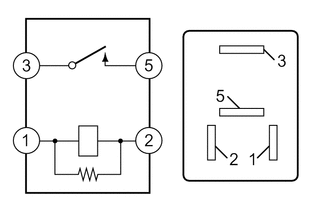
Measure the resistance according to the value(s) in the table below.
- Standard Resistance:
Tester Connection Condition Specified Condition 3 - 5 Auxiliary battery voltage applied between terminals 1 and 2 Below 1 Ω 3 - 5 Auxiliary battery voltage not applied between terminals 10 kΩ or higher
- Result:
Proceed to OK NG
OK
NG
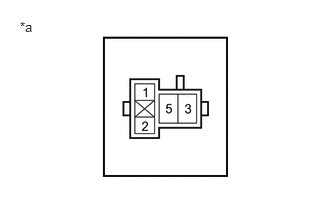
| *a | DEICER Relay Holder |
Measure the voltage according to the value(s) in the table below.
- Standard Voltage:
Tester Connection Condition Specified Condition DEICER relay holder terminal 2 - Body ground Ignition switch ON 11 to 14 V DEICER relay holder terminal 3 - Body ground Always 11 to 14 V
- Result:
Proceed to OK NG
OK
NG
| *a | DEICER Relay Holder |
Disconnect the H62 air conditioning amplifier assembly connector.
Measure the resistance according to the value(s) in the table below.
- Standard Resistance:
Tester Connection Condition Specified Condition DEICER relay holder terminal 1 - H62-22 (FDEF) Always Below 1 Ω DEICER relay holder terminal 1 or H62-22 (FDEF) - Body ground Always 10 kΩ higher
- Result:
Proceed to OK NG
OK
NG
| *a | DEICER Relay Holder |
Remove the HWD NO. 1 relay and HWD NO. 2 relay from the No. 2 engine room relay block and No. 2 junction block assembly.
Measure the resistance according to the value(s) in the table below.
- Standard Resistance:
Tester Connection Condition Specified Condition DEICER relay holder terminal 5 - HWD NO. 1 relay holder terminal 2 or HWD NO. 2 relay holder terminal 2 Always Below 1 Ω HWD NO. 1 relay holder terminal 2 or HWD NO. 2 relay holder terminal 2 - Body ground Always 10 kΩ higher
- Result:
Proceed to OK NG
OK
NG
Measure the resistance according to the value(s) in the table below.
- Standard Resistance:
Tester Connection Condition Specified Condition HWD NO. 1 relay holder terminal 1 or HWD NO. 2 relay holder terminal 1 - Body ground Always Below 1 Ω
- Result:
Proceed to OK NG
OK
NG
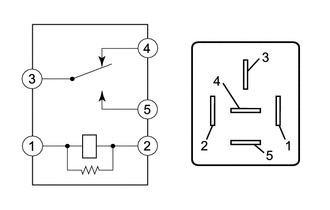
Measure the resistance according to the value(s) in the table below.
- Standard Resistance:
Tester Connection Condition Specified Condition 3 - 4 Auxiliary battery voltage applied between terminals 1 and 2 10 kΩ or higher 3 - 4 Auxiliary battery voltage not applied between terminals Below 1 Ω 3 - 5 Auxiliary battery voltage applied between terminals 1 and 2 Below 1 Ω 3 - 5 Auxiliary battery voltage not applied between terminals 10 kΩ or higher 4 - 5 Always 10 kΩ or higher
- Result:
Proceed to OK NG
OK
NG
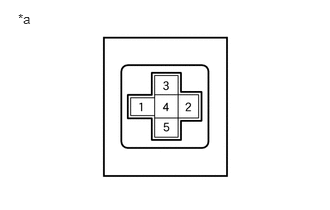
| *a | HWD NO. 1 Relay Holder |
Measure the voltage according to the value(s) in the table below.
- Standard Voltage:
Tester Connection Condition Specified Condition HWD NO. 1 relay holder terminal 5 - Body ground Always 11 to 14 V
- Result:
Proceed to OK NG
OK
NG
Remove the DEICER relay from the No. 1 engine room relay block and No. 1 junction block assembly.
Measure the resistance according to the value(s) in the table below.
- Standard Resistance:
Tester Connection Condition Specified Condition DEICER relay holder terminal 5 - HWD NO. 1 relay holder terminal 2 Always Below 1 Ω DEICER relay holder terminal 5 or HWD NO. 1 relay holder terminal 2 - Body ground Always 10 kΩ higher
- Result:
Proceed to OK NG
OK
NG
Measure the resistance according to the value(s) in the table below.
- Standard Resistance:
Tester Connection Condition Specified Condition HWD NO. 1 relay holder terminal 1 - Body ground Always Below 1 Ω
- Result:
Proceed to OK NG
OK
NG
Disconnect the A61 No. 1 heated windshield defroster (windshield glass) connector.
Measure the resistance according to the value(s) in the table below.
- Standard Resistance:
Tester Connection Condition Specified Condition HWD NO. 1 relay holder terminal 3 - A61-2 (B) Always Below 1 Ω HWD NO. 1 relay holder terminal 3 or A61-2 (B) - Body ground Always 10 kΩ higher
- Result:
Proceed to OK NG
OK
NG
Measure the resistance according to the value(s) in the table below.
- Standard Resistance:
Tester Connection Condition Specified Condition A61-1 (E) - Body ground Always Below 1 Ω
- Result:
Proceed to OK NG
OK
NG
Measure the resistance according to the value(s) in the table below.
- Standard Resistance:
Tester Connection Condition Specified Condition 3 - 4 Auxiliary battery voltage applied between terminals 1 and 2 10 kΩ or higher 3 - 4 Auxiliary battery voltage not applied between terminals Below 1 Ω 3 - 5 Auxiliary battery voltage applied between terminals 1 and 2 Below 1 Ω 3 - 5 Auxiliary battery voltage not applied between terminals 10 kΩ or higher 4 - 5 Always 10 kΩ or higher
- Result:
Proceed to OK NG
OK
NG
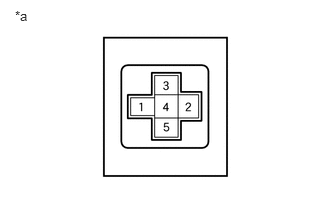
| *a | HWD NO. 2 Relay Holder |
Measure the voltage according to the value(s) in the table below.
- Standard Voltage:
Tester Connection Condition Specified Condition HWD NO. 2 relay holder terminal 5 - Body ground Always 11 to 14 V
- Result:
Proceed to OK NG
OK
NG
Remove the DEICER relay from the No. 1 engine room relay block and No. 1 junction block assembly.
Measure the resistance according to the value(s) in the table below.
- Standard Resistance:
Tester Connection Condition Specified Condition DEICER relay holder terminal 5 - HWD NO. 2 relay holder terminal 2 Always Below 1 Ω DEICER relay holder terminal 5 or HWD NO. 2 relay holder terminal 2 - Body ground Always 10 kΩ higher
- Result:
Proceed to OK NG
OK
NG
Measure the resistance according to the value(s) in the table below.
- Standard Resistance:
Tester Connection Condition Specified Condition HWD NO. 2 relay holder terminal 1 - Body ground Always Below 1 Ω
- Result:
Proceed to OK NG
OK
NG
Disconnect the A62 No. 2 heated windshield defroster (windshield glass) connector.
Measure the resistance according to the value(s) in the table below.
- Standard Resistance:
Tester Connection Condition Specified Condition HWD NO. 2 relay holder terminal 3 - A62-2 (B) Always Below 1 Ω HWD NO. 2 relay holder terminal 3 or A62-2 (B) - Body ground Always 10 kΩ higher
- Result:
Proceed to OK NG
OK
NG
Measure the resistance according to the value(s) in the table below.
- Standard Resistance:
Tester Connection Condition Specified Condition A62-1 (E) - Body ground Always Below 1 Ω
- Result:
Proceed to OK NG
OK
NG