MAINTENANCE REAR DISC BRAKE PAD REMOVAL
CAUTION / NOTICE / HINT
The necessary procedures (adjustment, calibration, initialization, or registration) that must be performed after parts are removed and installed, or replaced during rear disc brake pad removal/installation are shown below.
| Replaced Part or Performed Procedure | Necessary Procedure | Effect/Inoperative Function when Necessary Procedure not Performed | Link |
|---|---|---|---|
|
*1: Learning can also be performed using the GTS. Click here( |
|||
| Auxiliary battery terminal is disconnected/reconnected | Perform steering sensor zero point calibration | Lane Control System | ( ) |
| Parking Support Brake System*1 | |||
| Pre-collision System | |||
| Memorize steering angle neutral point | Parking Assist Monitor System | ()
|
|
| Panoramic View Monitor System | ()
|
||
| Initialize back door lock | Power Door Lock Control System | ()
|
|
| Reset back door close position | Power Back Door System | ()
|
|
- NOTICE:
- ·
Immediately after installing the brake pads, the braking performance may be reduced. Always perform a road test in a safe place while paying attention to the surroundings.
·After replacing the rear disc brake pads, the brake pedal may feel soft due to clearance between the rear disc brake pads and rear disc. Depress the brake pedal several times until the brake pedal feels firm.
·After replacing the rear disc brake pads, always perform a road test to check the braking performance and check for vibrations.
·When removing or installing the rear disc brake cylinder assembly, pushing back the disc brake piston may cause a large clearance between the brake pads and brake disc. When the brake pedal is depressed with a large clearance between the brake pads and the brake disc, DTC C13DB00, C13DC00, C13DD00, C13DE00, C140000 and/or C140A00 related to abnormal brake fluid pressure may be stored. Make sure to clear any DTCs after performing this procedure. (for HV Model)
·While the auxiliary battery is connected, even if the ignition switch is off, the brake control system activates when the brake pedal is depressed or any door courtesy switch turns on. Therefore, when servicing the brake system components, do not operate the brake pedal or open/close the doors while the auxiliary battery is connected. (for HV Model)
·After the ignition switch is turned off, the radio and display receiver assembly or the radio receiver assembly records various types of memory and settings. As a result, after turning the ignition switch off, make sure to wait at least 120 seconds before disconnecting the cable from the negative (-) auxiliary battery terminal. (for HV Model)
- HINT:
- ·
Use the same procedure for the RH side and LH side.
·The following procedure is for the LH side.
PROCEDURE

 1. PRECAUTION
- NOTICE:
- ·
Make sure to read the precautions of the electric parking brake system before removing the rear brake assembly.
for HV Model: Click hereBrake>PARKING BRAKE>ELECTRIC PARKING BRAKE SYSTEM (for HV Model)>PRECAUTION
for Gasoline Model: Click hereBrake>PARKING BRAKE>ELECTRIC PARKING BRAKE SYSTEM (for Gasoline Model)>PRECAUTION
2.REMOVE REAR WHEEL
3.PERFORM REAR BRAKE PAD REPLACEMENT MODE
for HV Model: Click hereBrake>PARKING BRAKE>ELECTRIC PARKING BRAKE SYSTEM (for HV Model)>TEST MODE PROCEDURE
for Gasoline Model: Click hereBrake>PARKING BRAKE>ELECTRIC PARKING BRAKE SYSTEM (for Gasoline Model)>TEST MODE PROCEDURE
4.DISABLE BRAKE CONTROL (for HV Model)
Click hereBrake>BRAKE (REAR)>REAR BRAKE>REMOVAL
890C0A
5.DISCONNECT NO. 2 PARKING BRAKE WIRE ASSEMBLY
47319F
6.SEPARATE REAR FLEXIBLE HOSE
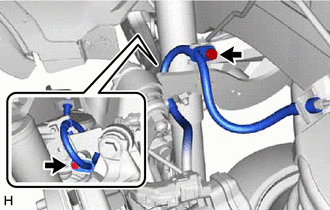
Remove the 2 bolts and separate the rear flexible hose.
7.SEPARATE REAR DISC BRAKE CYLINDER ASSEMBLY
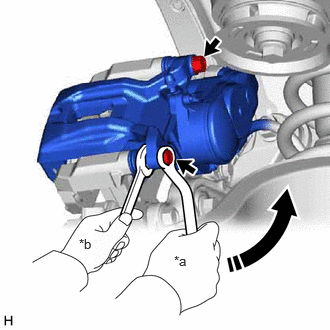
| *a | Turn |
| *b | Hold |
Hold the 2 rear disc brake cylinder slide pins and remove the 2 bolts and separate the rear disc brake cylinder assembly.
04466
8.REMOVE REAR DISC BRAKE PAD
- CAUTION:
-
Be careful not to get pinched by the rear disc brake cylinder assembly or other parts when removing the rear disc brake pads.
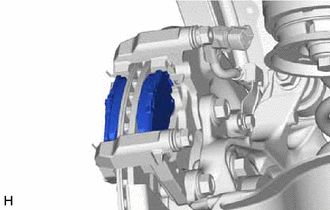
Remove the 2 rear disc brake pads from the rear disc brake cylinder mounting.
04946
9.REMOVE REAR DISC BRAKE ANTI-SQUEAL SHIM KIT
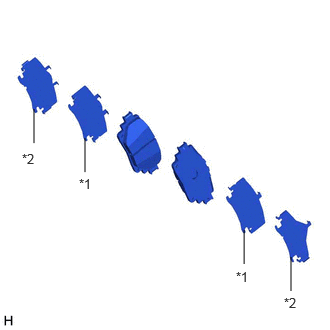
| *1 | Rear No. 1 Disc Brake Anti-squeal Shim |
| *2 | Rear No. 2 Disc Brake Anti-squeal Shim |
Remove the rear No. 1 disc brake anti-squeal shim and rear No. 2 disc brake anti-squeal shim from each rear disc brake pad.
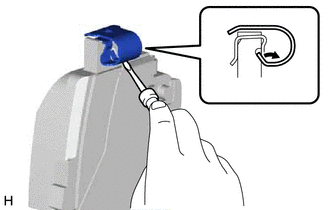
Remove the rear disc brake pad wear indicator plate from each rear disc brake pad.