SEAT REAR NO. 2 SEAT ASSEMBLY DISASSEMBLY
CAUTION / NOTICE / HINT
- CAUTION:
-
Wear protective gloves. Sharp areas on the seat frame may injure your hands.
PROCEDURE

 71848K
1.REMOVE SEAT ADJUSTER COVER CAP (for LH Side)
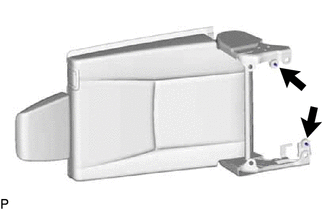
Remove the 2 seat adjuster cover caps.
79273
2.REMOVE NO. 2 SEAT HINGE COVER (for LH Side)
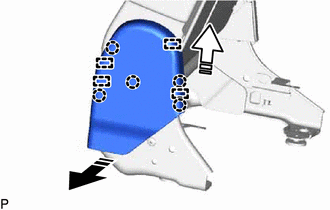

|
Remove in this Direction (1) |

|
Remove in this Direction (2) |
Disengage the 5 claws and 4 guides as shown in the illustration to remove the No. 2 seat hinge cover.
79273A
3.REMOVE NO. 2 SEAT NO. 2 HINGE COVER (for LH Side)
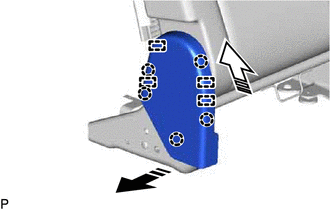
|
|
Remove in this Direction (1) |
|
|
Remove in this Direction (2) |
Disengage the 5 claws and 4 guides as shown in the illustration to remove the No. 2 seat No. 2 hinge cover.
72616A
4.REMOVE REAR SEATBACK LOCK STRIKER COVER LH (for LH Side)
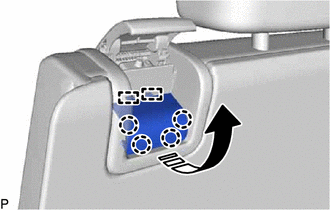
|
|
Remove in this Direction |
Disengage the 4 claws and 2 guides as shown in the illustration to remove the rear seatback lock striker cover LH.
72057B
5.REMOVE REAR SEAT LOCK CONTROL LEVER SUB-ASSEMBLY (for LH Side)
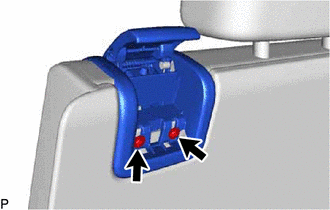
Remove the 2 screws.
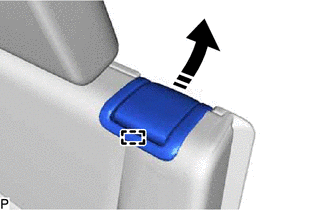
|
|
Remove in this Direction |
Disengage the guide as shown in the illustration.
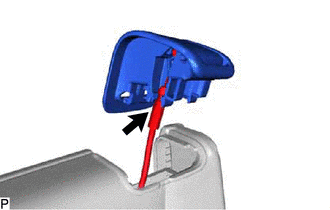
Disconnect the rear No. 2 seat cushion lock cable assembly LH to remove the rear seat lock control lever sub-assembly.
79207C
6.REMOVE NO. 2 SEATBACK BOARD SUB-ASSEMBLY LH (for LH Side)
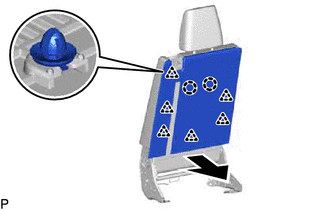
Disengage the 6 clips and 2 claws as shown in the illustration.
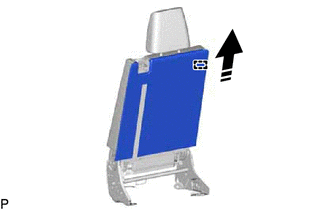
|
|
Remove in this Direction |
Disengage the guide as shown in the illustration to remove the No. 2 seatback board sub-assembly LH.
7.REMOVE SEPARATE TYPE REAR SEATBACK COVER WITH PAD LH (for LH Side)
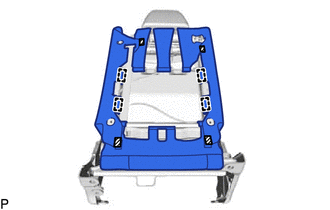

|
Fastener |
Disengage the 4 fasteners and 4 hooks.
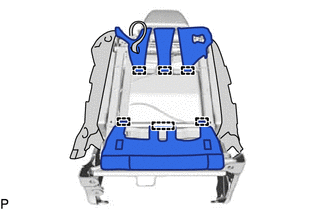
Disengage the 6 hooks.
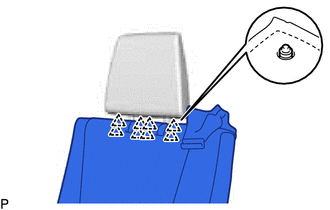
Remove the 8 clips and separate type rear seatback cover with pad LH.
79024
8.REMOVE NO. 2 SEATBACK COVER SUB-ASSEMBLY LH (for LH Side)
Using a screwdriver, disengage the 10 claws as shown in the illustration and remove the No. 2 seatback cover sub-assembly LH from the No. 2 seatback pad LH.
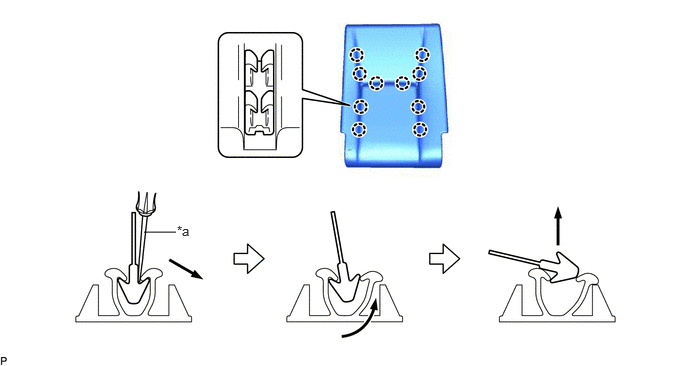
| *a | Screwdriver | - | - |
71704
9.REMOVE REAR SIDE SEAT BAND SUB-ASSEMBLY (for LH Side)
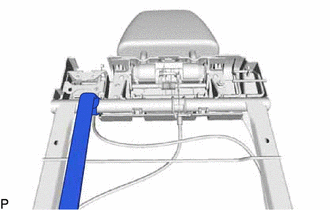
Remove the rear side seat band sub-assembly.
72598D
10.REMOVE NO. 2 RECLINING REMOTE CONTROL BEZEL LH (for LH Side)
|
|
Move in this Direction |
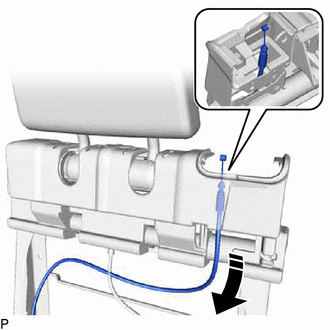
Move the rear No. 2 seat cushion lock cable assembly as shown in the illustration.
|
|
Remove in this Direction |
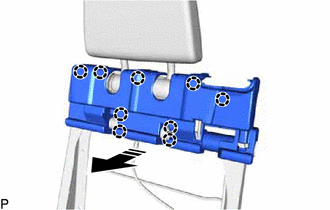
Disengage the 9 claws as shown in the illustration to remove the No. 2 reclining remote control bezel LH.
71844K
11.REMOVE REAR NO. 2 SEAT NO. 2 RECLINING COVER LH (for LH Side)
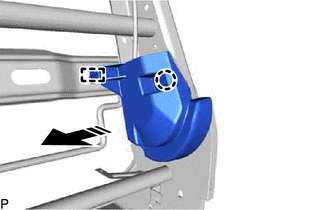
|
|
Remove in this Direction |
Disengage the claw and guide as shown in the illustration to remove the rear No. 2 seat No. 2 reclining cover LH.
71844A
12.REMOVE REAR NO. 2 SEAT RECLINING COVER LH (for LH Side)
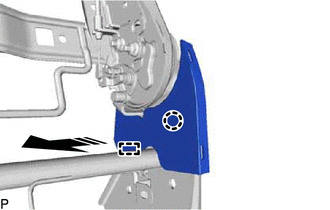
|
|
Remove in this Direction |
Disengage the claw and guide as shown in the illustration to remove the rear No. 2 seat reclining cover LH.
71844C
13.REMOVE REAR NO. 2 SEAT RECLINING COVER LH (for LH Side)
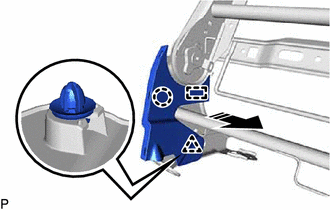
|
|
Remove in this Direction |
Disengage the claw, clip and guide as shown in the illustration to remove the rear No. 2 seat reclining cover LH.
72660J
14.REMOVE REAR NO. 2 SEAT CUSHION LOCK CABLE ASSEMBLY (for LH Side)
Disengage the 4 clamps.
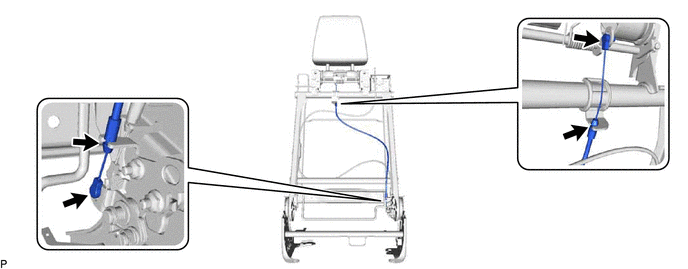
Remove the rear No. 2 seat cushion lock cable assembly.
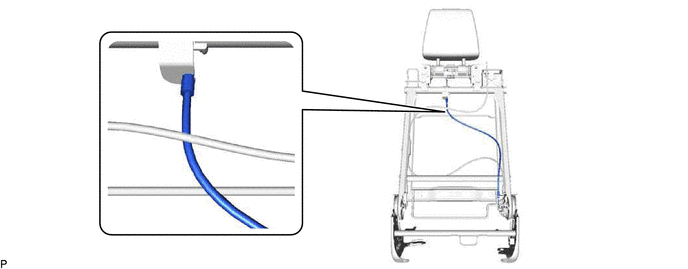
72660L
15.REMOVE REAR NO. 2 SEAT CUSHION LOCK CABLE ASSEMBLY LH (for LH Side)
Disengage the 4 clamps.
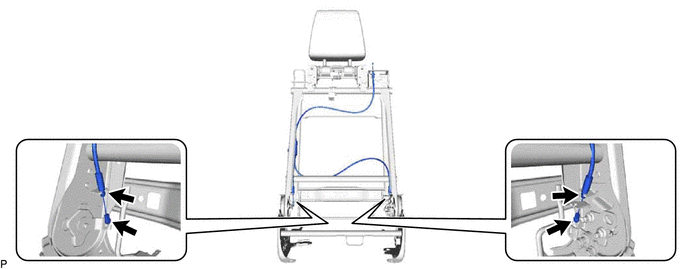
Disengage the clamp to remove the rear No. 2 seat cushion lock cable assembly LH.
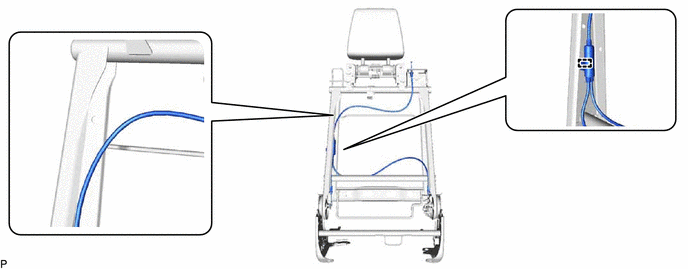
71940E
16.REMOVE NO. 2 SEAT HEADREST ASSEMBLY (for LH Side)
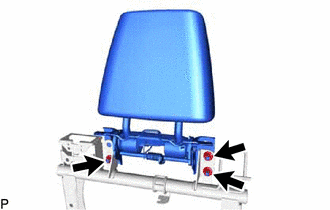
Remove the 3 nuts and No. 2 seat headrest assembly.
71983
17.REMOVE REAR SEAT HEADREST GUIDE (for LH Side)
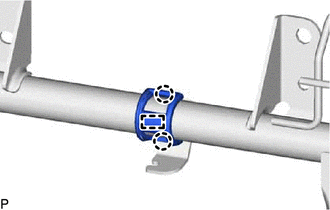
Disengage the 2 claws and guide to remove the rear seat headrest guide.
72308
18.REMOVE RECLINING CONTROL LINK SUB-ASSEMBLY LH (for LH Side)
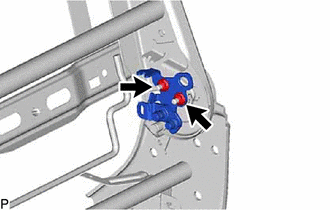
Remove the 2 nuts and reclining control link sub-assembly LH.
71848K
19.REMOVE SEAT ADJUSTER COVER CAP (for RH Side)
- HINT:
-
Use the same procedure as for the LH side.
79273
20.REMOVE NO. 2 SEAT HINGE COVER (for RH Side)
- HINT:
-
Use the same procedure as for the LH side.
79273A
21.REMOVE NO. 2 SEAT NO. 2 HINGE COVER (for RH Side)
- HINT:
-
Use the same procedure as for the LH side.
72615A
22.REMOVE REAR SEATBACK LOCK STRIKER COVER RH (for RH Side)
- HINT:
-
Use the same procedure as for the LH side.
72057B
23.REMOVE REAR SEAT LOCK CONTROL LEVER SUB-ASSEMBLY (for RH Side)
- HINT:
-
Use the same procedure as for the LH side.
79207B
24.REMOVE NO. 2 SEATBACK BOARD SUB-ASSEMBLY RH (for RH Side)
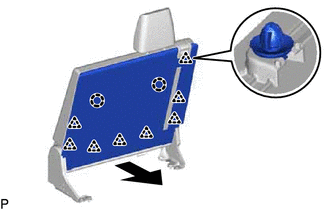
Disengage the 8 clips and 2 claws as shown in the illustration.
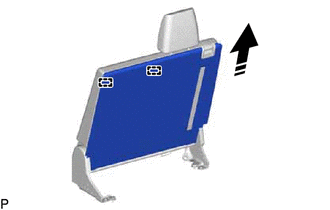
|
|
Remove in this Direction |
Disengage the 2 guides as shown in the illustration to remove the No. 2 seatback board sub-assembly RH.
25.REMOVE SEPARATE TYPE REAR SEATBACK COVER WITH PAD RH (for RH Side)
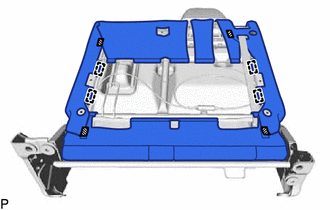
|
|
Fastener |
Disengage the 4 fasteners and 4 hooks.
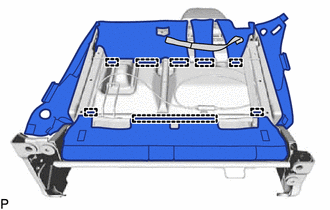
Disengage the 8 hooks.
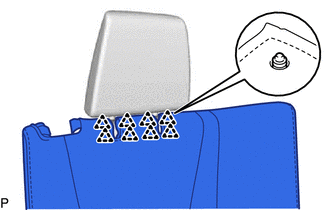
Remove the 8 clips and separate type rear seatback cover with pad RH.
79023
26.REMOVE NO. 2 SEATBACK COVER SUB-ASSEMBLY RH (for RH Side)
Using a screwdriver, disengage the 10 claws as shown in the illustration and remove the No. 2 seatback cover sub-assembly RH from the No. 2 seatback pad RH.
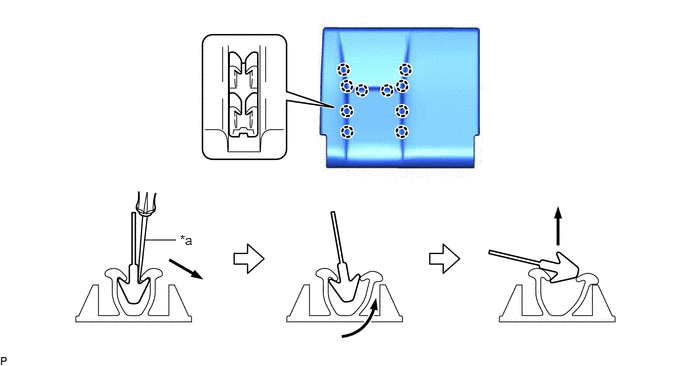
| *a | Screwdriver | - | - |
71704
27.REMOVE REAR SIDE SEAT BAND SUB-ASSEMBLY (for RH Side)
- HINT:
-
Use the same procedure as for the LH side.
71697M
28.REMOVE REAR SEATBACK PROTECTOR (for RH Side)
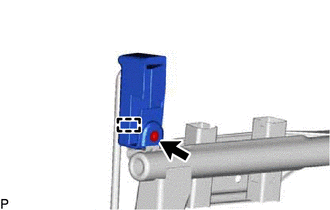
Remove the screw.
Disengage the guide to remove the rear seatback protector.
72597E
29.REMOVE NO. 2 RECLINING REMOTE CONTROL BEZEL RH (for RH Side)
- HINT:
-
Use the same procedure as for the LH side.
71843K
30.REMOVE REAR NO. 2 SEAT NO. 2 RECLINING COVER RH (for RH Side)
- HINT:
-
Use the same procedure as for the LH side.
71843A
31.REMOVE REAR NO. 2 SEAT RECLINING COVER RH (for RH Side)
- HINT:
-
Use the same procedure as for the LH side.
71843D
32.REMOVE REAR NO. 2 SEAT RECLINING COVER RH (for RH Side)
- HINT:
-
Use the same procedure as for the LH side.
72660J
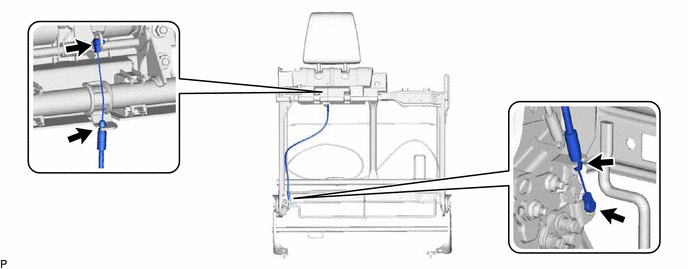
33.REMOVE REAR NO. 2 SEAT CUSHION LOCK CABLE ASSEMBLY (for RH Side)
Disengage the 4 clamps and remove the rear No. 2 seat cushion lock cable assembly.
72660K
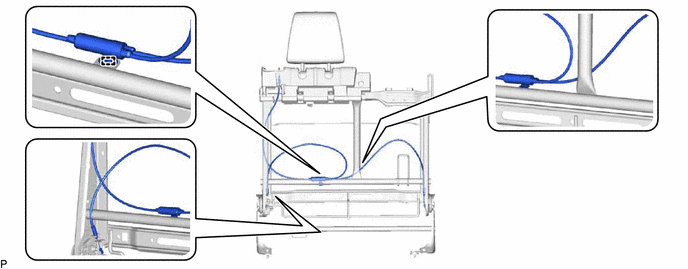
34.REMOVE REAR NO. 2 SEAT CUSHION LOCK CABLE ASSEMBLY RH (for RH Side)
Disengage the 4 clamps.
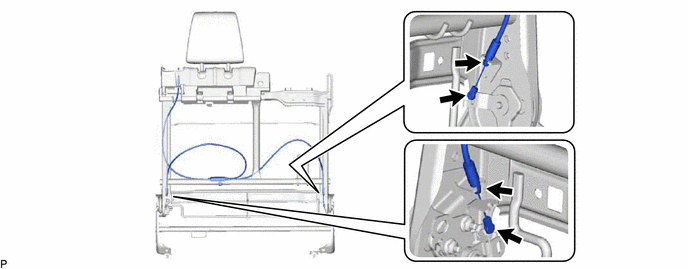
Disengage the clamp and remove the rear No. 2 seat cushion lock cable assembly RH.
71940E
35.REMOVE NO. 2 SEAT HEADREST ASSEMBLY (for RH Side)
- HINT:
-
Use the same procedure as for the LH side.
71983
36.REMOVE REAR SEAT HEADREST GUIDE (for RH Side)
- HINT:
-
Use the same procedure as for the LH side.
72307
37.REMOVE RECLINING CONTROL LINK SUB-ASSEMBLY RH (for RH Side)
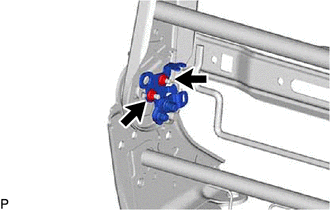
Remove the 2 nuts and reclining control link sub-assembly LH.
79021A
38.REMOVE NO. 2 SEAT CUSHION COVER SUB-ASSEMBLY
w/ Occupant Detection Sensor:
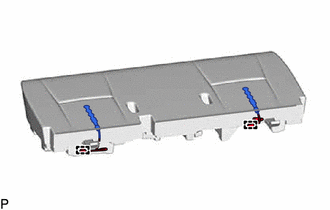
Disengage the 2 clamps.
Disengage the 19 hooks.
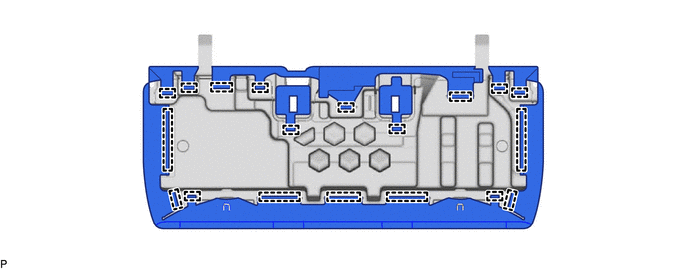
Using a screwdriver, disengage the 14 claws as shown in the illustration and remove the No. 2 seat cushion cover sub-assembly from the rear seat cushion pad sub-assembly.
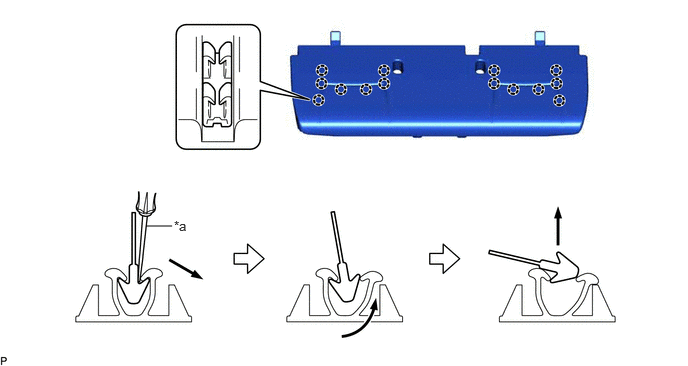
| *a | Screwdriver | - | - |