Front Shock Absorber with Coil Spring
Suspension
COMPONENTS
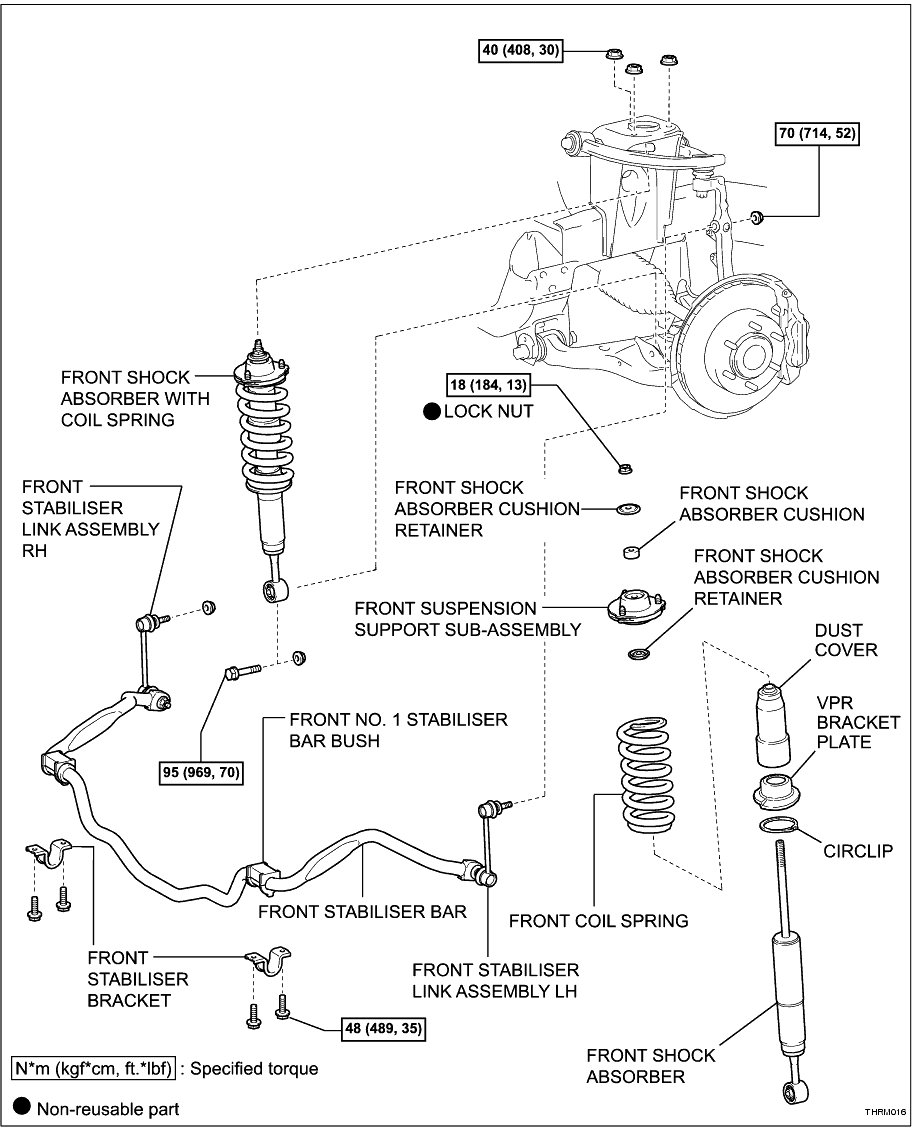
REMOVAL
HINT:
• Use the same procedures for the RH side and LH side.
• The procedures listed below are for the LH side.
1. REMOVE FRONT WHEEL
2. DISCONNECT FRONT STABILISER LINK ASSEMBLY LH
(a) Remove the nut and disconnect the stabiliser link from the steering knuckle.
HINT:
If the ball joint turns together with the nut, use a 6 mm hexagon wrench to hold the stud in place.
-
3. DISCONNECT FRONT STABILISER LINK ASSEMBLY RH
HINT:
Use the same procedures described for the LH side.
4. REMOVE FRONT STABILISER BRACKET
(a) Remove the 4 bolts and 2 brackets.
-
5. REMOVE FRONT STABILISER BAR
(a) Remove the stabiliser bar front from the vehicle.
-
6. REMOVE FRONT SHOCK ABSORBER WITH COIL SPRING
(a) Remove the nut and bolt.
HINT:
While holding the nut, loosen and remove the bolt.
-
(b) Remove the 3 nuts and shock absorber with coil spring.
-
DISASSEMBLY
1. REMOVE FRONT SUPPORT TO FRONT SHOCK ABSORBER NUT
(a) Using SST, compress the coil spring.
SST
09727-30021
(09727-00010
09727-00031)
09727-00060
NOTICE:
Do not use an impact wrench. It will damage SST.
-
(b) Hold the shock absorber rod and remove the nut.
NOTICE:
Do not use an impact wrench. It will damage the shock absorber rod.
-
2. REMOVE FRONT SHOCK ABSORBER CUSHION RETAINER
(a) Remove the cushion retainer from the shock absorber.
-
3. REMOVE FRONT SHOCK ABSORBER CUSHION
(a) Remove the cushion from the shock absorber.
-
4. REMOVE FRONT SUSPENSION SUPPORT SUB-ASSEMBLY
(a) Remove the suspension support from the coil spring.
-
5. REMOVE FRONT COIL SPRING
(a) Remove the coil spring from the shock absorber.
-
6. REMOVE DUST COVER
(a) Remove the dust cover from the shock absorber.
-
7. REMOVE VPR BRACKET PLATE
(a) Remove the VPR bracket plate from the shock absorber.
-
8. REMOVE CIRCLIP
(a) Using circlip pliers, remove the circlip from the shock absorber.
-
INSPECTION
1. INSPECT FRONT SHOCK ABSORBER ASSEMBLY
(a) Compress and extend the shock absorber rod 4 times or more. Check there is no abnormal resistance or unusual sound during the operation.
If there is any abnormality, replace the shock absorber assembly with a new one.
-
REASSEMBLY
1. INSTALL CIRCLIP
(a) Using circlip pliers, install the circlip onto the shock absorber.
HINT:
Ensure the circlip is correctly seated in the groove.
-
2. INSTALL VPR BRACKET PLATE
(a) Install the VPR bracket plate onto the shock absorber.
HINT:
Ensure the plate is correctly seated against the circlip.
-
3. INSTALL DUST COVER
(a) Install the dust cover onto the shock absorber.
-
4. INSTALL FRONT COIL SPRING LH
(a) Using SST, compress the coil spring.
SST
09727-30021
(09727-00010
09727-00031)
09727-00060
NOTICE:
Do not use an impact wrench. It will damage SST.
-
(b) Install the coil spring to the shock absorber. Fit the lower end of the coil spring into the recess of the VPR bracket plate.
-
(c) Install the insulator, retainer, cushion and front suspension support to the rod.
-
(d) Temporarily install a new lock nut.
-
5. INSTALL FRONT SUPPORT TO FRONT SHOCK ABSORBER NUT
(a) Align the suspension support and absorber bush as shown in the illustration.
-
(b) Tighten the lock nut.
Torque:
18 N*m
(184 kgf*cm,
13 ft.*lbf)
NOTICE:
Do not use an impact wrench. It will damage the shock absorber rod.
-
(c) Release the coil spring while checking the position of the spring lower seat and suspension support.
-
INSTALLATION
1. TEMPORARILY INSTALL FRONT SHOCK ABSORBER WITH COIL SPRING
(a) Install the shock absorber on the body so the lower end of the coil spring faces the rear of the vehicle.
-
(b) Install the 3 nuts on the upper side of the shock absorber with coil spring.
Torque:
40 N*m
(408 kgf*cm,
30 ft.*lbf)
-
(c) Temporarily install the bolt and nut as shown in the illustration.
HINT:
Fix the nut in place and temporarily install the bolt.
-
2. INSTALL FRONT STABILISER BAR
(a) Install the front stabiliser bar to the vehicle.
-
3. INSTALL FRONT STABILISER BRACKET
(a) Install the 2 brackets with the 4 bolts.
Torque:
48 N*m
(489 kgf*cm,
35 ft.*lbf)
HINT:
The stabiliser brackets are imprinted with arrows which must point toward the front of the vehicle.
-
4. INSTALL FRONT STABILISER LINK ASSEMBLY LH
(a) Connect the stabiliser link to the steering knuckle with the nut.
Torque:
70 N*m
(714 kgf*cm,
52 ft.*lbf)
HINT:
If the ball joint turns together with the nut, use a 6 mm hexagon wrench to hold the stud in place.
-
5. INSTALL FRONT STABILISER LINK ASSEMBLY RH
HINT:
Use the same procedures described for the LH side.
6. INSTALL FRONT WHEEL
(a) Install the front wheel.
Torque:
105 N*m
(1,071 kgf*cm,
77 ft.*lbf)
-
7. STABILISE SUSPENSION
(a) Lower the vehicle.
-
(b) Press down on the vehicle several times to stabilise the suspension.
-
8. TIGHTEN FRONT SHOCK ABSORBER WITH COIL SPRING
(a) Fix the nut in place and tighten the bolt.
Torque:
95 N*m
(969 kgf*cm,
70 ft.*lbf)
NOTICE:
Do not tighten the nut.
-
9. INSPECT AND ADJUST FRONT WHEEL ALIGNMENT
DISPOSAL
1. DISPOSE OF FRONT SHOCK ABSORBER ASSEMBLY
CAUTION:
Hydrogen gas is contained under pressure within the shock absorber and is colourless and harmless, however, as metal debris may be blown outward by the gas, you must:
• Wear protective glasses.
• Cover the area being cut.
(a) Fully extend the shock absorber piston rod and clamp the shock absorber in a vice at an angle.
-
(b) Drill a 5 mm hole in area A to discharge the gas within the shock absorber.
-