Rear Shock Absorber
Suspension
COMPONENTS
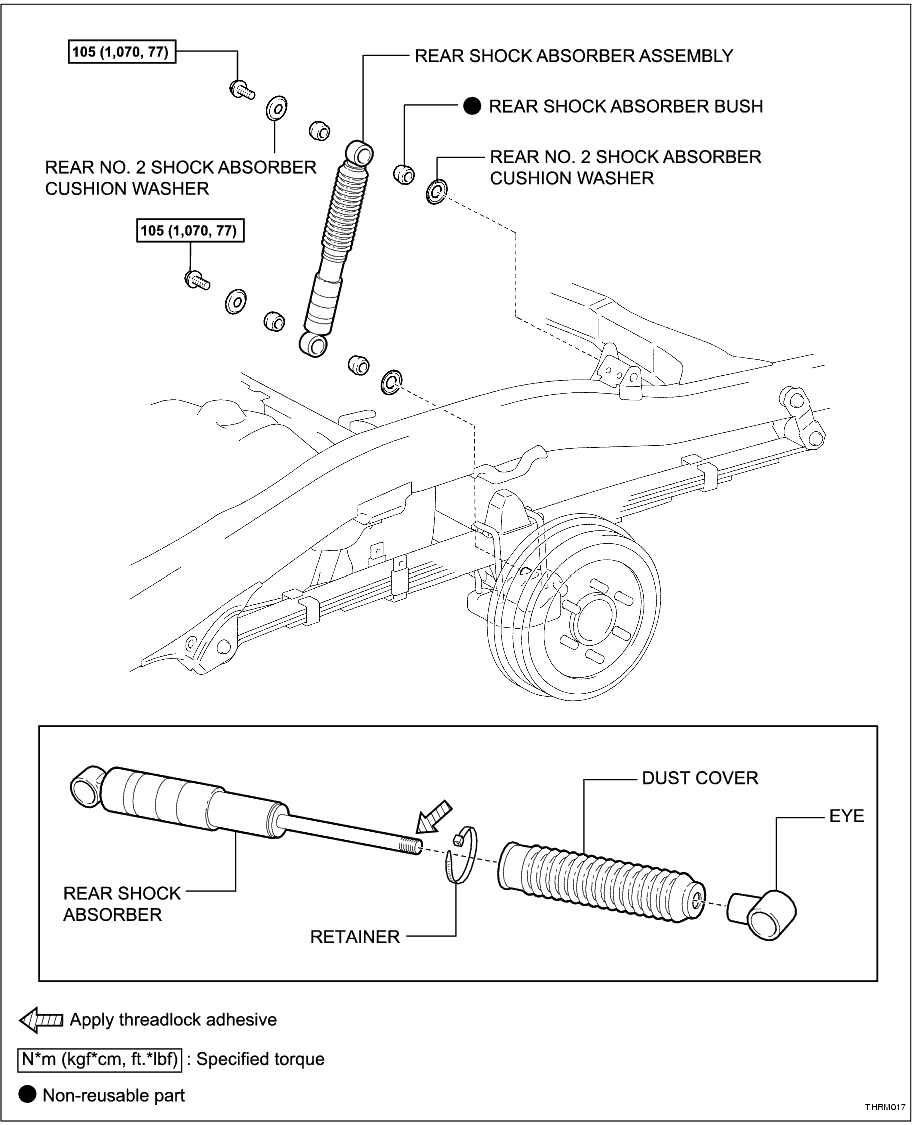
REMOVAL
HINT:
• Use the same procedures for the RH side and LH side.
• The procedures listed below are for the LH side.
1. REMOVE REAR WHEEL
2. REMOVE REAR SHOCK ABSORBER ASSEMBLY
(a) Support the rear axle housing.
(1) Jack up and support the vehicle's frame on stands.
(2) Lower the axle housing until the leaf spring tension is free, and maintain this position.
-
(b) Remove the 2 bolts and 2 washers.
-
(c) Disconnect the shock absorber (with the 4 bushes) from the U bolt seat and frame.
-
(d) Remove the 2 washers.
-
DISASSEMBLY
1. REMOVE SHOCK ABSORBER BUSH
(a) Remove the 4 bushes from the shock absorber and discard.
-
2. REMOVE DUST COVER
(a) Cut the dust cover retainer and discard.
-
(b) Slide the dust cover down the piston rod and secure the shock absorber piston rod in a vice using SST.
SST
J-49365
-
(c) Using an oxygen/acetylene torch, lightly heat the thread section of the eye to release the thread lock adhesive.
-
(d) Using SST, remove the eye from the piston rod.
SST
J-49366
-
(e) Remove the shock absorber from the vice and remove the dust cover.
-
INSPECTION
1. INSPECT REAR SHOCK ABSORBER ASSEMBLY
(a) Compress and extend the shock absorber rod, and check there is no abnormal resistance or unusual sound during the operation.
If there is any abnormality, replace the shock absorber with a new one.
-
(b) Inspect the dust cover for cuts or holes. Replace if damaged.
-
REASSEMBLY
1. INSTALL DUST COVER
(a) Slide the new dust cover down the piston rod and secure the shock absorber piston rod in a vice using SST.
SST
J-49365
-
(b) Clean the residual thread lock adhesive from the thread section of the piston rod.
-
(c) Apply thread lock adhesive onto the piston rod thread.
Adhesive:
Loctite #262 or equivalent
-
(d) Using SST, install the eye onto the piston rod.
SST
J-49366
Torque:
34 N*m
(346 kgf*cm,
25 ft.*lbf)
-
(e) Remove the shock absorber from the vice and secure the dust cover with a new retainer.
-
2. INSTALL SHOCK ABSORBER BUSH
(a) Install 4 new bushes onto the shock absorber.
-
INSTALLATION
1. INSTALL REAR SHOCK ABSORBER ASSEMBLY
(a) Install the 2 washers to the axle housing.
-
(b) Install the shock absorber (with the 4 bushes) to the U bolt seat and frame.
-
(c) Install the 2 washers.
-
(d) Temporarily tighten the 2 bolts.
-
2. INSTALL REAR WHEEL
(a) Install the wheel.
Torque:
105 N*m
(1,070 kgf*cm,
77 ft.*lbf)
-
3. STABILISE SUSPENSION
(a) Lower the vehicle.
-
(b) Press down on the vehicle several times to stabilise the suspension.
-
4. TIGHTEN REAR SHOCK ABSORBER BOLT
(a) Tighten the 2 bolts.
Torque:
105 N*m
(1,070 kgf*cm,
77 ft.*lbf)
-
DISPOSAL
1. DISPOSE OF REAR SHOCK ABSORBER ASSEMBLY
CAUTION:
Hydrogen gas is contained under pressure within the shock absorber and is colourless and harmless, however, as metal debris may be blown outward by the gas, you must:
• Wear protective glasses.
• Cover the area being cut.
(a) Fully extend the shock absorber piston rod and clamp the shock absorber in a vice at an angle as shown.
-
(b) Drill a 5 mm hole at position A to discharge the gas from within the shock absorber.
-
(c) Drill two 2.5 mm holes at position B. Remove the shock absorber from the vice and hold it inverted over a waste oil container to drain the oil from within the shock absorber.
-