Sports BAR
Exterior
COMPONENTS
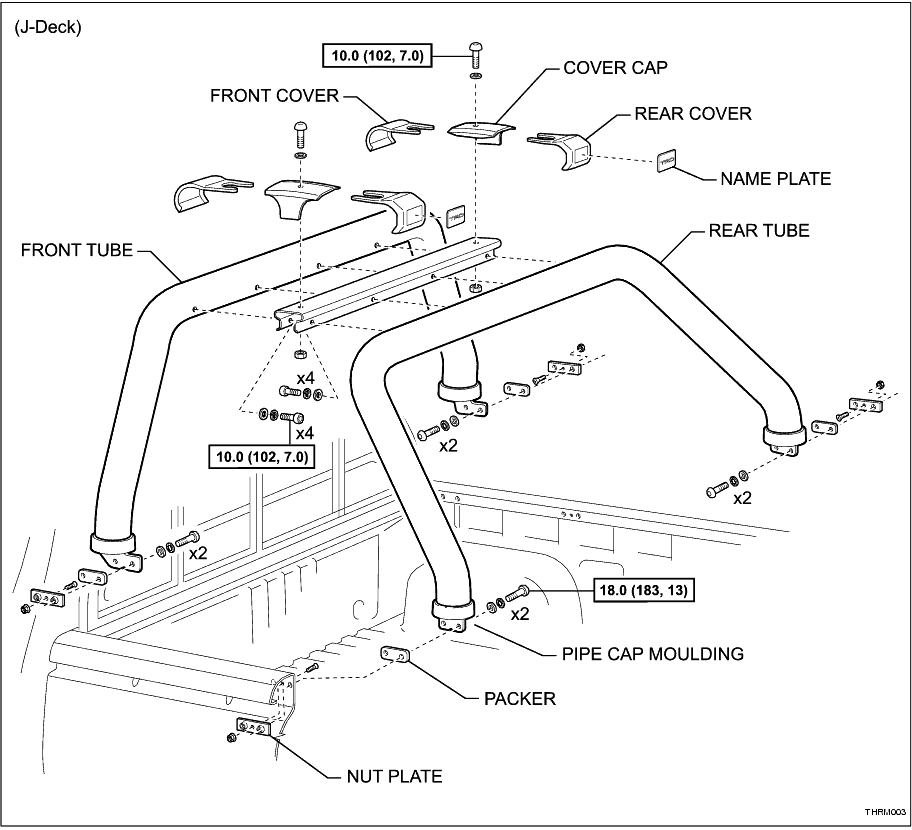
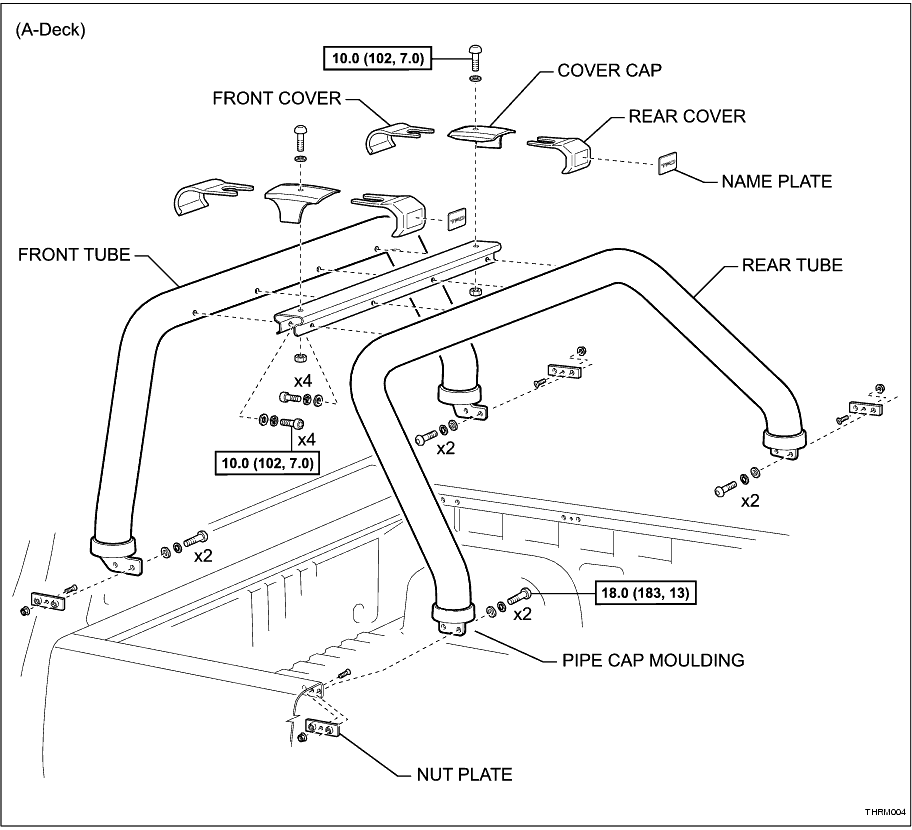
REMOVAL
1. REMOVE SPORTS BAR ASSEMBLY (J-DECK)
(a) Remove the 2 screws, shake-proof washers and flat washers.
-
(b) Repeat at each other mounting position.
-
(c) Remove the sports bar assembly and 4 packing spacers.
-
2. REMOVE SPORTS BAR ASSEMBLY (A-DECK)
(a) Remove the 2 screws, shake-proof washers and flat washers.
-
(b) Repeat at each other mounting position.
-
(c) Remove the sports bar assembly.
-
3. REMOVE NUT PLATE
(a) Remove the countersunk screw and nut and the nut plate from behind the panel.
-
(b) Repeat for each other nut plate.
-
DISASSEMBLY
1. REMOVE COVER CAPS LH
(a) Remove the screw, shake-proof washer and nut and the cover cap.
-
(b) Remove the front and rear cover caps.
-
(c) Remove the name plate.
HINT:
When removing the name plate, heat the plate and rear cover cap using a heat light.
(1) Carefully prise the name plate from the rear cover cap.
-
2. REMOVE COVER CAPS RH
HINT:
Use the same procedures described for the LH side.
3. REMOVE CONNECTOR CHANNEL
(a) Remove the 4 screws, shake-proof washers and flat washers and the rear tube.
-
(b) Remove the 4 screws, shake-proof washers and flat washers and the front tube.
-
4. REMOVE PIPE CAP MOULDING
(a) Carefully remove the pipe cap moulding from each end of the front and/or rear tubes.
-
REASSEMBLY
1. INSTALL PIPE CAP MOULDING
(a) Install the pipe cap moulding to each end of the front and/or rear tubes.
-
2. INSTALL CONNECTOR CHANNEL
(a) Install the connector channel to the front tube with the 4 screws, shake-proof washers and flat washers. Do not tighten.
-
(b) Install the connector channel to the rear tube with the 4 screws, shake-proof washers and flat washers. Do not tighten.
-
INSTALLATION
1. PREPARATION
HINT:
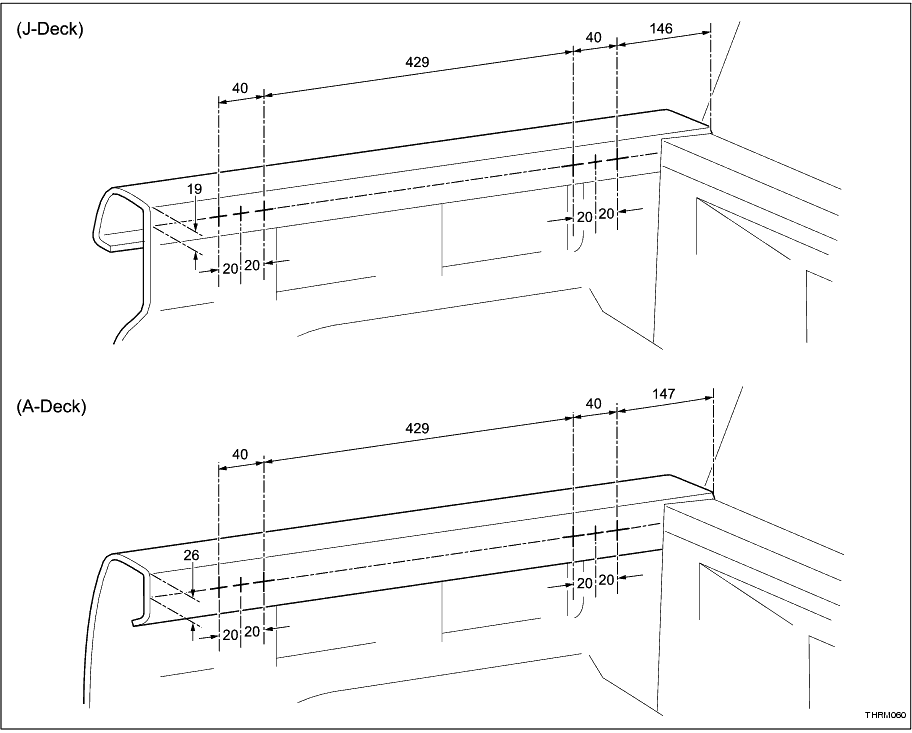
If new mounting holes are required, drill as described below.
(a) Mark the hole positions as shown in the diagram.
-
(b) Centre punch each mark and drill each mark with a 5.5 mm drill bit.
-
(c) Enlarge the outer holes to 9.0 mm.
-
(d) Enlarge the centre holes to 7.0 mm.
-
(e) Countersink the centre holes.
-
(f) Remove drilling swarf and apply suitable rust preventative to each hole.
-
2. INSTALL NUT PLATE
(a) Install the nut plate behind the panel and secure with the countersunk screw and nut.
-
(b) Repeat for each other plate.
-
3. INSTALL SPORTS BAR ASSEMBLY (J-DECK)
(a) Install the sports bar assembly and 4 packing spacers.
-
(b) Install the 2 screws, shake-proof washers and flat washers. Do not tighten.
-
(c) Repeat at each other mounting position.
-
(d) Tighten the connector channel screws.
Torque:
10 N*m
(102 kgf*cm,
7.0 ft.*lbf)
NOTICE:
Do not over-tighten the screws.
-
(e) Tighten the sports bar assembly screws.
Torque:
18 N*m
(183 kgf*cm,
13 ft.*lbf)
NOTICE:
Do not over-tighten the screws.
-
4. INSTALL SPORTS BAR ASSEMBLY (A-DECK)
(a) Install the sports bar assembly.
-
(b) Install the 2 screws, shake-proof washers and flat washers. Do not tighten.
-
(c) Repeat at each other mounting position.
-
(d) Tighten the connector channel screws.
Torque:
10 N*m
(102 kgf*cm,
7.0 ft.*lbf)
NOTICE:
Do not over-tighten the screws.
-
(e) Tighten the sports bar assembly screws.
Torque:
18 N*m
(183 kgf*cm,
13 ft.*lbf)
NOTICE:
Do not over-tighten the screws.
-
5. INSTALL COVER CAPS LH
(a) Install the name plate.
HINT:
• Ensure the rear cover cap surface is clean and dry.
• When installing the name plate, heat the plate and rear cover cap using a heat light.
(1) Remove the backing paper and affix the name plate to the centre of the rear cover cap.
-
(b) Install the front and rear cover caps.
-
(c) Install the cover cap with the screw, shake-proof washer and nut.
Torque:
10 N*m
(102 kgf*cm,
7.0 ft.*lbf)
-
6. INSTALL COVER CAPS RH
HINT:
Use the same procedures described for the LH side.