 |
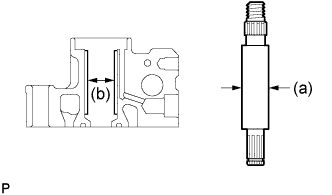
Using a micrometer, measure the diameter (a) of the vane pump shaft.
VANE PUMP (for 5L-E) > INSPECTION |
| 1. INSPECT VANE PUMP SHAFT AND BUSHING IN FRONT HOUSING |
|
Using a micrometer, measure the diameter (a) of the vane pump shaft.
Using a caliper gauge, measure the inside diameter (b) of the front housing.
Subtract (a) from (b) to calculate the oil clearance.
| 2. INSPECT VANE PUMP ROTOR AND VANE PUMP PLATES CLEARANCE |
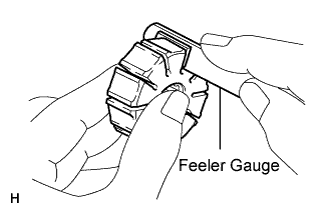 |
Using a feeler gauge, measure the clearance between the side face of the vane pump rotor groove and the vane pump plates.
| Vane Pump Rotor Part No. | Vane Pump Cam Ring Part No. | Vane Pump Plate Part No. |
| 44313-02160 | 44325-0K060 | 44345-06060 |
| 44313-02170 | 44325-0K070 | 44345-06070 |
| 44313-02180 | 44325-0K080 | 44345-06080 |
| 44313-02190 | 44325-0K090 | 44345-06090 |
| 44313-02200 | 44325-0K100 | 44345-06100 |
| Vane Pump Rotor Part No. | Vane Pump Cam Ring Part No. | Vane Pump Plate Part No. |
| 44313-02160 | 44325-06110 | 44345-06060 |
| 44313-02170 | 44325-06120 | 44345-06070 |
| 44313-02180 | 44325-06130 | 44345-06080 |
| 44313-02190 | 44325-06140 | 44345-06090 |
| 44313-02200 | 44325-06150 | 44345-06100 |
| 3. INSPECT FLOW CONTROL VALVE |
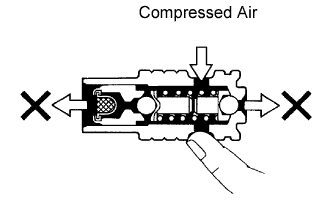 |
Check the flow control valve for leakage. Close one of the holes and apply compressed air, 392 to 490 kPa (4 to 5 kgf/cm2, 57 to 71 psi), into the opposite side hole, and confirm that air does not come out from the end holes.
 |
If there is leakage, replace the flow control valve.
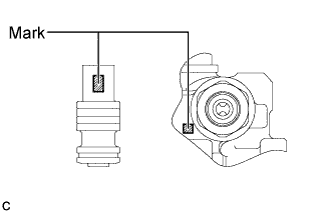
| Front Housing Mark | Flow Control Valve Mark | Flow Control Valve Part No. |
| A | A | 44330-04010 |
| B | B | 44330-04020 |
| C | C | 44330-04030 |
| D | D | 44330-04040 |
| E | E | 44330-04050 |
| F | F | 44330-04060 |
Coat the flow control valve with power steering fluid.
Insert the flow control valve into the flow control valve installation hole of the front housing, and check that the flow control valve enters smoothly under its own weight.
If the flow control valve does not enter the front housing smoothly, replace the flow control valve.
| 4. INSPECT FLOW CONTROL VALVE COMPRESSION SPRING |
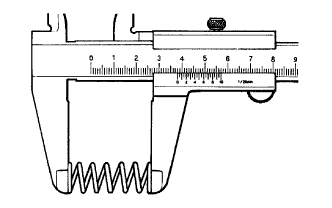 |
Using a vernier caliper, measure the free length of the flow control valve compression spring.
| 5. INSPECT PRESSURE PORT UNION |
If the union seat in the pressure port union is severely damaged, replace the pressure port union.