 |
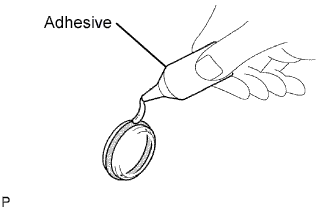
Apply adhesive to a new tight plug.
- Adhesive:
- Toyota Genuine Adhesive 1324, Three Bond 1324 or equivalent
- NOTICE:
- Do not start the engine for 1 hour after the installation.
ENGINE UNIT > REASSEMBLY |
| 1. INSTALL TIGHT PLUG |
|
Apply adhesive to a new tight plug.
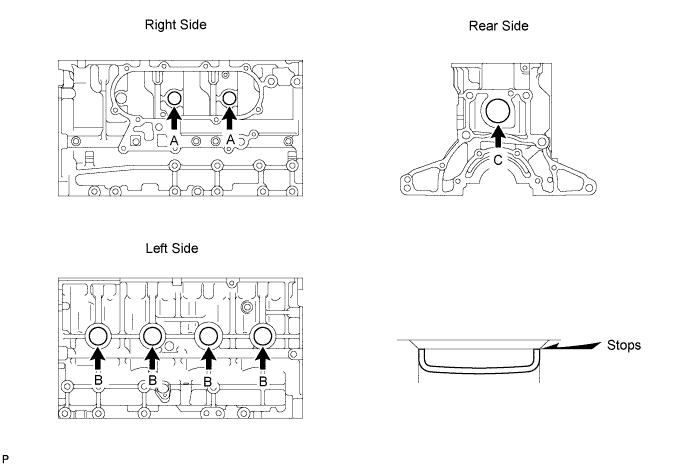
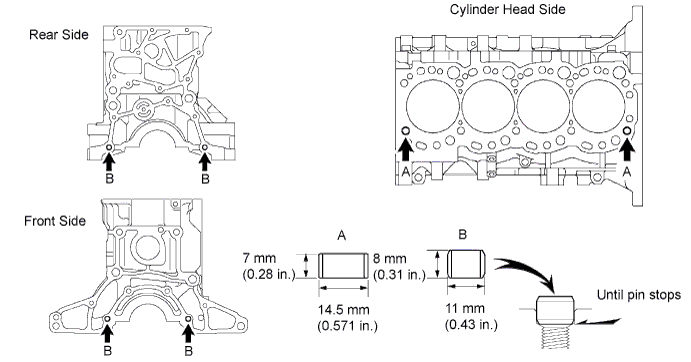
Using SST and a hammer, tap in the 2 tight plugs A.
Using SST and a hammer, tap in the 4 tight plugs B.
Using SST and a hammer, tap in the tight plug C.
| 2. INSTALL STUD BOLT |
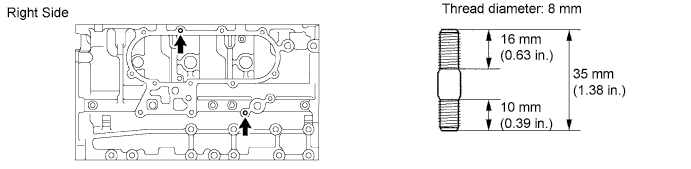
Install the stud bolts as shown in the illustration.
| 3. INSTALL STRAIGHT PIN |
Install the straight pin as shown in the illustration.
| 4. INSTALL RING PIN |
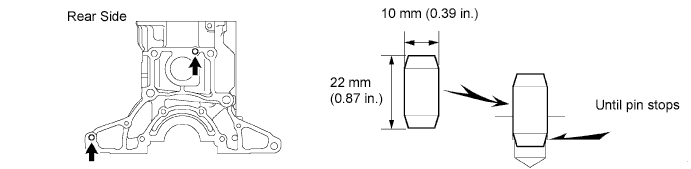
Install the ring pin as shown in the illustration.
| 5. INSTALL NO. 1 TAPER SCREW PLUG |
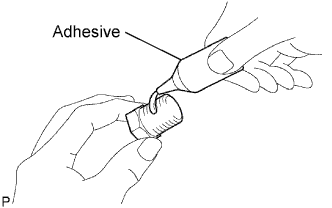 |
Apply adhesive to 2 or 3 threads.
Install the screw plug.
| 6. INSTALL CYLINDER BLOCK WATER DRAIN COCK SUB-ASSEMBLY |
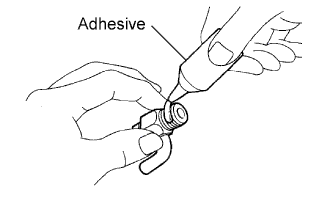 |
Apply adhesive to 2 or 3 threads.
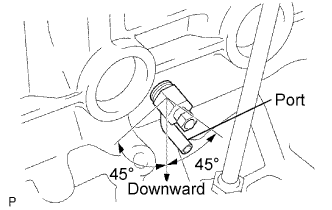 |
Install the water drain cock.
| 7. INSTALL CRANKSHAFT POSITION SENSOR |
Install the sensor with the bolt.
| 8. INSTALL CYLINDER BLOCK OIL ORIFICE |
Using a 6 mm hexagon wrench, install the oil orifice.
| 9. INSTALL NO. 1 OIL NOZZLE SUB-ASSEMBLY |
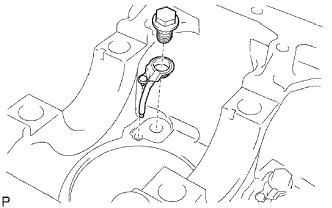 |
Align the pin of the oil nozzle with the pin hole of the cylinder block.
Install the oil nozzle with the check valve. Install the 4 oil nozzles and check valves.
| 10. INSTALL PISTON SUB-ASSEMBLY |
Assemble the piston and connecting rod.
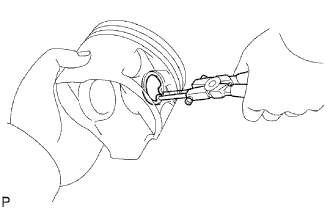 |
Using snap ring pliers, install a new snap ring on one side of the piston pin hole.
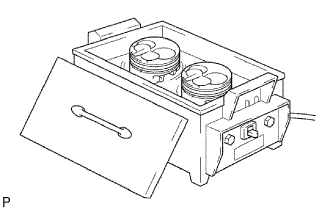 |
Gradually heat the piston to about 60°C (140°F).
Coat the piston pin with engine oil.
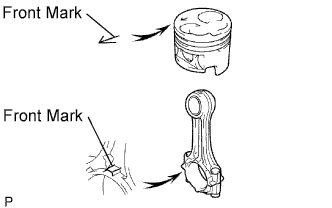 |
Align the front marks of the piston and connecting rod, and push in the piston pin with your thumb.
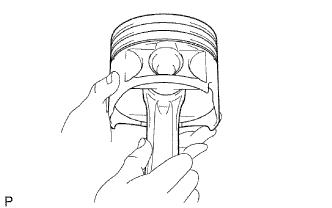 |
Check the fitting condition between the piston and piston pin. Try to move the piston back and forth on the piston pin.
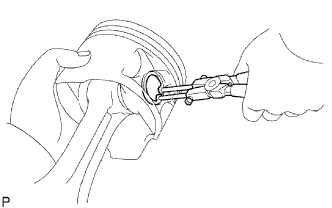 |
Using snap ring pliers, install a new snap ring on the other side of the piston pin hole.
Install the piston rings.
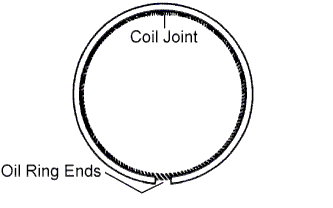 |
Install the coil and oil ring by hand.
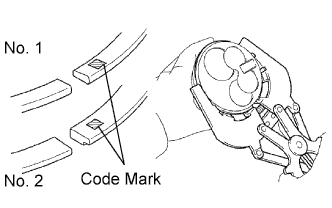 |
Using a piston ring expander, install the No. 1 and No. 2 piston rings with the code mark facing upward.
| Item | Code Mark |
| No. 1 piston ring | 1N |
| No. 2 piston ring | 2N |
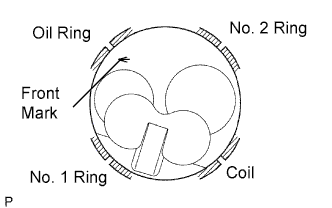 |
Position the piston rings so that the ring ends are as shown in the illustration.
| 11. INSTALL CONNECTING ROD BEARING |
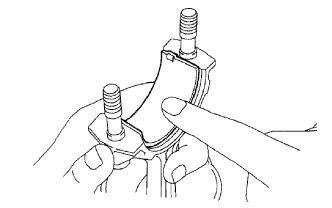 |
Align the bearing claw with the groove of the connecting rod or connecting rod cap.
Install the bearings in the connecting rod and connecting rod cap.
| 12. INSTALL CRANKSHAFT BEARING |
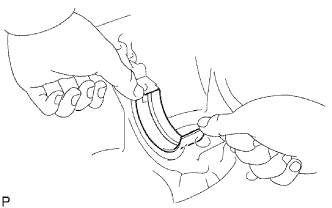 |
Align the bearing claw with the claw groove of the cylinder block, and push in the 5 upper bearings.
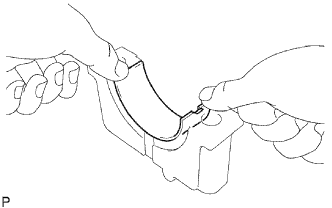 |
Align the bearing claw with the claw groove of the crankshaft bearing cap, and push in the 5 lower bearings.
| 13. INSTALL CRANKSHAFT THRUST WASHER SET |
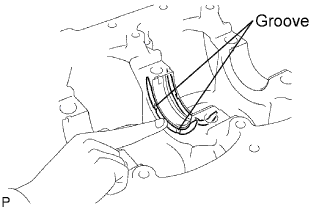 |
Install the 2 thrust washers under the No. 3 journal position of the cylinder block with the oil grooves facing outward.
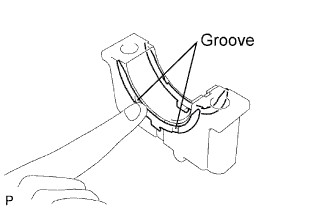 |
Install the 2 thrust washers on the No. 3 crankshaft bearing cap with the grooves facing outward.
| 14. INSTALL CRANKSHAFT |
Place the crankshaft on the cylinder block.
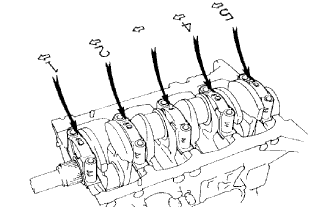 |
Install the 5 crankshaft bearing caps in their proper locations.
Install the crankshaft bearing cap bolts.
Apply a light coat of the engine oil to the threads and under the bolt heads of the crankshaft bearing caps.
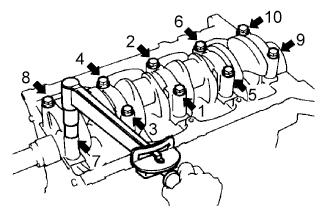 |
Install and uniformly tighten the 10 bolts of the crankshaft bearing caps, in several steps, in the sequence shown.
Check that the crankshaft turns smoothly.
Check the crankshaft thrust clearance .
| 15. INSTALL PISTON AND CONNECTING ROD |
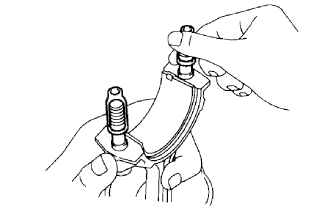 |
Cover the connecting rod bolts with a short piece of hose to protect the crankshaft and cylinder bore from damage.
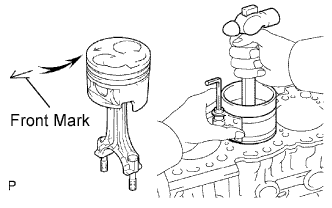 |
Using a piston ring compressor, push the correctly numbered piston and connecting rod assembly into the cylinder with the front mark of the piston facing forward.
Place the connecting rod cap on the connecting rod.
Match the numbered connecting rod cap with the connecting rod.
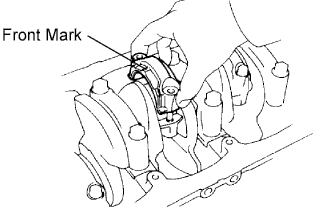 |
Install the connection rod cap with the front mark facing forward.
Install the connecting rod cap nuts.
Apply a light of engine oil to the threads and under the heads of the connecting rod cap nuts.
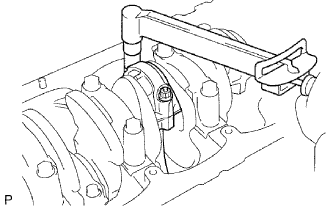 |
Install and alternately tighten the nuts of the connecting rod cap in several passes.
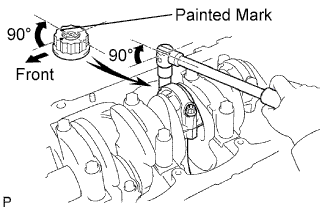 |
Mark the front of the connecting rod cap nuts with paint.
Retighten the connecting rod cap nuts 90° as shown.
Check that the painted mark is now at a 90° angle to the front.
Check that the crankshaft turns smoothly.
Check the connecting rod thrust clearance .
| 16. INSTALL ENGINE REAR OIL SEAL RETAINER |
Install a new gasket and the retainer with the 4 bolts.
| 17. INSTALL TIMING GEAR CASE SUB-ASSEMBLY |
Place a new gasket on the cylinder block.
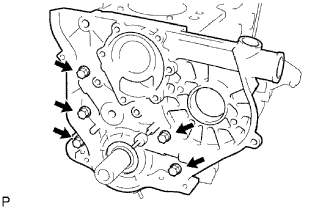 |
Install the timing gear case with the 5 bolts.
| 18. INSTALL OIL STRAINER SUB-ASSEMBLY |
Install a new gasket and oil strainer with the 2 bolts and 2 nuts.
| 19. INSTALL OIL PAN SUB-ASSEMBLY |
Remove any old packing (FIPG) material and do not drop any oil on the contact surfaces of the oil pan and cylinder block.
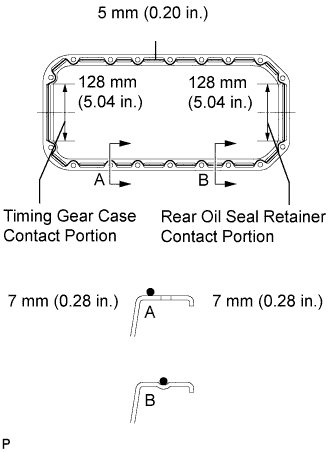 |
Apply seal packing to the oil pan as shown in the illustration.
Install the oil pan with the 16 bolts and 2 nuts. Uniformly tighten the bolts and nuts in several steps.
| 20. INSTALL CRANKSHAFT TIMING PULLEY |
Align the pulley set key with the key groove of the timing pulley.
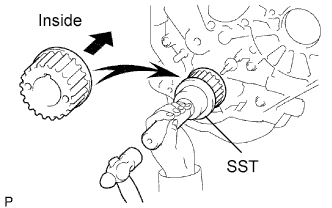 |
Using SST and a hammer, tap in the timing pulley, facing the flange side inward.
| 21. INSTALL WATER PUMP |
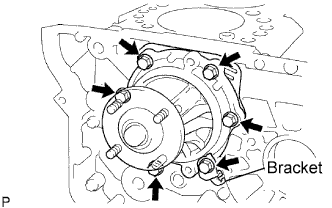 |
Install a new gasket, the water pump and tension spring bracket with the 6 bolts.
| 22. INSTALL NO. 2 TIMING BELT IDLER SUB-ASSEMBLY |
Install the spacer and No. 2 timing belt idler with the bolt.
Check that the No. 2 timing belt idler moves smoothly.
| 23. INSTALL NO. 1 TIMING BELT IDLER SUB-ASSEMBLY |
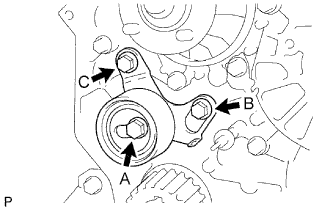 |
Install the No. 1 timing belt idler with the 3 bolts.
Tighten the bolt C.
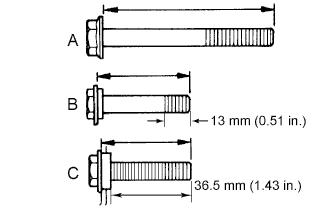 |
| 24. INSTALL CYLINDER HEAD GASKET |
Check the piston protrusion for each cylinder.
Clean the cylinder block with solvent.
Set the piston of the cylinder to be measured to slightly before TDC.
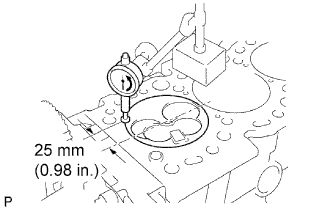 |
Place a dial indicator on the cylinder block, and set the measuring tip as shown in the illustration.
Set the dial indicator at 0 mm (0 in.).
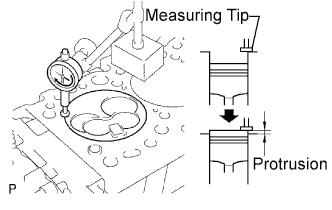 |
Find where the piston head protrudes most by slowly turning the crankshaft clockwise and counterclockwise.
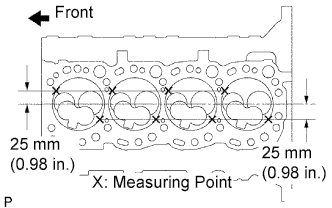 |
Measure the protrusion of each cylinder at 2 places as shown in the illustration, making a total of 8 measurements.
For the piston protrusion value of each cylinder, use the average of the 2 measurements of each cylinder.
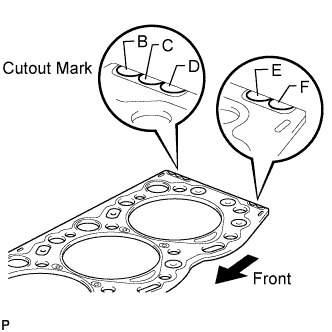 |
Select the largest piston protrusion value from the measurements made, then select a new appropriate gasket according to the table below.
| Gasket Size | Protrusion |
| Use B | 0.73 to 0.78 mm (0.0287 to 0.0307 in.) |
| Use C | 0.78 to 0.83 mm (0.0307 to 0.0327 in.) |
| Use D | 0.83 to 0.88 mm (0.0327 to 0.0346 in.) |
| Use E | 0.88 to 0.93 mm (0.0346 to 0.0366 in.) |
| Use F | 0.93 to 0.98 mm (0.0366 to 0.0386 in.) |
| Cutout Mark | Thickness |
| B | 1.40 to 1.50 mm (0.0551 to 0.0591 in.) |
| C | 1.45 to 1.55 mm (0.0570 to 0.0610 in.) |
| D | 1.50 to 1.60 mm (0.0591 to 0.0630 in.) |
| E | 1.55 to 1.65 mm (0.0610 to 0.0650 in.) |
| F | 1.60 to 1.70 mm (0.0630 to 0.0669 in.) |
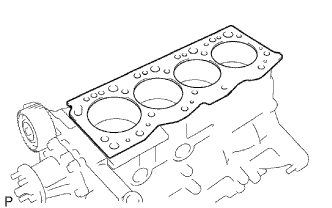 |
Place a new cylinder head gasket in position on the cylinder block.
| 25. INSTALL CYLINDER HEAD |
Install the cylinder head (Click here).
| 26. INSTALL PUMP BRACKET |
Install the mounting bracket with the 6 bolts.
| 27. INSTALL NO. 1 FRONT ENGINE MOUNTING BRACKET RH |
Install the mounting bracket with the 4 bolts.
| 28. INSTALL OIL FILTER BRACKET SUB-ASSEMBLY |
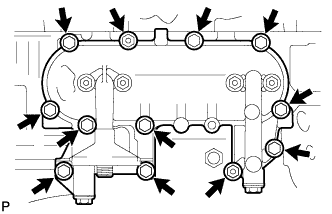 |
Install a new gasket and oil filter bracket with the 10 bolts and 2 nuts.
| 29. INSTALL OIL FILTER |
Check and clean the oil filter installation surface.
Apply clean engine oil to the gasket of a new oil filter.
Install the oil filter, and tighten it by hand until the gasket contacts the installation surface.
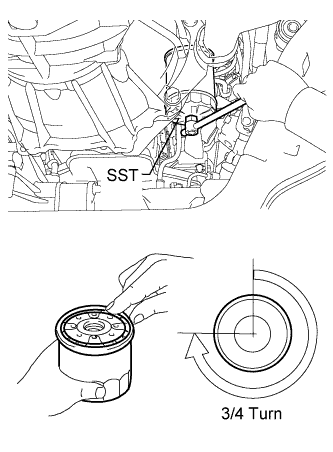 |
Using SST, tighten it by an additional 3/4 turn to seat the filter.
| 30. INSTALL ENGINE OIL PRESSURE SWITCH |
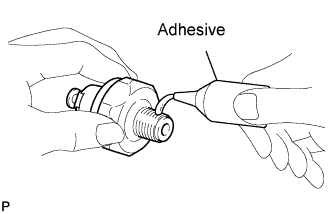 |
Apply adhesive to 2 or 3 threads of the oil pressure switch.
Using a 24 mm deep socket wrench, install the oil pressure switch.
Connect the oil pressure switch connector.
Start the engine and check for engine oil leaks.
| 31. INSTALL INJECTION PUMP ASSEMBLY |
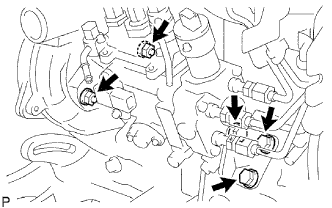 |
Install the injection pump to the timing gear case, and temporarily tighten the 2 nuts.
Install the injection pump stay to the injection pump rear end, and temporarily tighten the 3 bolts.
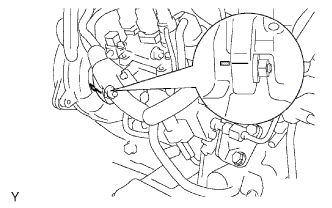 |
Rotate the pump body to align the marking of the pump flange and timing gear case.
Tighten the 2 nuts to install the injection pump.
Tighten the 3 bolts to install the injection pump stay.
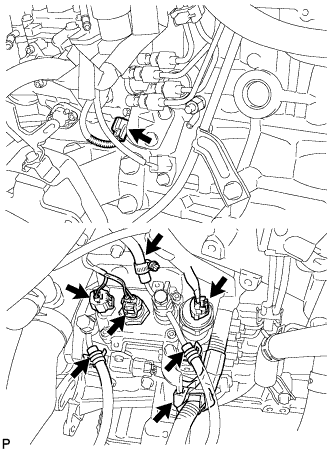 |
Connect the 3 fuel hoses.
Connect the engine speed sensor connector.
Connect the spill control valve connector.
Connect the correction unit connector.
Connect the timing control valve connector.
Connect the fuel temperature sensor connector.
Connect the engine wire clamp.
| 32. INSTALL INJECTION PUMP DRIVE PULLEY |
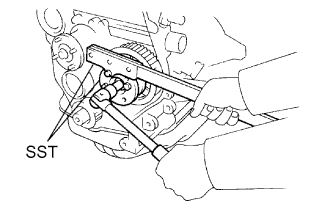 |
Using SST, install the injection pump drive pulley with the nut.
| 33. INSTALL GENERATOR WITH VACUUM PUMP ASSEMBLY |
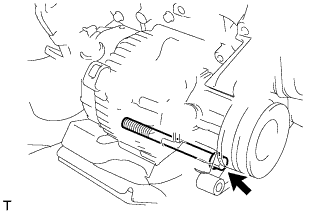 |
Install the generator with the bolt.
Connect the vacuum oil outlet hose.
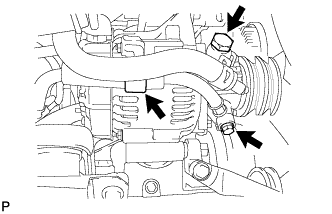 |
Install 2 new gaskets and the vacuum pump hose with the union bolt.
Install the vacuum pump oil inlet hose with 2 new gaskets and the union bolt.
Attach the vacuum pump oil inlet hose to the cord clip.
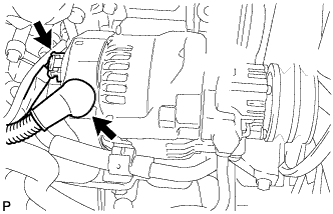 |
Install the generator wire with the nut.
Attach the terminal cap.
Connect the generator connector.