INTAKE AIR CONTROL SYSTEM (w/ EGR Cooler) > ON-VEHICLE INSPECTION |
| 1. CHECK INTAKE AIR SYSTEM |
Check for leakage or clogging between the air cleaner housing and turbocharger inlet, and between the turbocharger outlet and cylinder head.
| Condition | Operation |
| Clogged air cleaner | Clean or replace |
| Collapsed or deformed hoses | Repair or replace |
| Leakage from connections | Check each connection and repair |
| Cracks in components | Check and replace |
| 2. CHECK EXHAUST SYSTEM |
Check for leakage or clogging between the cylinder head and turbocharger inlet, and between the turbocharger outlet and exhaust pipe.
| Condition | Operation |
| Deformed components | Repair or replace |
| Foreign matter in passages | Remove |
| Leakage from components | Repair or replace |
| Cracks in components | Check or replace |
| 3. CHECK BOOST PRESSURE |
Connect the intelligent tester to the DLC3.
Start the engine and turn the tester ON.
Warm up the engine.
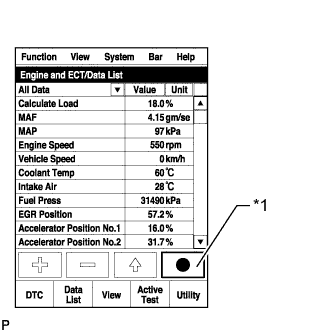
Enter the following menus: Powertrain / Engine / Data List / All Data.
![]() |
Take a snapshot of the Data List items with the intelligent tester shown in the illustration.
|
*1 | Snapshot Record Button |
Compare MAP with Target Booster Pressure.
Warm up the engine.
![]() |
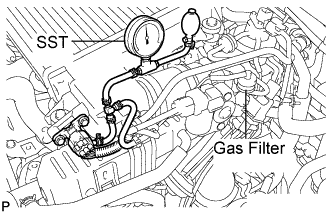
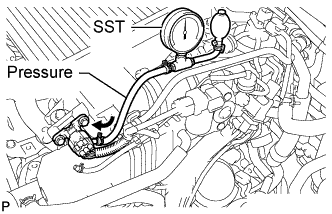
Using a 3-way connector, connect SST (turbocharger pressure gauge) between the diesel turbo pressure sensor (manifold absolute pressure sensor) and the gas filter.
Fully apply the parking brake and chock the 4 wheels.
For Waste Gate Type Turbocharger (vacuum controlled actuator):
While depressing the clutch pedal, fully depress the accelerator pedal. Measure the boost pressure at maximum engine speed (approximately 4600 rpm).
For Variable Nozzle Type Turbocharger (motor controlled actuator):
While depressing the clutch pedal, fully depress the accelerator pedal. Measure the boost pressure at maximum engine speed (approximately 4600 rpm).
Chart showing the suspected trouble areas when the pressure is lower than the standard.
| Item | MAP (Absolute pressure inside intake manifold) | MAF (Intake air flow rate) | Accel Position | Actual Throttle Position | Actual EGR Valve Pos. or EGR Lift Sensor Volt % | EGR Close Lrn. Status (EGR valve fully closed position learning status) | Fuel Pressure | Injection Feedback Val #1 (to #4) |
| Values taken from an actual normal vehicle *1 | - | 96 g/sec. | 99 % or more | 0% | Actual EGR Valve Pos.: 0% | OK | - | -3 to +3 mm3/st |
| EGR Lift Sensor Volt %: Valve fully closed position calculated from EGR Close Lrn. Val. | ||||||||
| Values which represent a malfunction *1 | MAP is below Target Booster Pressure by 30 kPa or more | MAF is less than 81 g/sec. | Accel Position is not fully depressed position *2 | Actual Throttle Position is not fully open position | Actual EGR Valve Pos. is not valve fully closed position *3 | NG (Determined after performing learning) | Fuel Pressure is below Target Common Rail Pressure by 10 MPa or more (Check while condition steady) | Outside of above range |
| EGR Valve Lift Sensor Volt % is not valve fully closed position *3 | ||||||||
| Turbocharger | ○ | ○ | - | - | - | - | - | - |
| EGR valve does not close or has problem with movement | ○ | ○ | - | - | ○ (Problem with EGR valve movement) *4 | ○ (EGR valve does not close) *4 | - | - |
| Problem with diesel throttle movement | ○ (Intake airflow decreases) | ○ | - | ○ | - | - | - | - |
| Accelerator pedal cannot be fully depressed or problem with accelerator pedal position sensor exists | - | ○ | ○ | - | - | - | - | - |
| Intake air system leakage or blockage | ○ | ○ | - | - | - | - | - | - |
| Exhaust gas leakage before turbocharger or blockage | ○ | ○ | - | - | - | - | - | - |
| Manifold absolute pressure sensor | ○ | ○ | - | - | - | - | - | - |
| Manifold absolute pressure sensor hose is disconnected | ○ | ○ | - | - | - | - | - | - |
| Mass air flow meter sub-assembly | - | ○ | - | - | - | - | - | - |
| Fuel system (injector, supply pump or common rail) | ○ | ○ | - | - | - | - | ○ (Fuel injector leakage, decrease in pressure discharge valve relief pressure or valve is stuck) | ○ *5 |
| 4. CHECK MANIFOLD ABSOLUTE PRESSURE SENSOR |
![]() |
Inspect the power source voltage.
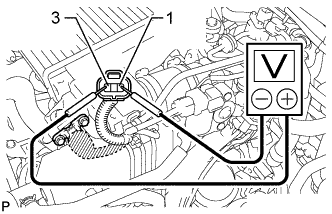
Disconnect the pressure sensor connector.
Turn the ignition switch to ON.
Measure the voltage between terminals 3 (VC (+)) and 1 (E (-)) of the wire harness side connector.
Turn the ignition switch off.
Connect the pressure sensor connector.
![]() |
Check the power supply.
Turn the ignition switch to ON.
Disconnect the vacuum hose from the pressure sensor.
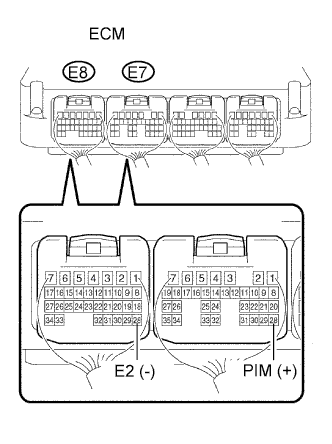
Connect a voltmeter to terminals E7-28 (PIM (+)) and E8-28 (E2 (-)) of the ECM, and measure the output voltage at ambient atmospheric pressure.
![]() |
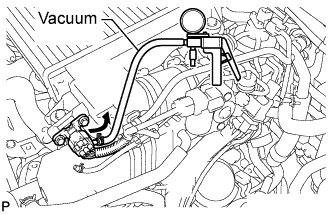
Apply a vacuum to the pressure sensor in 13.3 kPa (100 mmHg, 3.93 in.Hg) increments until the pressure reaches 40.0 kPa (300 mmHg, 11.8 in.Hg). Measure the decrease in voltage for each increment.
| Applied Vacuum | Voltage Decrease |
| 13.3 kPa (100 mmHg, 3.94 in.Hg) | 0 to 0.3 V |
| 26.6 kPa (199 mmHg, 7.85 in.Hg) | 0.1 to 0.4 V |
| 40 kPa (300 mmHg, 11.81 in.Hg) | 0.2 to 0.6 V |
![]() |
Using SST (turbocharger pressure gauge), apply pressure to the pressure sensor in 19.6 kPa (0.20 kgf/cm2, 2.84 psi) increments until the pressure reaches 98.0 kPa (1.00 kgf/cm2, 14.2 psi). Measure the increase in voltage for each increment.
| Applied Pressure | Voltage Increase |
| 19.6 kPa (0.20 kgf/cm2, 2.84 psi) | 0.05 to 0.3 V |
| 39.2 kPa (0.40 kgf/cm2, 5.68 psi) | 0.25 to 0.55 V |
| 58.8 kPa (0.60 kgf/cm2, 8.53 psi) | 0.45 to 0.75 V |
| 78.5 kPa (0.80 kgf/cm2, 11.4 psi) | 0.65 to 0.95 V |
| 98.0 kPa (1.00 kgf/cm2, 14.2 psi) | 0.9 to 1.2 V |
| 5. CHECK MOTOR FOR TURBOCHARGER CONTROL OPERATION (for Motor Controlled Actuator) |
Remove the No. 1 exhaust manifold heat insulator and No. 1 turbo insulator .
Check the stroke.
Make sure that the connector is properly connected.
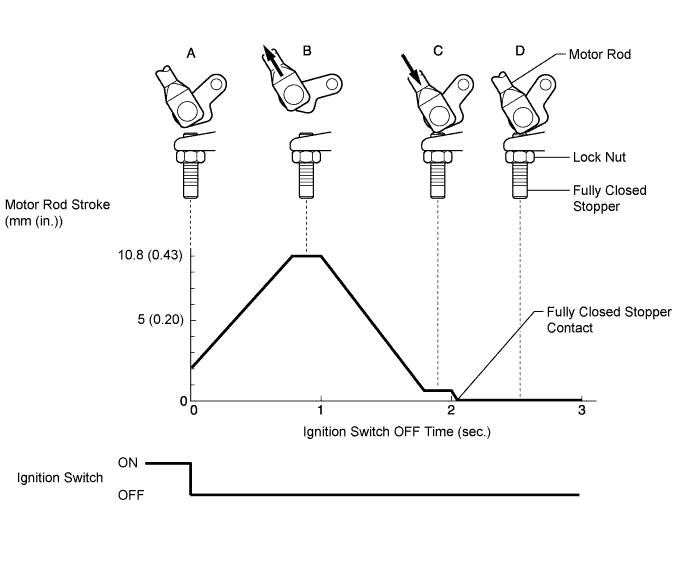
Turn the ignition switch from ON to OFF.
Check the DC motor's operation. Check that the motor rod stroke is as shown in A to D in the illustration below.
After the DC motor operates, visually check that the vane activation link contacts the fully closed stopper.

| 6. CHECK TURBO MOTOR DRIVER (for Motor Controlled Actuator) |
![]() |
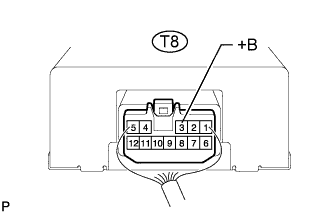
Check the voltage of the turbo motor driver.
Turn the ignition switch to ON.
Measure the voltage of the motor driver.
| Tester Connection | Specified Condition |
| T8-3 (+B) - Body ground | 9 to 14 V |
![]() |
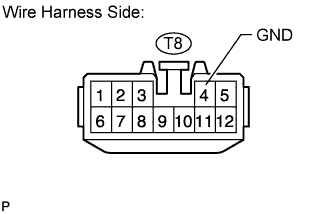
Check the resistance of the wire harness side connector.
Turn the ignition switch off.
Disconnect the T8 wire harness side connector.
Measure the resistance of the motor driver.
| Tester Connection | Specified Condition |
| T8-4 (GND) - Body ground | Below 1 Ω |
Connect the T8 turbo motor drive connector.
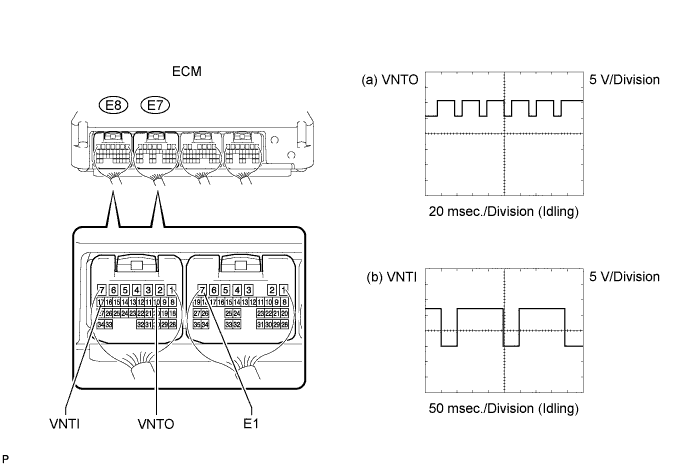
Check the turbo motor signal.

| Tester Connection | Tool Setting | Condition | Specified Condition |
| (a) E8-10 (VNTO) - E7-7 (E1) (b) E8-17 (VNTI) - E7-7 (E1) | (a) 5 V/Division, 20 msec./Division (b) 5 V/Division, 50 msec./Division | Idling with warm engine | Refer to illustration |
Connect an oscilloscope to the terminals of the ECM.
While idling the engine, check the waveform of the ECM.
If the result is not as specified, replace the turbo motor driver.