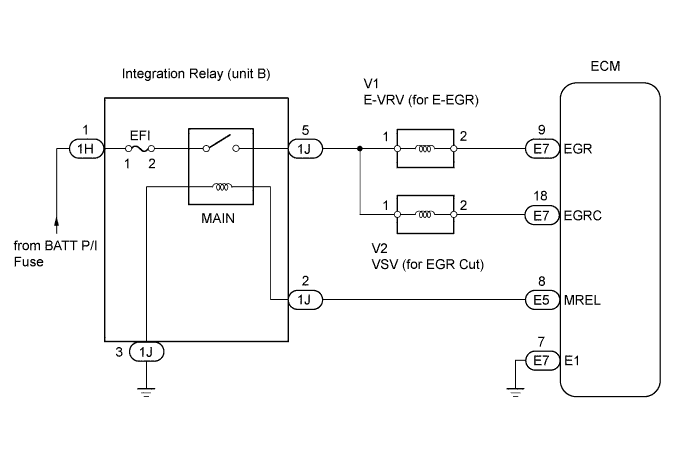
DTC P0400 Exhaust Gas Recirculation Flow |
| DTC No. | DTC Detection Condition | Trouble Area |
| P0400 | When either condition below is met:
|
|
| 1.CHECK OTHER DTC OUTPUT (IN ADDITION TO DTC P0400) |
Connect the intelligent tester to the DLC3.
Turn the ignition switch ON and turn the intelligent tester ON.
Enter the following menus: Powertrain / Engine / DTC.
Read DTCs.
| Display (DTC output) | Proceed to |
| P0400 | A |
| P0400 and P0405 and/or P0406 | B |
|
| ||||
| A | |
 |
| 2.INSPECT VACUUM PUMP ASSEMBLY |
Check the negative pressure of the vacuum pump (Click here).
|
| ||||
| OK | |
|
| 3.CHECK VACUUM HOSES |
Check the vacuum hoses.
|
| ||||
| OK | |
|
| 4.CHECK ELECTRIC VACUUM REGULATING VALVE (FOR E-EGR) |
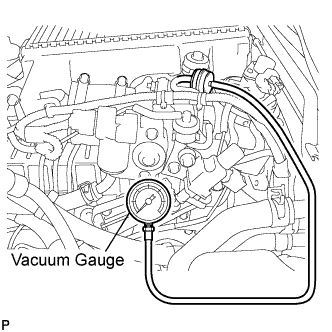 |
Disconnect the vacuum hose to the EGR valve.
Connect the vacuum gauge.
Connect the intelligent tester to the DLC3.
Start the engine.
Warm up the engine.
Enter the following menus: Powertrain / Engine / Active Test / Control the EGR system.
Check the vacuum change when the Active Test is used to turn the E-VRV (for E-EGR) from OFF to ON.
| Active Test | Vacuum Gauge | Proceed to |
| OFF to ON | Changes from above 28 kPa (210 mmHg, 8.3 in.Hg) to 0 kPa (0 mmHg, 0 in.Hg) | A |
| Stays at 0 kPa (0 mmHg, 0 in.Hg), or stays above 28 kPa (210 mmHg, 8.3 in.Hg) | B |
|
| ||||
| A | |
|
| 5.INSPECT NO. 1 VACUUM SWITCHING VALVE (FOR EGR CUT) |
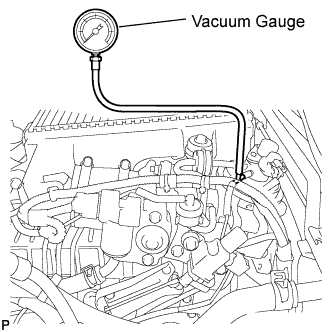 |
Using a 3-way connector, connect a vacuum gauge to the hose between the VSV (for EGR Cut) and EGR valve.
Connect the intelligent tester to the DLC3.
Start the engine and turn the tester ON.
Enter the following menus: Powertrain / Engine / Active Test / Activate the VSV for EGR Cut.
Check the vacuum change when the Active Test is used to turn the VSV (for EGR Cut) from OFF to ON.
| Active Test | Vacuum Gauge | Proceed to |
| OFF to ON | Changes from above 28 kPa (210 mmHg, 8.3 in.Hg) to 0 kPa (0 mmHg, 0 in.Hg) | A |
| Stays at 0 kPa (0 mmHg, 0 in.Hg), or stays above 28 kPa (210 mmHg, 8.3 in.Hg) | B |
|
| ||||
| A | |
|
| 6.INSPECT ELECTRIC EGR CONTROL VALVE ASSEMBLY |
Inspect the electric EGR control valve .
|
| ||||
| OK | |
|
| 7.CHECK FOR BLOCKAGE IN EGR GAS PASSAGE (EXHAUST MANIFOLD - ELECTRIC EGR CONTROL VALVE) |
Check for blockage in the EGR gas passage between the exhaust manifold and electric EGR control valve assembly.
|
| ||||
| OK | ||
 | ||
| ||
| 8.INSPECT ELECTRIC VACUUM REGULATING VALVE FOR EGR (E-VRV FOR E-EGR) |
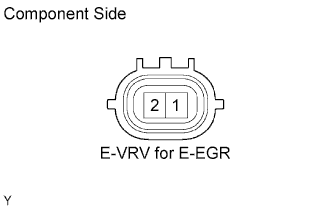 |
Disconnect the V1 E-VRV for E-EGR connector.
Measure the resistance of the E-VRV for E-EGR connector.
| Tester Connection | Condition | Specified Condition |
| 1 - 2 | 20°C (68°F) | 11 to 13 Ω |
|
| ||||
| OK | |
|
| 9.CHECK HARNESS AND CONNECTOR (E-VRV FOR E-EGR - ECM) |
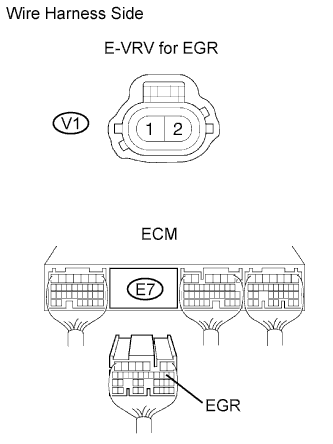 |
Disconnect the V1 E-VRV for E-EGR connector.
Disconnect the E7 ECM connector.
Measure the resistance of the wire harness side connectors.
| Tester Connection | Specified Condition |
| E7-9 (EGR) - V1-2 | Below 1 Ω |
| Tester Connection | Specified Condition |
| E7-9 (EGR) or V1-2 - Body ground | 10 kΩ or higher |
|
| ||||
| OK | |
|
| 10.CHECK HARNESS AND CONNECTOR (INTEGRATION RELAY (MAIN RELAY) - E-VRV FOR E-EGR) |
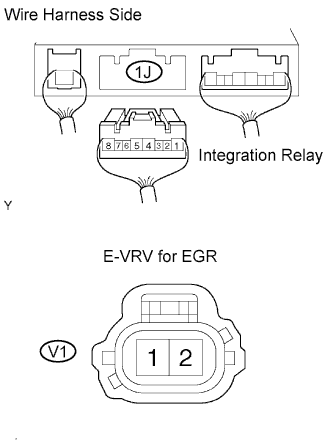 |
Remove the integration relay from the engine room junction block (Click here).
Disconnect the 1J integration relay connector.
Disconnect the V1 E-VRV connector.
Measure the resistance of the wire harness side connectors.
| Tester Connection | Specified Condition |
| 1J-5 - V1-1 | Below 1 Ω |
| Tester Connection | Specified Condition |
| 1J-5 or V1-1 - Body ground | 10 kΩ or higher |
|
| ||||
| OK | ||
| ||
| ||
| 11.INSPECT NO. 1 VACUUM SWITCHING VALVE FOR EGR CUT (RESISTANCE) |
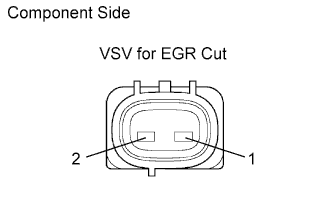 |
Disconnect the V2 VSV for EGR cut connector.
Measure the resistance of the VSV for EGR Cut.
| Tester Connection | Condition | Specified Condition |
| 1 - 2 | 20°C (68°F) | 37 to 44 Ω |
|
| ||||
| OK | |
|
| 12.CHECK HARNESS AND CONNECTOR (NO. 1 VACUUM SWITCHING VALVE FOR EGR CUT - ECM) |
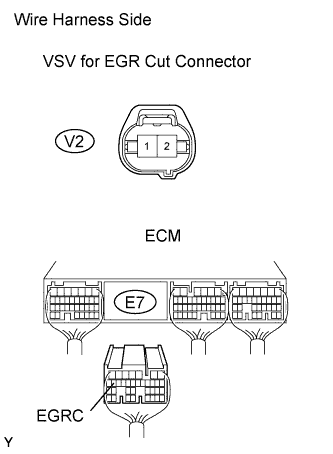 |
Disconnect the V2 VSV for EGR Cut connector.
Disconnect the E7 ECM connector.
Measure the resistance of the wire harness side connectors.
| Tester Connection | Specified Condition |
| E7-18 (EGRC) - V2-2 | Below 1 Ω |
| Tester Connection | Specified Condition |
| E7-18 (EGRC) or V2-2 - Body ground | 10 kΩ or higher |
|
| ||||
| OK | |
|
| 13.CHECK HARNESS AND CONNECTOR (INTEGRATION RELAY (MAIN RELAY) - VSV FOR EGR CUT) |
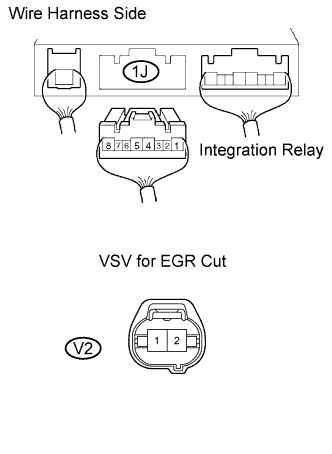 |
Remove the integration relay from the engine room junction block (Click here)
Disconnect the 1J integration relay connector.
Disconnect the V2 VSV for EGR Cut connector.
Measure the resistance of the wire harness side connectors.
| Tester Connection | Specified Condition |
| 1J-5 - V2-1 | Below 1 Ω |
| Tester Connection | Specified Condition |
| 1J-5 or V2-1 - Body ground | 10 kΩ or higher |
|
| ||||
| OK | ||
| ||
| ||

