| B |  |
| REPAIR OR REPLACE MALFUNCTIONING PARTS |
ECD SYSTEM (w/o EGR Cooler) > Engine Knocking or Rattling |
| Malfunction Condition | Main Trouble Area | Related Trouble Area |
|
|
|
| 1.CHECK SOUND AREA |
Find the source of the abnormal sound using a mechanic's stethoscope.
| Result | Proceed to |
| Sound from supply pump | A |
| Sound from parts other than supply pump | B |
|
| ||||
| A | |
 |
| 2.CHECK WIRE HARNESS IN ENGINE COMPARTMENT |
Check the wire harness connections.
|
| ||||
| OK | |
|
| 3.PERFORM CONFIRMATION DRIVING PATTERN |
| NEXT | |
|
| 4.READ OUTPUT DTC (RELATING TO ENGINE) |
Enter the following menus: Powertrain / Engine / DTC.
Read pending DTCs.
| Display (DTC Output) | Proceed to |
| No output | A |
| Engine related DTCs (Click here) | B |
|
| ||||
| A | |
|
| 5.PERFORM ACTIVE TEST USING INTELLIGENT TESTER (TEST THE FUEL LEAK) |
Connect the intelligent tester to the DLC3.
Start the engine and turn the intelligent tester ON.
Enter the following menus: Powertrain / Engine / Active Test / Test the Fuel Leak.
Visually check the supply pump, injector and fuel line located between the supply pump and common rail for fuel leaks and fuel pressure leaks. Also, perform the same check on the fuel line between the common rail and the injector (Click here).
|
| ||||
| OK | |
|
| 6.READ VALUE USING INTELLIGENT TESTER (MAP, FUEL PRESS) |
Connect the intelligent tester to the DLC3.
Start the engine and warm it up, and turn the intelligent tester ON.
Enter the following menus: Powertrain / Engine / Data List.
Select the following menu items in order and read the values.
| Item | Engine Speed* | Standard Range | Proceed to | Description |
| MAP | Ignition switch ON (engine stopped) | Same as atmospheric pressure |
| Intake manifold internal pressure detected by intake pressure sensor |
| Idling | 90 to 100 kPa (675 to 750 mmHg, 26.6 to 29.5 in.Hg) | |||
| 3,000 rpm (No engine load) | 110 to 130 kPa (825 to 975 mmHg, 32.5 to 38.4 in.Hg) | |||
| 3,500 rpm (full throttle acceleration) | Min.: 175 kPa (1,313 mmHg, 51.7 in.Hg) | |||
| Fuel Press | Idling | 25 to 35 MPa |
| Common rail internal fuel pressure |
| 2,000 rpm (No engine load) | 25 to 35 MPa | |||
| 3,000 rpm (No engine load) | 35 to 45 MPa | |||
| 3,500 rpm (full throttle acceleration) | Min.: 121 MPa |
|
| ||||
|
| ||||
| A | |
|
| 7.READ VALUE USING INTELLIGENT TESTER (INJECTION FEED BACK VAL, INJECTION VOLUME) |
Select the following menu items in order and read the values.
| Item | Engine Speed* | Standard Range | Proceed to | Description |
| Injection Feedback Val #1 | Idling | -3.0 to 3.0 mm3
|
| Value of injector fuel injection volume compensates for differences in combustion condition of cylinders
|
| Injection Feedback Val #2 | Idling | -3.0 to 3.0 mm3
| ||
| Injection Feedback Val #3 | Idling | -3.0 to 3.0 mm3
| ||
| Injection Feedback Val #4 | Idling | -3.0 to 3.0 mm3
| ||
| Injection Volume | Idling | 3.0 to 10.0 mm3
| Fuel injection volume value controlled by ECU
|
|
| ||||
| A | |
|
| 8.CHECK INJECTOR COMPENSATION CODE |
|
| ||||
| OK | |
|
| 9.CHECK BATTERY |
Disconnect the cable from the negative (-) battery terminal for at least 2 minutes.
Reconnect the cable to the negative (-) battery terminal.
Check whether the malfunction has been successfully repaired by performing a driving test using the freeze frame data recorded at the time the malfunction occurred.
|
| ||||
| NG | |
|
| 10.BASIC INSPECTION |
Check the fuel quality.
Check the fuel for air.
Check the fuel system for blockages.
Check the air filter.
Check the engine oil.
Check the engine coolant.
Check the engine idling speed and the maximum engine speed.
Check the vacuum pump.
|
| ||||
| OK | |
|
| 11.CHECK INTAKE AND EXHAUST SYSTEM |
Check for air leakage and blockage between the air cleaner and turbocharger.
Check for air leakage and blockage between the turbocharger and intake manifold.
|
| ||||
| OK | |
|
| 12.CHECK ECM (EGLS VOLTAGE*) |
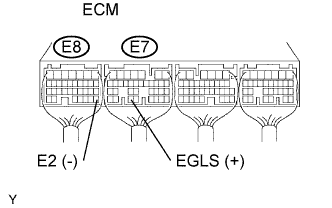 |
Turn the ignition switch ON.
Measure the voltage of the ECM connectors.
| Tester Connection | Specified Condition |
| E7-33 (EGLS) - E8-28 (E2) | A (0.3 to 1.3 V) |
Start the engine and warm it up.
Measure the voltage of the ECM connectors.
| Tester Connection | Condition | Specified Condition |
| E7-33 (EGLS) - E8-28 (E2) | Idling: 750 rpm | A + (1.91 to 2.70 V) |
|
| ||||
| OK | |
|
| 13.INSPECT DIESEL THROTTLE BODY ASSEMBLY |
Measure the resistance between terminal 1 of the diesel throttle body and the body ground.
|
| ||||
| OK | |
|
| 14.CHECK COMBUSTION |
Confirm type of sound emitted.
| Result | Proceed to |
| Knocking | A |
| Mechanical sound other than knocking | B |
|
| ||||
| A | |
|
| 15.PERFORM ACTIVE TEST USING INTELLIGENT TESTER (FUEL CUT FOR IDENTIFYING MALFUNCTION) |
Connect the intelligent tester to the DLC3.
Start the engine and turn the intelligent tester ON.
Enter the following menus: Powertrain / Engine / Active Test / Control the Cylinder#1, #2, #3 and #4 Fuel Cut.
Check the 4 cylinders in sequence to identify any faulty cylinders by performing the power balance inspection.
| NEXT | |
|
| 16.CHECK CYLINDER COMPRESSION PRESSURE |
Check the cylinder compression pressure .
|
| ||||
| OK | |
|
| 17.CHECK MALFUNCTIONING CYLINDER INJECTION FOR DEPOSIT |
Check the injector for any deposits.
| Result | Proceed to |
| Deposits | A |
| No deposits | B |
|
| ||||
| A | |
|
| 18.CLEAN INJECTOR |
| NEXT | |
|
| 19.READ VALUE USING INTELLIGENT TESTER (INJECTION FEEDBACK VAL, INJECTION VOLUME) |
Reinstall the injector to the cylinder head.
Connect the intelligent tester to the DLC3.
Turn the ignition switch ON and turn the intelligent tester ON.
Start the engine and warm it up.
Enter the following menus: Powertrain / Engine / Data List.
Select the following menu items in order and read the values.
| Item | Engine Speed* | Reference Value |
| Injection Feedback Val #1 to #4 | Idling | -3.0 to 3.0 mm3
|
| Injection Volume | Idling | 3.0 to 10.0 mm3
|
|
| ||||
| OK | ||
 | ||
| ||
| 20.IDENTIFY MALFUNCTIONING CYLINDER INJECTOR |
Follow the instructions in the table below according to the check result of the intelligent tester.
| Item | Engine Speed* | Reference Value |
| Injection Feedback Val #1 to #4 | Idling | -3.0 to 3.0 mm3
|
| Injection Volume | Idling | 3.0 to 10.0 mm3
|
| Injection Volume Injection Feedback Val #1 to #4 | Less than 3.0 mm3
| Between 3.0 to 10.0 mm3 (Normal) | More than 10.0 mm3
|
| 3.0 mm3 or more, -3.0 mm3 or less | A | B | B |
| Between -3.0 to 3.0 mm3
| - | Normal | C* |
| Proceed to | Inspection Area | Description |
| A | Inspect and repair cylinder injector with revised injection volume of less than -3.0 mm3:
| Abnormal value cylinder injector injects excessively large quantity of fuel |
| B | Identify malfunctioning cylinders by conducting power balance inspection:
| Abnormal value cylinder injector injects excessively large quantity of fuel:
|
| C | Inspect and repair all cylinder injectors: Clean all cylinder injectors, and then inspect and repair them | All cylinder injectors inject excessively small quantity of fuel: Fuel injection volume too low due to all cylinder injector nozzles being blocked by deposits |
|
| ||||
|
| ||||
| A | |
|
| 21.PERFORM ACTIVE TEST USING INTELLIGENT TESTER (FUEL CUT FOR IDENTIFYING MALFUNCTIONING CYLINDER) |
Connect the intelligent tester to the DLC3.
Start the engine and turn the intelligent tester ON.
Enter the following menus: Powertrain / Engine / Active Test / Control the Cylinder#1, #2, #3 and #4 Fuel Cut.
Check the four cylinders in sequence to identify any faulty cylinders by performing the power balance inspection.
| NEXT | ||
| ||
| ||
| 22.CHECK ALL CYLINDER INJECTORS FOR DEPOSIT |
Check the injectors for any deposits.
| Injector Condition | Proceed to |
| Deposits | A |
| No Deposits | B |
|
| ||||
| A | |
|
| 23.CLEAN INJECTOR |
| NEXT | |
|
| 24.READ VALUE USING INTELLIGENT TESTER (INJECTION FEEDBACK VAL, INJECTION VOLUME) |
Reinstall the injector to the cylinder head.
Connect the intelligent tester to the DLC3.
Turn the ignition switch ON and turn the intelligent tester ON.
Start the engine and warm it up.
Enter the following menus: Powertrain / Engine / Data List.
Select the following menu items in order and read the values displayed on the intelligent tester respectively.
| Item | Engine Speed* | Reference Value |
| Injection Feedback Val #1 to #4 | Idling | -3.0 to 3.0 mm3
|
| Injection Volume | Idling | 3.0 to 10.0 mm3
|
|
| ||||
| OK | ||
| ||
| ||
| 25.CHECK SOUND AREA |
Find the source of the abnormal sound using a mechanic's stethoscope.
| Result | Proceed to |
| Sound from supply pump | A |
| Sound from parts other than supply pump | B |
|
| ||||
| A | |
|
| 26.BLEED AIR FROM FUEL SYSTEM |
To bleed air from the priming pump, pump the priming pump until it becomes hard and cannot be pumped any more.
| NEXT | |
|
| 27.CONFIRM WHETHER MALFUNCTION HAS BEEN SUCCESSFULLY REPAIRED |
Check whether the knocking has been successfully repaired by performing a driving test.
| NEXT | ||
| ||
| ||
| 28.INSPECT SUPPLY PUMP ASSEMBLY |
Measure the resistance of the suction control valve terminals.
|
| ||||
| OK | |
|
| 29.INSPECT COMMON RAIL ASSEMBLY (FUEL PRESSURE SENSOR) |
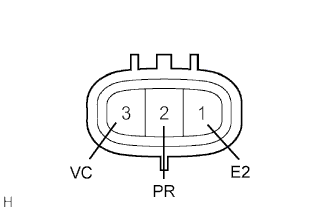 |
Disconnect the F9 sensor connector.
Measure the resistance of the sensor.
| Tester Connection | Specified Condition |
| 1 (E2) - 2 (PR) | 3 kΩ or less |
| 2 (PR) - 3 (VC) | 16.4 kΩ or less |
|
| ||||
| OK | ||
| ||
| ||
