Home › ENGINE ยท 1TR-FE › ENGINE MECHANICAL › ENGINE UNIT

ENGINE UNIT > INSPECTION

for Preparation Click here


1. INSPECT OIL NOZZLE
  1. Check the oil nozzle for damage or clogging.
    If necessary, replace the oil nozzle.


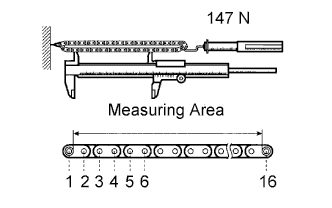
2. INSPECT CHAIN


    A097900E03
  1. Pull the chain with a force of 147 N (15 kgf, 33 lbf) as shown in the illustration.

  1. Using a vernier caliper, measure the length of 16 links.

    Maximum chain elongation:
    147.5 mm (5.807 in.)

    If the elongation is greater than the maximum, replace the chain.

    NOTICE:
    Make the same measurement pulling at 3 or more places selected at random. Average the measurements.


3. INSPECT CAMSHAFT


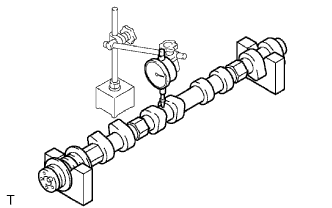
    A086996E01
  1. Check the camshaft for runout.

    1. Place the camshaft on V-blocks.

    2. Using a dial indicator, measure the circle runout at the center journal.
      Maximum circle runout:
      0.03 mm (0.0012 in.)

      If the circle runout is greater than the maximum, replace the camshaft.


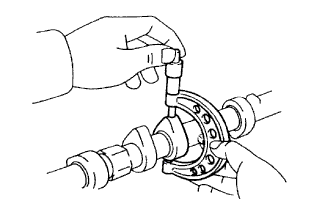
    A034310E01
  1. Using a micrometer, measure the cam lobe height.
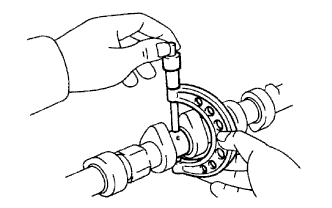
    Standard cam lobe height:
    42.712 to 42.812 mm (1.6816 to 1.6885 in.)

    Minimum cam lobe height:
    42.712 mm (1.6816 in.)

    If the cam lobe height is less than the minimum, replace the camshaft.


    A034311E01
  1. Using a micrometer, measure the journal diameter.

    Standard journal diameter:
    Journal
    Specified Condition
    No. 1 journal
    35.949 to 35.965 mm (1.4153 to 1.4159 in.)
    Other journal
    26.959 to 26.975 mm (1.0614 to 1.0620 in.)

    If the journal diameter is not as specified, check the oil clearance.


4. INSPECT NO.2 CAMSHAFT


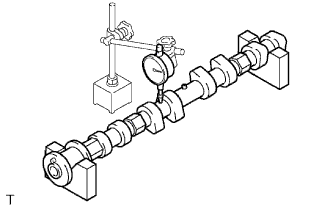
    A086997E01
  1. Check the camshaft for runout.

    1. Place the camshaft on V-blocks.

    2. Using a dial indicator, measure the circle runout at the center journal.
      Maximum circle runout:
      0.03 mm (0.0012 in.)

      If the circle runout is greater than the maximum, replace the camshaft.


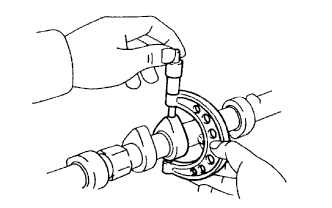
    A034310E02
  1. Using a micrometer, measure the cam lobe height.

    Standard cam lobe height:
    42.540 to 42.640 mm (1.6748 to 1.6787 in.)

    Minimum cam lobe height:
    42.540 mm (1.6748 in.)

    If the cam lobe height is less than the minimum, replace the camshaft.


    A034311E01
  1. Using a micrometer, measure the journal diameter.

    Standard journal diameter:
    Journal
    Specified Condition
    No. 1 journal
    35.949 to 35.965 mm
    (1.4153 to 1.4159 in.)
    Other journal
    26.959 to 26.975 mm
    (1.0614 to 1.0620 in.)

    If the journal diameter is not as specified, check the oil clearance.


5. INSPECT CAMSHAFT TIMING GEAR (VVT CONTROLLER OPERATION)


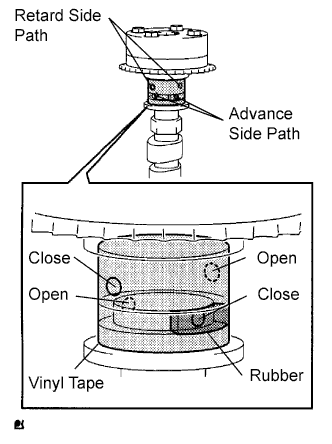
    A062190E02
  1. Check the lock of the camshaft timing gear.

    1. Clamp the camshaft in a vise, and confirm that the camshaft timing gear is locked.

      NOTICE:
      Be careful not to damage the camshaft.


  1. Release the lock pin.

    1. Cover the 4 oil paths of the cam journal with vinyl tape as shown in the illustration.

      HINT:
      2 advance side paths are provided in the groove of the camshaft. Plug one of the paths with a rubber piece.

    2. Break through the tape of the advance side path and the retard side path on the opposite side of the groove.
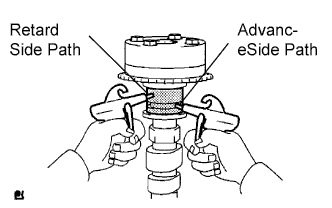


    3. A062191E03
    4. Apply approximately 200 kPa (2.0 kgf/cm2, 28 psi) of air pressure to the paths whose tape was broken in the procedure above.
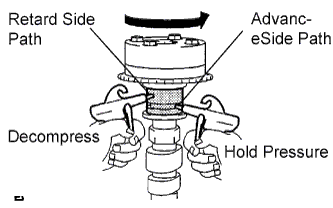
      CAUTION:
      Some oil spraying will occur. Contain the spray with a shop rag.


    5. A062192E04
    6. Check that the camshaft timing gear revolves in the advance direction when weakening the air pressure of the retard side path.

      OK:
      Gear rotates in advance direction.

      HINT:
      This operation releases the lock pin for the extreme retard position.

    7. When the camshaft timing gear reaches the extreme advance position, remove the air gun from the retard side path and advance side path, in that order.

      NOTICE:
      Do not remove the air gun from the advance side path first. The gear may abruptly shift in the retard direction and break the lock pin.

  1. Check for smooth rotation.

    1. Rotate the camshaft timing gear within its movable range several times, but do not turn it to the extreme retard position. Check that the gear rotates smoothly.

      OK:
      Gear rotates in advance direction.

      NOTICE:
      Do not use an air gun to perform the smooth operation check.

  1. Check the lock in the extreme retard position.

    1. Confirm that the camshaft timing gear is locked at the extreme retard position.


6. INSPECT CHAIN TENSIONER


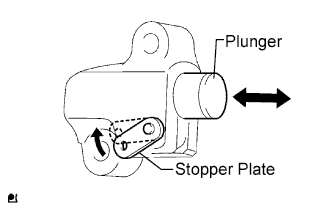
    A097905E03
  1. Move the stopper plate upward to release the lock. Push the plunger and check that it moves smoothly.


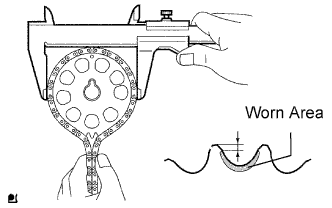
7. INSPECT CAMSHAFT TIMING SPROCKET


    A097906E03
  1. Measure the distance between the most worn out sprocket tip and the beginning of the worn area below the tip.

    Minimum distance:
    1.0 mm (0.039 in.)

    If the distance is less than the minimum, replace the sprocket.

    HINT:
    If the worn area is too small or difficult to distinguish from a normal area, perform steps below.

  1. Wrap the chain around the sprocket.

  1. Using a vernier caliper, measure the sprocket diameter with the chain.

    Minimum sprocket diameter (with chain):
    113.8 mm (4.480 in.)

    HINT:
    The vernier caliper must contact the chain rollers for the measurement.

    If the diameter is less than the minimum, replace the chain and sprocket.


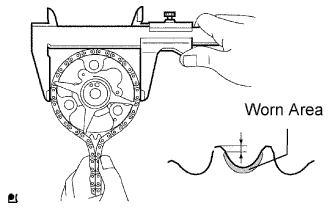
8. INSPECT CAMSHAFT TIMING GEAR


    A097907E03
  1. Measure the distance between the most worn out timing gear tip and the beginning of the worn area below the tip.

    Minimum distance:
    1.0 mm (0.039 in.)

    If the distance is less than the minimum, replace the timing gear.

    HINT:
    If the worn area is too small or difficult to distinguish from a normal area, perform steps below.

  1. Wrap the chain around the timing gear.

  1. Using a vernier caliper, measure the sprocket diameter with the chain.

    Minimum sprocket diameter (with chain):
    113.8 mm (4.480 in.)

    HINT:
    The vernier caliper must contact the chain rollers for the measurement.

    If the diameter is less than the minimum, replace the chain and timing gear.


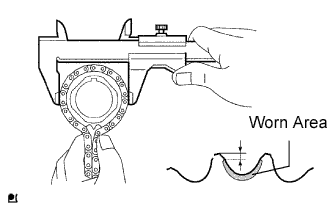
9. INSPECT CRANKSHAFT TIMING SPROCKET


    A097908E03
  1. Measure the distance between the most worn out sprocket tip and the beginning of the worn area below the tip.

    Minimum distance:
    1.0 mm (0.039 in.)

    If the distance is less than the minimum, replace the sprocket.

    HINT:
    If the worn area is too small or difficult to distinguish from a normal area, perform steps below.

  1. Wrap the chain around the drive sprocket.

  1. Using a vernier caliper, measure the sprocket diameter with the chain.

    Minimum sprocket diameter (with chain):
    59.4 mm (2.358 in.)

    HINT:
    The vernier caliper must contact the chain rollers for the measurement.

    If the diameter is less than the minimum, replace the chain and sprocket.


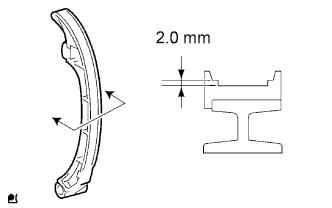
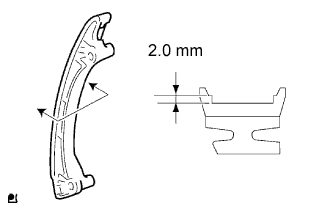
10. INSPECT CHAIN TENSIONER SLIPPER


    A097909E02
  1. Using a vernier caliper, measure the tensioner slipper wear.

    Maximum wear:
    2.0 mm (0.079 in.)

    If the wear is greater than the maximum, replace the tensioner slipper.


11. INSPECT CHAIN VIBRATION DAMPER


    A097910E02
  1. Using a vernier caliper, measure the vibration damper wear.

    Maximum wear:
    2.0 mm (0.079 in.)

    If the wear is greater than the maximum, replace the vibration damper.


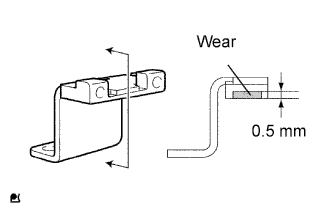
12. INSPECT TIMING CHAIN GUIDE


    A097911E02
  1. Using a vernier caliper, measure the chain guide wear.

    Maximum wear:
    0.5 mm (0.020 in.)

    If the wear is greater than the maximum, replace the timing chain guide.


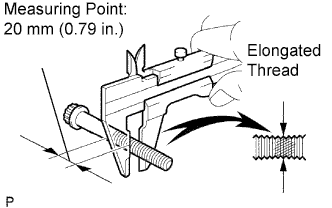
13. INSPECT CYLINDER HEAD SET BOLT


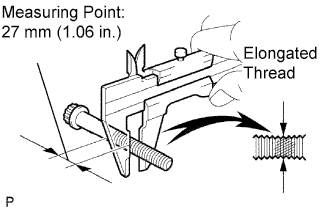
    G035889E02
  1. Using a vernier caliper, measure the minimum diameter of the elongated thread at the measuring point.

    Standard outside diameter:
    10.76 to 10.97 mm (0.4236 to 0.4319 in.)

    Minimum outside diameter:
    10.40 mm (0.4094 in.)

    HINT:
    If a visual check reveals no excessively thin areas, check the center of the bolt (see illustration) and find the area that has the lowest diameter.

    If the diameter is less than the minimum, replace the cylinder head bolt.


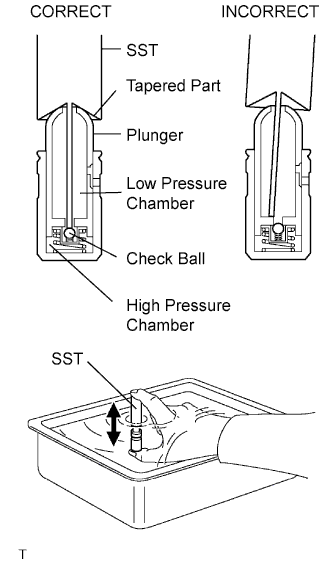
14. INSPECT VALVE LASH ADJUSTER


A097867E01

NOTICE:
  1. Keep the lash adjuster free from foreign matter.
  2. Only use clean engine oil.

  1. Place the lash adjuster into a container full of engine oil.

  1. Insert SST's tip into the lash adjuster's plunger and use the tip to press down on the checkball inside the plunger.

    SST
    09276-75010  

  1. Squeeze the SST and lash adjuster together to move the plunger up and down 5 to 6 times.

  1. Check the movement of the plunger and bleed air.

    OK:
    Plunger moves up and down.

    NOTICE:
    When bleeding high-pressure air from the compression chamber, make sure that the tip of the SST is actually pressing the checkball as shown in the illustration. If the checkball is not pressed, air will not bleed.

  1. After bleeding air, remove SST. Then, try to quickly and firmly press the plunger with a finger.

    OK:
    Plunger is difficult to move.

    If the result is not as specified, replace the lash adjuster.


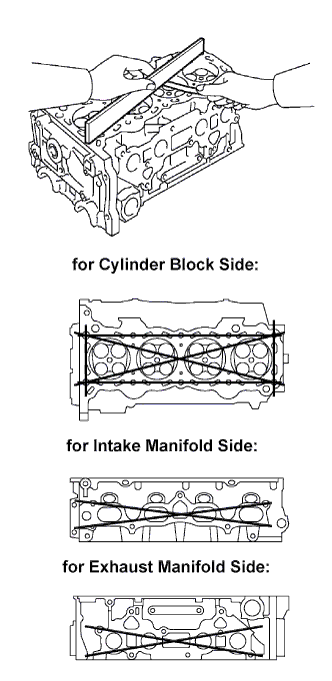
15. INSPECT CYLINDER HEAD FOR FLATNESS


    A097935E01
  1. Using a precision straightedge and feeler gauge, measure the surface contacting the cylinder block and manifold for warpage.

    Maximum warpage:
    0.05 mm (0.0020 in.)

    If the warpage is greater than the maximum, replace the cylinder head.


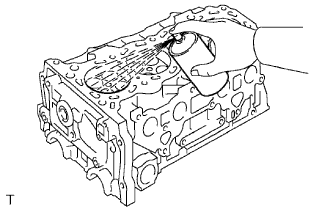
16. INSPECT CYLINDER HEAD FOR CRACKS


    A086993E01
  1. Using a dye penetrant, check the intake ports, exhaust ports and cylinder surface for cracks.
    If cracked, replace the cylinder head.


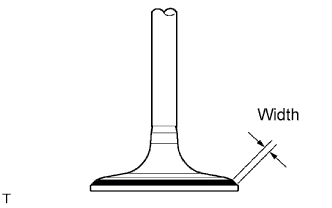
17. INSPECT INTAKE VALVE SEAT


    A099448E01
  1. Apply a light coat of Prussian blue (or white lead) to the valve face.

  1. Lightly press the valve face against the valve seat.

  1. Check the valve face and valve seat according to the following procedure.

    1. If blue appears 360° around the valve face, the valve face is concentric. If not, replace the valve.

    2. If blue appears 360° around the valve seat, the guide and valve face are concentric. If not, resurface the valve seat.

    3. Check that the valve seat contact is in the middle of the valve face with the width between 1.0 to 1.4 mm (0.039 to 0.055 in.).


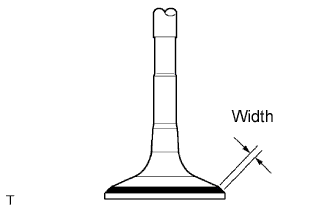
18. INSPECT EXHAUST VALVE SEAT


    A099449E01
  1. Apply a light coat of Pprussian blue (or white lead) to the valve face.

  1. Lightly press the valve face against the valve seat.

  1. Check the valve face and valve seat according to the following procedure.

    1. If blue appears 360° around the valve face, the valve face is concentric. If not, replace the valve.

    2. If blue appears 360° around the valve seat, the guide and valve face are concentric. If not, resurface the valve seat.

    3. Check that the valve seat contact is in the middle of the valve face with the width between 1.0 to 1.4 mm (0.039 to 0.055 in.).


19. INSPECT CAMSHAFT THRUST CLEARANCE


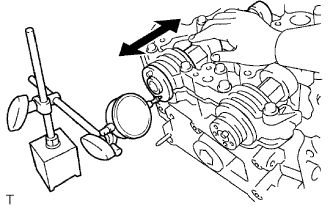
    A086998E01
  1. Using a dial indicator, measure the thrust clearance while moving the camshaft back and forth.

    Standard thrust clearance:
    0.10 to 0.24 mm (0.004 to 0.009 in.)

    Maximum thrust clearance:
    0.26 mm (0.010 in.)

    If the thrust clearance is greater than the maximum, replace the cylinder head. If the thrust surface is damaged, replace the camshaft.


20. INSPECT CAMSHAFT OIL CLEARANCE


    A086999E01
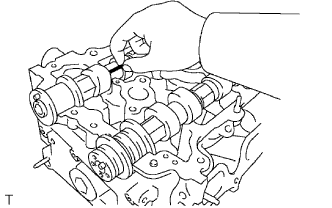
  1. Clean the bearing caps and camshaft journals.

  1. Place the camshafts on the cylinder head.

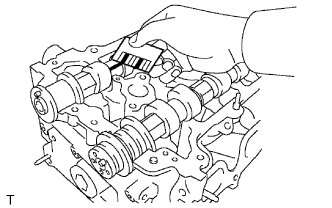
  1. Lay a strip of Plastigage across each of the camshaft journals.


  1. Install the bearing caps.


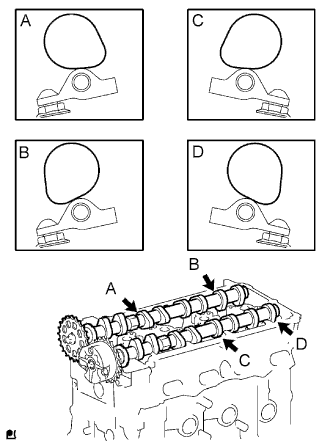
      G034736E01
      G035211E01
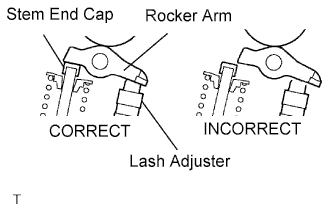
    1. Set the camshaft and No. 2 camshaft as shown in the illustration.
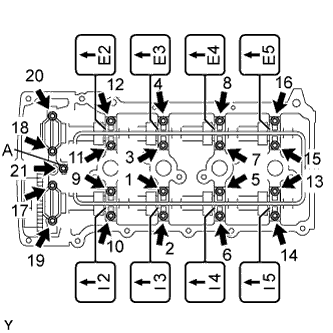
      NOTICE:
      Before and after setting the camshaft and No. 2 camshaft, firmly set the rocker arm to the lash adjuster.


    2. A113790E01
    3. Loosely install the No. 1 camshaft bearing cap.

    4. Check the proper location of each No. 2 camshaft bearing cap and install each one.

    5. Install a new O-ring to the camshaft bearing cap No. 1.

    6. Loosely install the oil delivery pipe.

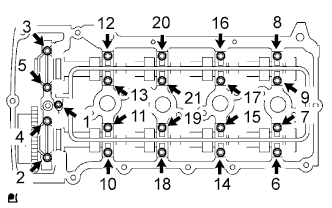
    7. Tighten the 21 bolts in the order shown in the illustration.

      Torque:
      12 N*m{ 122 kgf*cm , 9 ft.*lbf } for bolt A
      15.5 N*m{ 158 kgf*cm , 11 ft.*lbf } for except bolt A


  1. Remove the bearing caps.


      A097866E01
    1. Uniformly loosen and remove the 21 bearing cap bolts on the camshafts in the sequence shown in the illustration. Then remove the oil delivery pipe, O-ring and 9 bearing caps.

      NOTICE:
      Place the camshaft on a flat surface and loosen the bolts uniformly.

    2. Remove the 2 camshafts.


    A087000E01
  1. Measure the plastigage at its widest point.

    Standard oil clearance:
    Journal
    Oil clearance
    No. 1 journal
    0.035 to 0.072 mm (0.0014 to 0.0029 in.)
    Other journal
    0.025 to 0.062 mm (0.0010 to 0.0028 in.)

    Maximum oil clearance:
    0.08 mm (0.0031 in.)

    If the oil clearance is greater than the maximum, replace the camshaft. If necessary, replace the cylinder head.

  1. Completely remove the Plastigage.


21. INSPECT COMPRESSION SPRING


    A051437E01
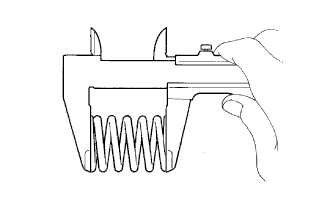
  1. Using a vernier caliper, measure the free length of the inner compression spring.
    Standard free length:
    48.89 mm (1.9248 in.)

    If the free length is not as specified, replace the spring.


    A062784E01
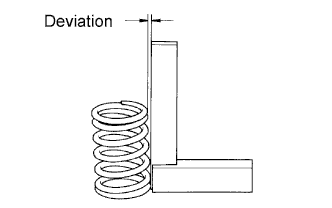
  1. Using a steel square, measure the deviation of the inner compression spring.

    Maximum deviation:
    1.5 mm (0.059 in.)

    Maximum angle (reference):
    2°

    If the deviation is greater than the maximum, replace the spring.


22. INSPECT INTAKE VALVE


    EM02534E01
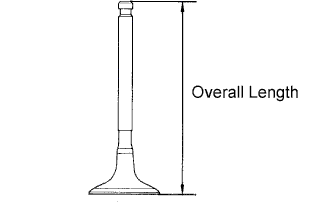
  1. Using a vernier caliper, measure the valve's overall length.
    Standard overall length:
    106.56 to 106.96 mm (4.1953 to 4.2110 in.)

    Minimum overall length:
    106.46 mm (4.1913 in.)

    If the overall length is less than the minimum, replace the valve.


    A087001E01
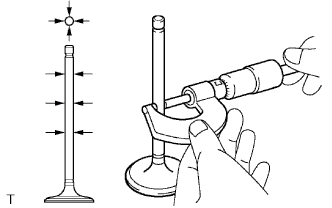
  1. Using a micrometer, measure the diameter of the valve stem.
    Standard valve stem diameter:
    5.470 to 5.485 mm (0.2154 to 0.2159 in.)


    A099452E01
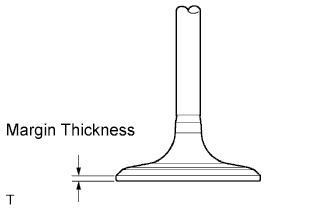
  1. Using a vernier caliper, measure the valve head margin thickness.

    Standard margin thickness:
    1.05 to 1.45 mm (0.0413 to 0.0571 in.)

    Minimum margin thickness:
    0.50 mm (0.0197 in.)

    If the margin thickness is less than the minimum, replace the valve.


23. INSPECT EXHAUST VALVE


    EM02534E01
  1. Using a vernier caliper, measure the valve's overall length.
    Standard overall length:
    107.04 to 107.44 mm (4.2220 to 4.2299 in.)

    Minimum overall length:
    106.94 mm (4.2102 in.)

    If the overall length is less than the minimum, replace the valve.


    A087003E01
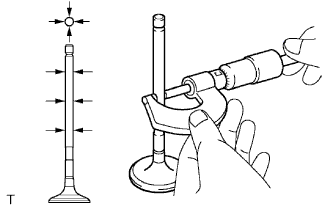
  1. Using a micrometer, measure the diameter of the valve stem.
    Standard valve stem diameter:
    5.465 to 5.480 mm (0.2151 to 0.2157 in.)


    A099453E01
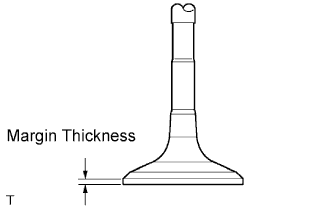
  1. Using a vernier caliper, measure the valve head margin thickness.

    Standard margin thickness:
    1.2 to 1.6 mm (0.0472 to 0.0630 in.)

    Minimum margin thickness:
    0.50 mm (0.0197 in.)

    If the margin thickness is less than the minimum, replace the valve.


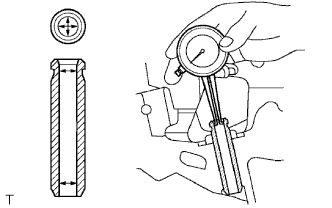
24. INSPECT INTAKE VALVE GUIDE BUSH


    A087005E01
  1. Using a caliper gauge, measure the inside diameter of the guide bush.

    Standard bush inside diameter:
    5.510 to 5.530 mm (0.2169 to 0.2177 in.)

  1. Subtract the valve stem diameter measurement from the guide bush inside diameter measurement.

    Standard oil clearance:
    0.025 to 0.060 mm (0.0010 to 0.0024 in.)

    Maximum oil clearance:
    0.08 mm (0.0032 in.)

    If the clearance is greater than the maximum, replace the valve and guide bush.


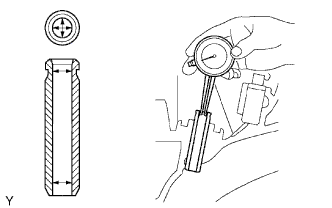
25. INSPECT EXHAUST VALVE GUIDE BUSH


    G035204E01
  1. Using a caliper gauge, measure the inside diameter of the guide bush.

    Standard bush inside diameter:
    5.510 to 5.530 mm (0.2169 to 0.2177 in.)

  1. Subtract the valve stem diameter measurement from the guide bush inside diameter measurement.

    Standard oil clearance:
    0.030 to 0.065 mm (0.0012 to 0.0026 in.)

    Maximum oil clearance:
    0.10 mm (0.0039 in.)

    If the clearance is greater than the maximum, replace the valve and guide bush.


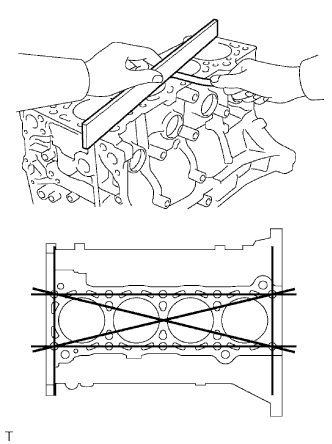
26. INSPECT CYLINDER BLOCK


    A087191E01
  1. Inspect for flatness.

    1. Using a precision straightedge and feeler gauge, measure the surface contacting the cylinder head gasket for warpage.
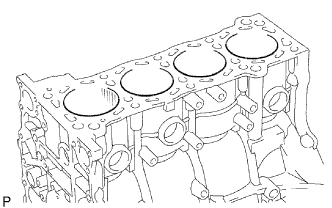
      Maximum warpage:
      0.05 mm (0.0020 in.)

      If the warpage is greater than the maximum, replace the cylinder block.


    G035190E01
  1. Visually check the cylinder for vertical scratches.
    If deep scratches are present, rebore all the 4 cylinders. If necessary, replace the cylinder block.


    A112877E02
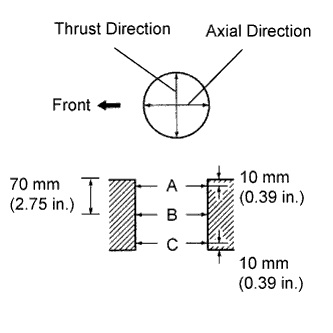
  1. Inspect the cylinder bore diameter.

    1. Using a cylinder gauge, measure the cylinder bore diameter at positions A, B and C in the thrust and axial directions.
      Standard diameter:
      85.990 to 86.003 mm (3.3854 to 3.3859 in.)

      If the diameter is greater than the maximum, rebore all the 4 cylinders. If necessary, replace the cylinder block.


    G035191E04
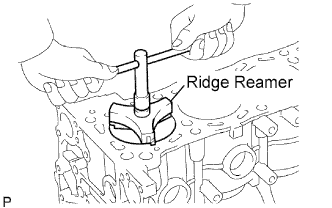
  1. Inspect the cylinder ridge.

    1. If the wear is less than 0.2 mm (0.008 in.), using a ridge reamer, grind the top of the cylinder.


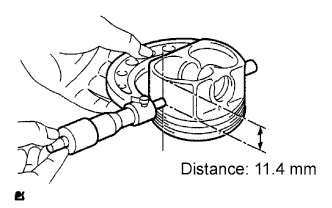
27. INSPECT PISTON WITH PIN


    A097953E03
  1. Inspect the piston oil clearance.

  1. Using a micrometer, measure the piston diameter at right angles to the piston center line, the indicated distance from the piston end.

    Standard distance:
    11.4 mm (0.449 in.)

    Standard piston diameter:
    Piston
    Diameter
    Standard
    85.951 to 85.986 mm (3.3839 to 3.3853 in.)
    O/S 0.50
    86.431 to 86.486 mm (3.4028 to 3.4050 in.)


    1. Measure the cylinder bore diameter in the thrust directions.

    2. Subtract the piston diameter measurement from the cylinder bore diameter measurement.
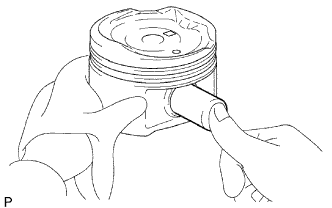
      Standard oil clearance:
      0.004 to 0.052 mm (0.0002 to 0.0020 in.)

      Maximum oil clearance:
      0.10 mm (0.0039 in.)

      If the oil clearance is greater than the maximum, replace all the 4 pistons and rebore all the 4 cylinders. If necessary, replace the cylinder block.


    G035195E02
  1. Inspect the piston pin fit.

    1. At 60°C (140°F), check that the position pin can be pushed into the piston hole with your thumb.


    G035891E01
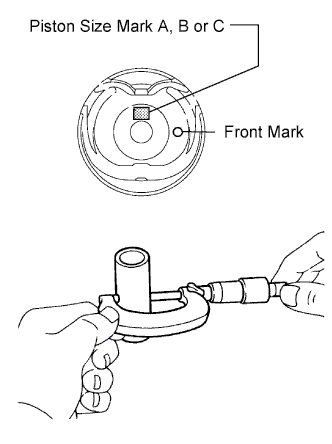
  1. Inspect the piston pin diameter.

    HINT:
    There are 3 piston pin sizes, which are indicated by an A, B or C mark on its surface.


    1. Using a micrometer, measure the piston pin diameter.

      Standard piston pin diameter:
      Size Mark
      Diameter
      A
      21.997 to 22.000 mm (0.86602 to 0.86614 in.)
      B
      22.001 to 22.003 mm (0.86615 to 0.86626 in.)
      C
      22.003 to 22.006 mm (0.86627 to 0.86638 in.)

      If the diameter is not as specified, replace the piston pin and piston as a set.


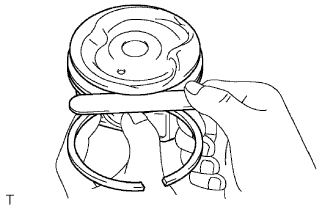
28. INSPECT PISTON RING SET


    A087192E01
  1. Using a feeler gauge, measure the clearance between a new piston ring and the wall of the ring groove.

    Standard ring groove clearance:
    Ring
    Groove clearance
    No. 1
    0.020 to 0.075 mm (0.0008 to 0.0030 in.)
    No. 2
    0.020 to 0.065 mm (0.0008 to 0.0026 in.)
    Oil
    0.020 to 0.070 mm (0.0008 to 0.0028 in.)

    If the clearance is not as specified, replace the piston.


    A097954E01
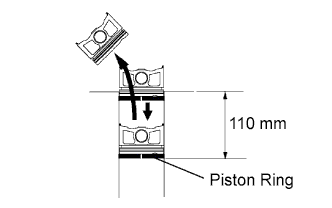
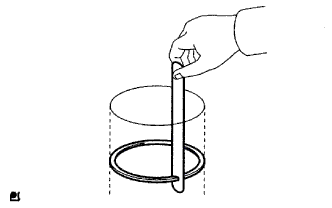
  1. Inspect the piston ring end gap.

    1. Insert the piston ring into the cylinder bore.

    2. Using a piston, push the piston ring a little beyond the bottom of the ring travel, 110 mm (4.33 in.) from the top of the cylinder block.


    3. A050189E01
    4. Using a feeler gauge, measure the end gap.

      Standard end gap:
      Ring
      Standard end gap
      No. 1
      0.22 to 0.34 mm (0.0087 to 0.0134 in.)
      No. 2
      0.45 to 0.57 mm (0.0177 to 0.0224 in.)
      Oil
      0.10 to 0.40 mm (0.0039 to 0.0157 in.)

      Maximum end gap:
      Ring
      Maximum end gap
      No. 1
      0.90 mm (0.0354 in.)
      No. 2
      1.36 mm (0.0535 in.)
      Oil
      0.75 mm (0.0295 in.)

      If the end gap is greater than the maximum, replace the piston ring. If the end gap is greater than the maximum, even with a new piston ring, rebore all the 4 cylinders or replace the cylinder block.


29. INSPECT CONNECTING ROD


    A054727E01
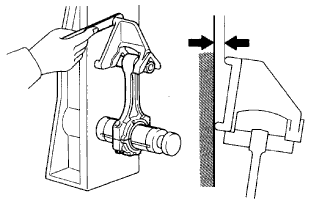
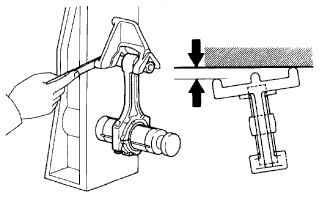
  1. Using a rod aligner and feeler gauge, check the connecting rod alignment.

    1. Check for bend.

      Maximum bend:
      0.03 mm (0.0012 in.) per 100 mm (3.94 in.)

      If the bend is greater than the maximum, replace the connecting rod.


    2. A054728E01
    3. Check for twist.

      Maximum twist:
      0.15 mm (0.0059 in.) per 100 mm (3.94 in.)

      If the twist is greater than the maximum, replace the connecting rod.


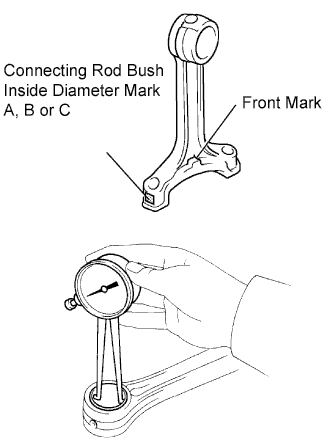
30. INSPECT PISTON PIN OIL CLEARANCE


    G035892E02
  1. Inspect the piston pin oil clearance.

    HINT:
    There are 3 connecting rod bush sizes, which are indicated by an A, B or C mark on its surface.


    1. Using a caliper gauge, measure the inside diameter of the connecting rod bush.

      Standard bush inside diameter:
      Size Mark
      Diameter
      A
      22.005 to 22.008 mm (0.86633 to 0.86645 in.)
      B
      22.008 to 22.011 mm (0.86645 to 0.86657 in.)
      C
      22.011 to 22.014 mm (0.86657 to 0.86669 in.)

    2. Subtract the piston pin diameter measurement from the bush inside diameter measurement.

      Standard oil clearance:
      0.001 to 0.007 mm (0.00004 to 0.00028 in.)

      Maximum oil clearance:
      0.01 mm (0.00039 in.)

      If the oil clearance is greater than the maximum, replace the connecting rod. If necessary, replace the piston and piston pin as a set.


31. INSPECT CONNECTING ROD BOLT


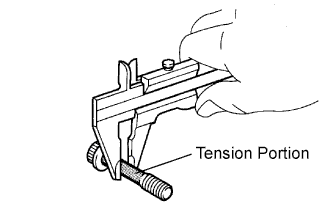
    A054729E03
  1. Using a vernier caliper, measure the tension portion diameter of the bolt.

    Standard diameter:
    7.2 to 7.3 mm (0.283 to 0.287 in.)

    Minimum diameter:
    7.0 mm (0.276 in.)

    If the diameter is less than the minimum, replace the bolt.


32. INSPECT CRANKSHAFT


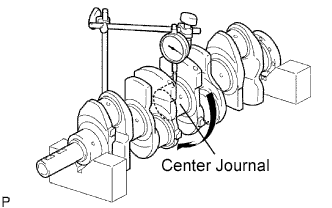
    A013859E01
  1. Inspect for circle runout.

    1. Place the crankshaft on V-blocks.

    2. Using a dial indicator, measure the circle runout at the center journal.
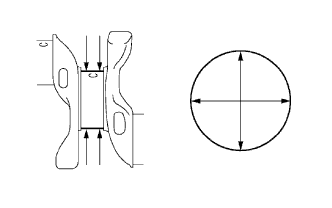
      Maximum circle runout:
      0.03 mm (0.0012 in.)

      If the circle runout is greater than the maximum, replace the crankshaft.


    A087264E01
  1. Inspect the main journals.

    1. Using a micrometer, measure the diameter of each main journal.

      Standard journal diameter:
      Journal
      Diameter
      No. 3
      59.981 to 59.994 mm (2.3615 to 2.3620 in.)
      Except No. 3
      59.987 to 60.000 mm (2.3229 to 2.3622 in.)

      If the diameter is not as specified, check the oil clearance. If necessary, replace the crankshaft.

    2. Check each main journal for taper and out-of-round as shown in the illustration.
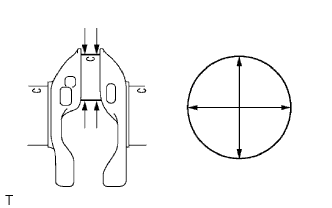
      Maximum taper and out-of-round:
      0.005 mm (0.0002 in.)

      If the taper and out-of-round is greater than the maximum, replace the crankshaft.


    A087196E01
  1. Inspect the crank pin.

    1. Using a micrometer, measure the diameter of each crank pin.

      Standard diameter:
      52.989 to 53.002 mm (2.0862 to 2.0867 in.)

      If the diameter is not as specified, check the oil clearance (see "INSPECT CONNECTING ROD OIL CLEARANCE" procedure). If necessary, replace the crankshaft.

    2. Check each crank pin for taper and out-of-round as shown in the illustration.

      Maximum taper and out-of-round:
      0.003 mm (0.0001 in.)

      If the taper and out-of-round is greater than the maximum, replace the crankshaft.


33. INSPECT CRANKSHAFT BEARING CAP SET BOLT


    G035889E03
  1. Using a vernier caliper, measure the minimum diameter of the elongated thread at the measuring point.

    Standard outside diameter:
    10.76 to 10.97 mm (0.4236 to 0.4319 in.)

    Minimum outside diameter:
    10.66 mm (0.4197 in.)

    If the diameter is less than the minimum, replace the crankshaft bearing cap bolt.