DIFFERENTIAL VACUUM ACTUATOR > REPLACEMENT |
| 1. REMOVE FRONT SIDE MEMBER TO FRONT SUSPENSION CROSSMEMBER BRACE |
| 2. REMOVE NO. 1 ENGINE UNDER COVER |
| 3. REMOVE NO. 2 ENGINE UNDER COVER |
| 4. DRAIN DIFFERENTIAL OIL |
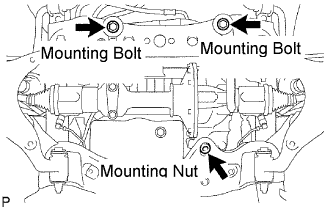
| 5. REMOVE DIFFERENTIAL VACUUM ACTUATOR ASSEMBLY |
|
Remove the bolt and disconnect the differential breather tube bracket.
Support the differential with a jack.
Remove the differential mounting nut No. 1.
Remove the 2 mounting bolts and 2 nuts.
Disconnect the actuator hose and connector.
Lower the jack.
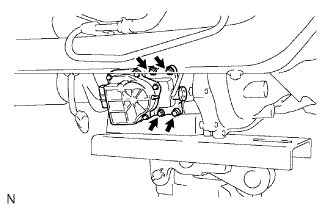 |
Remove the 4 bolts and vacuum actuator.
| 6. INSTALL DIFFERENTIAL VACUUM ACTUATOR ASSEMBLY |
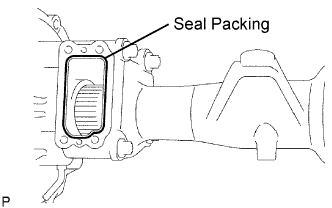 |
Remove any old seal packing material.
Using gasoline or alcohol, clean any residual seal packing material on the contact surfaces.
Apply seal packing to the differential tube, as shown in the illustration.
|
Clean the threads of the 4 bolts and retainer bolt holes with toluene or trichloroethylene.
Apply adhesive to 2 or 3 threads at the tip of the bolt.
Install the differential vacuum actuator to the differential tube with the 4 bolts.
|
Connect the actuator hose and connector.
Support the differential with a jack.
Install the 2 front mounting bolts and 2 nuts.
Install the differential mounting nuts No. 1.
Install the differential breather tube bracket with the bolt.
| 7. REFILL DIFFERENTIAL OIL |
Refill differential oil (Click here).
| 8. CHECK FOR DIFFERENTIAL OIL LEAKAGE |
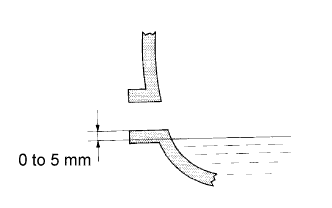 |
Stop the vehicle on a level surface.
Remove the differential filler plug and gasket.
Check that the oil level is between 0 to 5 mm (0 to 0.20 in.) from the bottom lip of the differential filler plug hole.
| Item | Temperature | Viscosity |
| Front differential (w/ A.D.D.) | SAE 75W-90 | |
| Front differential (w/o A.D.D.) Rear differential | Above -18°C (0°F) | SAE 90 |
| Below -18°C (0°F) | SAE 85W-90 | |
| Item | Oil type |
| Front differential Rear differential | Hypoid gear oil API GL-5 or equivalent |
| Rear differential (for LSD) | Hypoid gear oil LSD API GL-5 or equivalent |
| Item | Capacity |
| w/o A.D.D. | 1.40 to 1.50 liters (1.48 to 1.59 US qts., 1.23 to 1.31 Imp. qts.) |
| w/ A.D.D. | 1.60 to 1.70 liters (1.69 to 1.80 US qts., 1.40 to 1.50 Imp. qts.) |
| Item | Capacity |
| 2WD | 3.15 to 3.25 liters (3.30 to 3.43 US qts., 2.77 to 2.86 Imp. qts.) |
| 4WD | 3.30 to 3.40 liters (3.49 to 3.59 US qts., 2.90 to 2.99 Imp. qts.) |
Check for oil leakage when the oil level is low.
Install the differential filler plug with a new gasket.
| 9. INSTALL NO. 2 ENGINE UNDER COVER |
| 10. INSTALL NO. 1 ENGINE UNDER COVER |
| 11. INSTALL FRONT SIDE MEMBER TO FRONT SUSPENSION CROSSMEMBER BRACE |