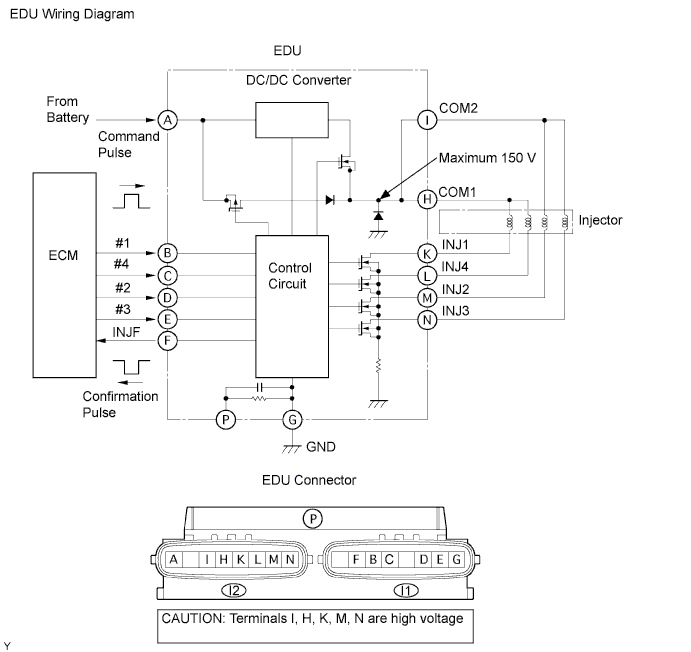
DTC P0200 Injector Circuit / Open |
| DTC No. | DTC Detection Condition | Trouble Area |
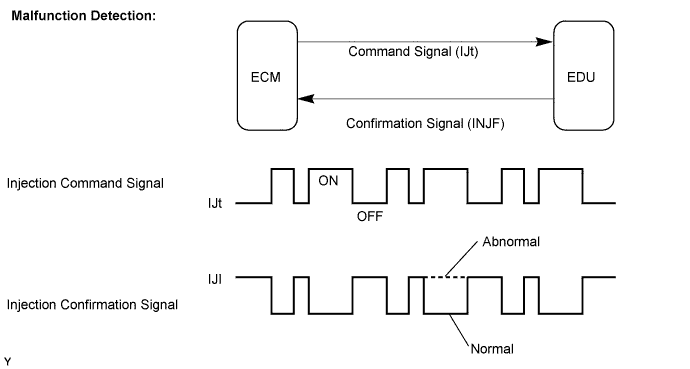
| P0200 | Open or short in EDU or injector circuit After engine is started, there is no INJF signal from EDU to ECM, despite ECM sending IJT signal to EDU (1 trip detection logic) |
|
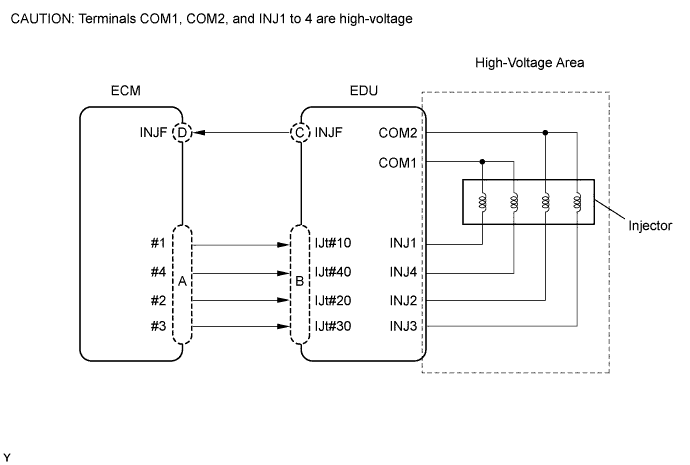
| Malfunction Point | Trouble Area |
| A |
|
| B (If A is normal) |
|
| C (If A and B are normal) |
|
| D (If A, B and C are normal) |
|
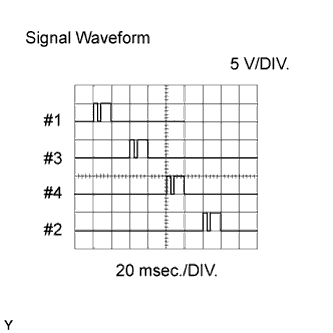 |
| Inspection Point | Specified Condition |
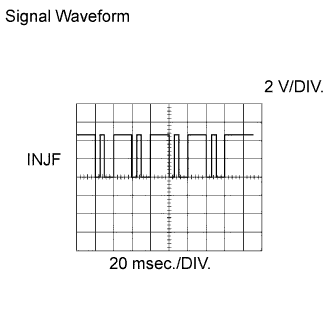
| A and B | Correct waveform is as shown |
 |
| Inspection Point | Specified Condition |
| C and D | Correct waveform is as shown |
| Required sensors | INJF signal from EDU |
| Frequency of operation | Continuous |
| Duration | 10 seconds |
| MIL operation | 1 driving cycle |
| Item | Specification Minimum | Specification Maximum |
| Engine speed | 500 rpm | - |
| Battery voltage | 11 V | - |
| Ignition switch | ON | ON |
| Threshold |
| Injection missing counter* for all cylinders, or for one individual cylinder, reaches a specified number (taking approximately 1 second from starting the engine) *: Increases when no INJF signal is received from the EDU despite the ECM sending IJT signals |
| 1.CHECK DTC OUTPUT (IN ADDITION TO DTC P0200) |
Connect the intelligent tester to the DLC3.
Turn the ignition switch ON and turn the tester ON.
Enter the following menus: Powertrain / Engine / DTC.
Read the DTCs.
| Display (DTC Output) | Proceed to |
| P0200 and P1238 | A |
| P0200 | B |
|
| ||||
| A | |
 |
| 2.READ VALUE USING INTELLIGENT TESTER (COMPENSATION OF INJECTION VOLUME BETWEEN CYLINDERS) |
Connect the intelligent tester to the DLC3.
Start the engine and turn the tester ON.
Enter the following menus: Powertrain / Engine / Data List / Injection Feedback Val #1, #2, #3 and #4.
Read the value.
Inspect and repair the cylinder that has an improper compensation value according to the following steps.
| NEXT | |
|
| 3.INSPECT INJECTOR ASSEMBLY |
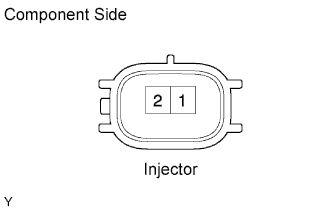 |
Disconnect the F5, F6, F7 and F8 injector connectors.
Measure the resistance of the injector.
| Tester Connection | Condition | Specified Condition |
| 1 - 2 | 20°C (68°F) | 0.85 to 1.05 Ω |
|
| ||||
| OK | |
|
| 4.CHECK HARNESS AND CONNECTOR (INJECTOR - EDU) |
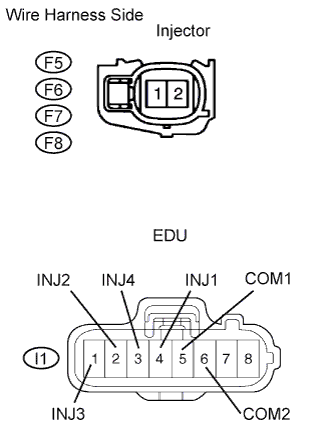 |
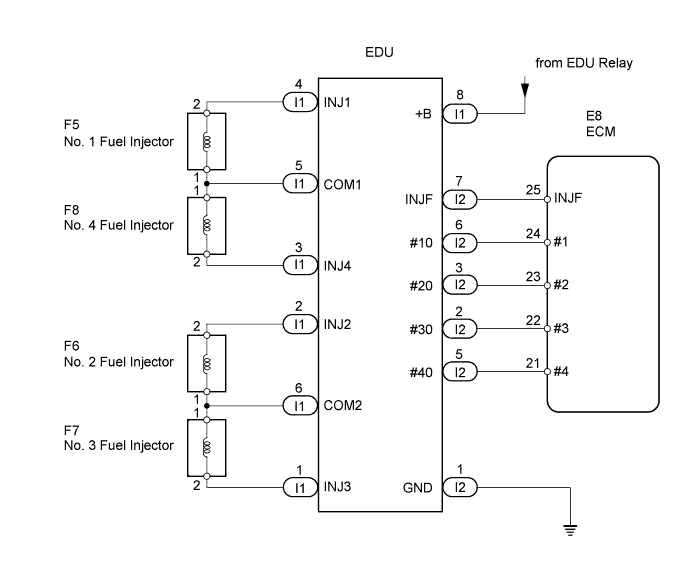
Check the wire harness between the injector and EDU (INJ terminal).
Disconnect the F5, F6, F7 and F8 connectors.
Disconnect the I1 EDU connector.
Measure the resistance of the wire harness side connectors.
| Tester Connection | Specified Condition |
| F5-2 - I1-4 (INJ1) | Below 1 Ω |
| F6-2 - I1-2 (INJ2) | Below 1 Ω |
| F7-2 - I1-1 (INJ3) | Below 1 Ω |
| F8-2 - I1-3 (INJ4) | Below 1 Ω |
| F5-1 - I1-5 (COM1) | Below 1 Ω |
| F6-1 - I1-6 (COM2) | Below 1 Ω |
| F7-1 - I1-6 (COM2) | Below 1 Ω |
| F8-1 - I1-5 (COM1) | Below 1 Ω |
| Tester Connection | Specified Condition |
| F5-2 or I1-4 (INJ1) - Body ground | 10 kΩ or higher |
| F6-2 or I1-2 (INJ2) - Body ground | 10 kΩ or higher |
| F7-2 or I1-1 (INJ3) - Body ground | 10 kΩ or higher |
| F8-2 or I1-3 (INJ4) - Body ground | 10 kΩ or higher |
| F5-1 or I1-5 (COM1) - Body ground | 10 kΩ or higher |
| F6-1 or I1-6 (COM2) - Body ground | 10 kΩ or higher |
| F7-1 or I1-6 (COM2) - Body ground | 10 kΩ or higher |
| F8-1 or I1-5 (COM1) - Body ground | 10 kΩ or higher |
|
| ||||
| OK | |
|
| 5.CHECK HARNESS AND CONNECTOR (EDU - ECM) |
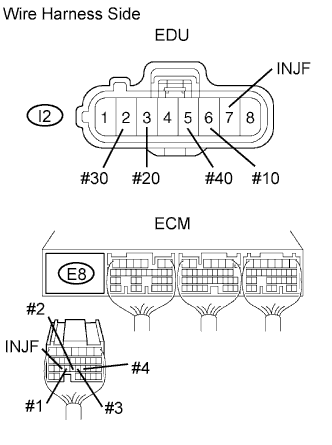 |
Disconnect the I2 EDU connector.
Disconnect the E8 ECM connector.
Measure the resistance of the wire harness side connectors.
| Tester Connection | Specified Condition |
| I2-6 (#10) - E8-24 (#1) | Below 1 Ω |
| I2-3 (#20) - E8-23 (#2) | Below 1 Ω |
| I2-2 (#30) - E8-22 (#3) | Below 1 Ω |
| I2-5 (#40) - E8-21 (#4) | Below 1 Ω |
| I2-7 (INJF) - E8-25 (INJF) | Below 1 Ω |
| Tester Connection | Specified Condition |
| I2-6 (#10) or E8-24 (#1) - Body ground | 10 kΩ or higher |
| I2-3 (#20) or E8-23 (#2) - Body ground | 10 kΩ or higher |
| I2-2 (#30) or E8-22 (#3) - Body ground | 10 kΩ or higher |
| I2-5 (#40) or E8-21 (#4) - Body ground | 10 kΩ or higher |
| I2-7 (INJF) or E8-25 (INJF) - Body ground | 10 kΩ or higher |
|
| ||||
| OK | |
|
| 6.CHECK INJECTOR DRIVER (BATTERY VOLTAGE) |
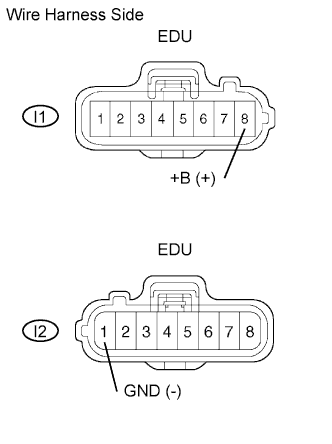 |
Disconnect the I1 and I2 EDU connectors.
Turn the ignition switch ON.
Measure the voltage of the wire harness side connectors.
| Tester Connection | Specified Condition |
| I1-8 (+B) - I2-1 (GND) | 11 to 14 V |
|
| ||||
| OK | |
|
| 7.CHECK ECM (INJECTOR VOLTAGE) |
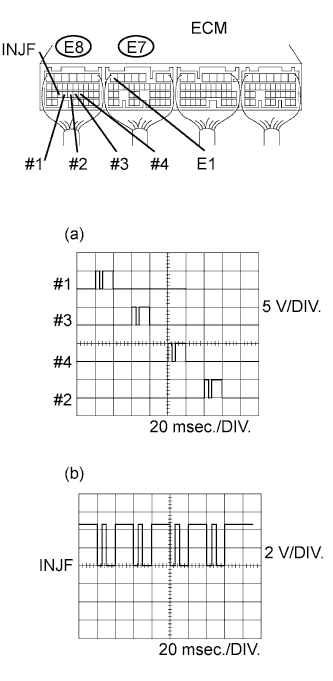 |
While idling the engine, check the waveform of the ECM connectors using an oscilloscope.
| Tester Connection | Specified Condition |
| E8-24 (#1) - E7-7 (E1) | Correct waveform is shown |
| E8-23 (#2) - E7-7 (E1) | Correct waveform is shown |
| E8-22 (#3) - E7-7 (E1) | Correct waveform is shown |
| E8-21 (#4) - E7-7 (E1) | Correct waveform is shown |
| E8-25 (INJF) - E7-7 (E1) | Correct waveform is shown |
| Tool Setting | Condition |
| (a) 5 V/DIV., 20 msec./DIV. (b) 2 V/DIV., 20 msec./DIV. | Idling with warm engine |
|
| ||||
| OK | |
|
| 8.REPLACE INJECTOR DRIVER |
Replace injector driver (Click here).
| NEXT | |
|
| 9.CHECK IF DTC OUTPUT RECURS (DTC P0200) |
| NEXT | ||
 | ||
| ||

