Home › ENGINE ยท 1KD-FTV › LUBRICATION › ENGINE OIL COOLER (w/o EGR Cooler)

ENGINE OIL COOLER (w/o EGR Cooler) > INSTALLATION

for Preparation Click here


NOTICE:
  1. When replacing the injectors (including shuffling the injectors between the cylinders), common rail or cylinder head, it is necessary to replace the injection pipes with new ones.
  2. When replacing the fuel supply pump, common rail, cylinder block, cylinder head, cylinder head gasket or timing gear case, it is necessary to replace the fuel inlet pipe with a new one.


1. INSTALL OIL COOLER ASSEMBLY


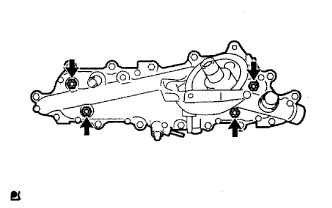
A038742E01
  1. Install 2 new gaskets to the oil cooler.

  1. Install the oil cooler to the oil cooler cover with the 4 nuts.

    Torque:
    16 N*m{ 163 kgf*cm , 12 ft.*lbf }


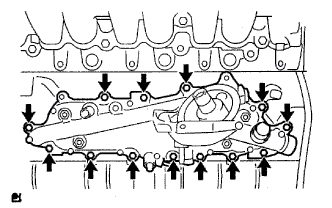
2. INSTALL OIL COOLER COVER SUB-ASSEMBLY


A038741E01
  1. Install a new gasket and the oil cooler cover with the 13 bolts and 2 nuts.

    Torque:
    13 N*m{ 133 kgf*cm , 10 ft.*lbf }

  1. Connect the oil pressure connector and install the wire harness.


3. INSTALL COMMON RAIL ASSEMBLY
  1. Install the common rail and No. 2 intake manifold insulator with the 2 bolts.

    Torque:
    38 N*m{ 387 kgf*cm , 28 ft.*lbf }

  1. Connect the 2 connectors.


4. INSTALL FUEL SUPPLY PUMP ASSEMBLY


A070715E01
  1. Check that the supply pump gear in the timing gear case moves back and forth smoothly.

  1. Install a new O-ring to the pump.

  1. Apply a light coat of engine oil to the O-ring.
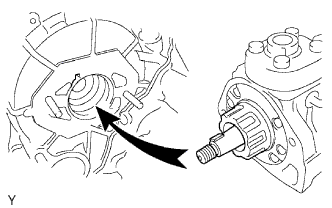


    A060835E01
  1. Align the set key on the drive shaft with the groove of the injection gear.


    A098897E01
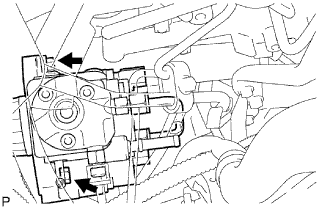
  1. Install the pump with the 2 nuts.

    Torque:
    21 N*m{ 214 kgf*cm , 15 ft.*lbf }

  1. Set a new O-ring before tightening the set nut.


    A070711E01
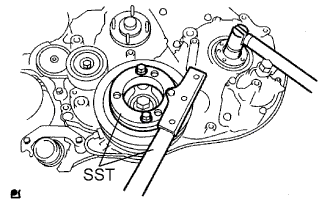
  1. Using SST, hold the crankshaft pulley and install the set nut.
    SST
    09213-58013  
    09330-00021  

    Torque:
    64 N*m{ 653 kgf*cm , 47 ft.*lbf }


    A071144E01
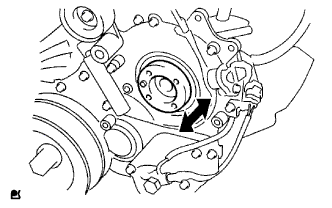
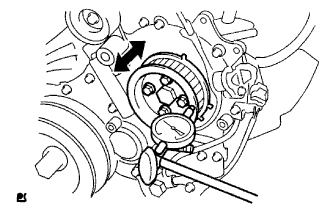
  1. Move the pump drive shaft pulley back and forth to check the thrust clearance of the injection pump drive shaft.
    Thrust clearance:
    0.15 to 0.55 mm (0.0059 to 0.0217 in.)

    If the clearance is not within the specified range, disassemble and reassemble the supply pump and pump drive shaft pulley. Then repeat the step above.


    A098896E01
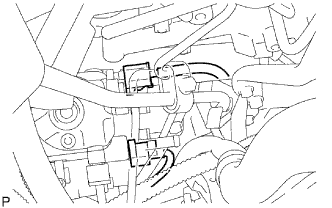
  1. Connect the 2 connectors.


    A098895E01
  1. Connect the 2 fuel hoses.


    A098974E06
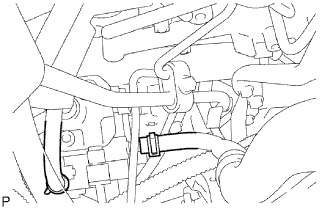
  1. Temporarily install the fuel inlet pipe with the union nuts.

    NOTICE:
    1. If the supply pump is replaced, the fuel inlet pipe must be replaced.
    2. Keep the fuel inlet pipe free of foreign matter.

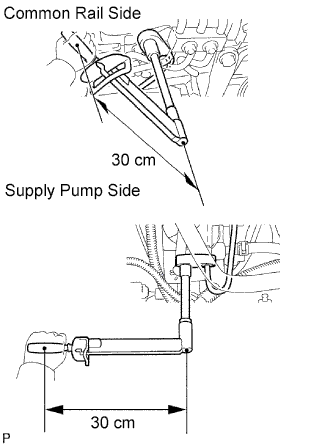
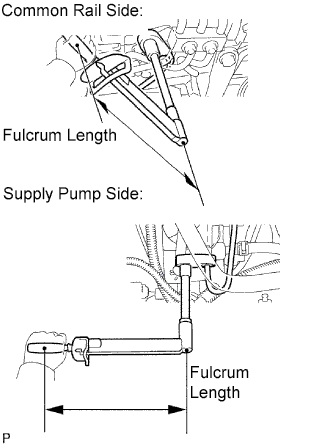
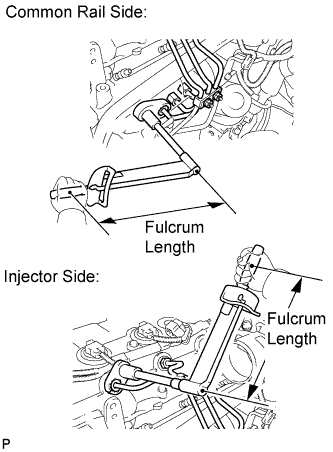
  1. Using a 17 mm union nut wrench, tighten the injection pipe union nut on the common rail side.

    Torque:
    32 N*m{ 326 kgf*cm , 24 ft.*lbf } for use with union nut wrench
    35 N*m{ 357 kgf*cm , 26 ft.*lbf } for use without union nut wrench

    HINT:
    Use a torque wrench with a fulcrum length of 30 cm (11.81 in.).

  1. Using a 17 mm union nut wrench, tighten the injection pipe union nut on the supply pump side.

    Torque:
    32 N*m{ 326 kgf*cm , 24 in.*lbf } for use with union nut wrench
    35 N*m{ 357 kgf*cm , 26 ft.*lbf } for use without union nut wrench

    Use a torque wrench with a fulcrum length of 30 cm (11.81 in.).

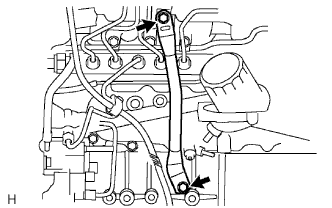
  1. Install the oil level gauge guide with the 2 bolts.
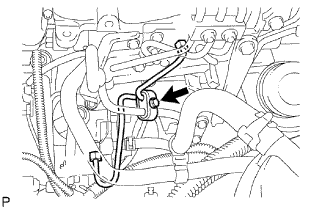
    Torque:
    8.0 N*m{ 82 kgf*cm , 71 in.*lbf }


    G036615E01
  1. Install the clamp with the bolt.

    Torque:
    5.0 N*m{ 51 kgf*cm , 44 in.*lbf }


5. INSTALL STARTER ASSEMBLY


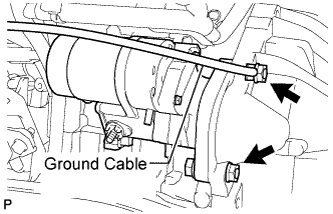
    A122908E01
  1. A/T:
    Connect the ground cable and install the starter with the 2 nuts and bolt.
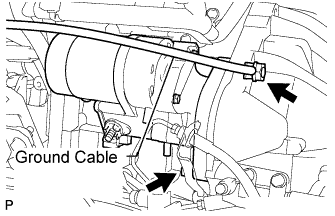
    Torque:
    68 N*m{ 693 kgf*cm , 50 ft.*lbf }

    HINT:
    Make sure to connect the ground cable with the nut as shown in the illustration.


    A122907E01
  1. M/T:
    Install the starter and ground cable with the nut and bolt.

    Torque:
    68 N*m{ 693 kgf*cm , 50 ft.*lbf }

    HINT:
    Make sure to connect the ground cable with the nut as shown in the illustration.

  1. Install the starter wire to terminal 30 with the nut.

    Torque:
    9.8 N*m{ 100 kgf*cm , 87 in.*lbf }

  1. Connect the starter connector.

  1. for A340F A340E:
    Install transmission oil filler tube sub-assembly.

    1. Coat a new O-ring with ATF, and install it to the transmission oil filler tube sub-assembly.

    2. Install the oil filler tube with the 2 bolts.

      Torque:
      12 N*m{ 122 kgf*cm , 9 ft.*lbf }

    3. Install the oil dipstick.


6. INSTALL OIL FILTER SUB-ASSEMBLY
  1. Check and clean the oil filter installation surface.

  1. Apply clean engine oil to the gasket of a new oil filter.

  1. Lightly screw the oil filter into place by hand. Tighten it until the gasket contacts the seat.
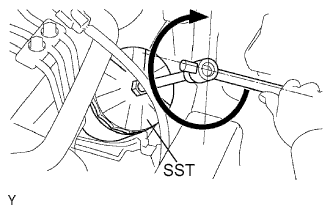


    A060101E01
  1. Using SST, tighten the oil filter. Depending on the work space available, choose from the following.

    SST
    09228-07501  

    1. If enough space is available, use a torque wrench to tighten the oil filter.

      Torque:
      12 N*m{ 122 kgf*cm , 9 ft.*lbf }

    2. If enough space is not available to use a torque wrench, tighten the oil filter 3/4 turn by hand or with a common wrench.


7. INSTALL NO. 4 INJECTION PIPE

NOTICE:
  1. When replacing an injector, it is necessary to replace the 4 injection pipes with new ones.
  2. Keep the joints of the injection pipe clean.

  1. Temporarily install the No. 4 injection pipe with the union nuts.

  1. Install the 2 bolts.

    Torque:
    13 N*m{ 130 kgf*cm , 9 ft.*lbf }

    NOTICE:
    1. If an injection pipe clamp is removed from the No. 4 injection pipe, replace the injection clamp with a new one.
    2. Make sure that the inner-rubbers of the injection pipe fit inside the clamps.
    3. When installing the pipe, check that the inner-rubbers and the clamps are in their proper positions.


    A231805E01
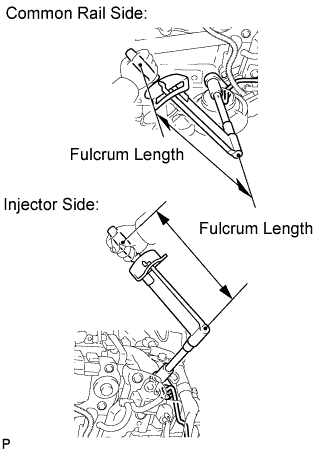
  1. Using a 17 mm union nut wrench, tighten the injection pipe union nut on the common rail side.

    Torque:
    35 N*m{ 357 kgf*cm , 26 ft.*lbf }

    NOTICE:
    Use the formula to calculate special torque values for situations where a union nut wrench is combined with a torque wrench (Click here).

  1. Using a 17 mm union nut wrench, tighten the injection pipe union nuts on the injector side.

    Torque:
    35 N*m{ 357 kgf*cm , 26 ft.*lbf }

    NOTICE:
    Use the formula to calculate special torque values for situations where a union nut wrench is combined with a torque wrench (Click here).


8. INSTALL NO. 1, NO. 2 AND NO. 3 INJECTION PIPE

NOTICE:
  1. When replacing an injector, it is necessary to replace the 4 injection pipes with new ones.
  2. Keep the joints of the injection pipe clean.

  1. Temporarily install the No. 1, No. 2 and No. 3 injection pipes with the union nuts.
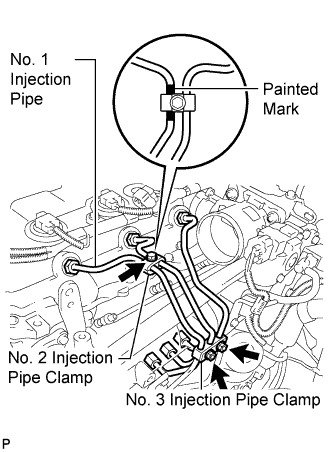


    A231806E01
  1. Install the No. 2 and No. 3 injection pipe clamps with the bolt and 2 nuts, as shown in the illustration.
    Torque:
    5.0 N*m{ 51 kgf*cm , 44 in.*lbf }

    HINT:
    If the painted mark on the No. 1 injection pipe has disappeared, use the illustration as a reference to install the clamps.


    A231807E01
  1. Using a 17 mm union nut wrench, tighten the injection pipe union nuts on the common rail side.

    Torque:
    35 N*m{ 357 kgf*cm , 26 ft.*lbf }

    NOTICE:
    Use the formula to calculate special torque values for situations where a union nut wrench is combined with a torque wrench (Click here).

  1. Using a 17 mm union nut wrench, tighten the injection pipe union nuts on the injector side.

    Torque:
    35 N*m{ 357 kgf*cm , 26 ft.*lbf }

    NOTICE:
    Use the formula to calculate special torque values for situations where a union nut wrench is combined with a torque wrench (Click here).


9. INSTALL FUEL INLET PIPE SUB-ASSEMBLY


    A098974E05
  1. Temporarily install the fuel inlet pipe with the union nuts.

    NOTICE:
    1. When replacing the common rail, it is necessary to replace the 4 injection pipes and fuel inlet pipe with new ones.
    2. Be careful that dust, dirt or any other foreign matter does not contact the joint area of the fuel inlet pipe.

  1. Using a 17 mm union nut wrench, tighten the fuel inlet pipe union nut on the common rail side.

    Torque:
    35 N*m{ 357 kgf*cm , 26 ft.*lbf }

    NOTICE:
    Use the formula to calculate special torque values for situations where a union nut wrench is combined with a torque wrench (Click here).

  1. Using a 17 mm union nut wrench, tighten the fuel inlet pipe union nut on the supply pump side.

    Torque:
    35 N*m{ 357 kgf*cm , 26 ft.*lbf }

    NOTICE:
    Use the formula to calculate special torque values for situations where a union nut wrench is combined with a torque wrench (Click here).

  1. Install a new O-ring to the engine oil level dipstick guide.

  1. Install the engine oil level dipstick guide with the bolt.

    Torque:
    8.0 N*m{ 82 kgf*cm , 71 in.*lbf }

  1. Install the clamp with the bolt.

    Torque:
    5.0 N*m{ 51 kgf*cm , 44 in.*lbf }

  1. Install the engine oil level dipstick.


10. INSTALL OIL LEVEL GAUGE SUB-ASSEMBLY
  1. Apply clean engine oil to a new O-ring.

  1. Install the O-ring to the dipstick.

  1. Install the level gauge with the bolt.

    Torque:
    8.0 N*m{ 82 kgf*cm , 71 in.*lbf }


11. INSTALL MANIFOLD STAY


G037596E01
  1. Install the stay with the 2 bolts.

    Torque:
    19 N*m{ 194 kgf*cm , 14 ft.*lbf }


12. ADD FUEL


13. TIGHTEN FUEL TANK CAP ASSEMBLY


14. ADD ENGINE OIL


15. BLEED AIR FROM FUEL SYSTEM


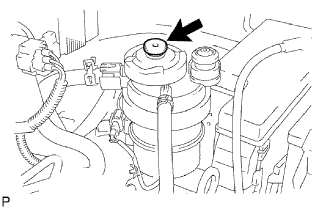
    A098962E02
  1. Using the hand pump mounted on the fuel filter cap, bleed the air from the fuel system. Continue pumping until the pump resistance increases.

    NOTICE:
    1. Hand pump pumping speed: Max. 2 strokes/ sec.
    2. The hand pump must be pushed with a full stroke during pumping.
    3. When the fuel pressure at the supply pump inlet port reaches a saturated pressure, the hand pump resistance increases.
    4. If pumping is interrupted during the air bleeding process, fuel in the fuel line may return to the fuel tank. Continue pumping until the hand pump resistance increases.
    5. If the hand pump resistance does not increase despite consecutively pumping 200 times or more, there may be a fuel leak between the fuel tank and fuel filter, the hand pump may be malfunctioning, or the vehicle may have run out of fuel.
    6. If air bleeding using the hand pump is incomplete, the common rail pressure does not rise to the pressure range necessary for normal use, and the engine cannot be started.

  1. Start the engine.

    NOTICE:
    1. Even if air bleeding using the hand pump has been completed, the starter may need to be cranked for 10 seconds or more to start the engine.
    2. Do not crank the engine continuously for more than 20 seconds. The battery may be discharged.
    3. Use a fully-charged battery.


    1. When the engine can be started, proceed to the next step.

    2. If the engine cannot be started, bleed the air again using the hand pump until the hand pump resistance increases (refer to the procedures above). Then start the engine.

  1. Turn the ignition switch off.

  1. Connect the intelligent tester to the DLC3.

  1. Turn the ignition switch to ON and turn the intelligent tester on.

  1. Clear the DTCs (Click here).

  1. Start the engine.*1


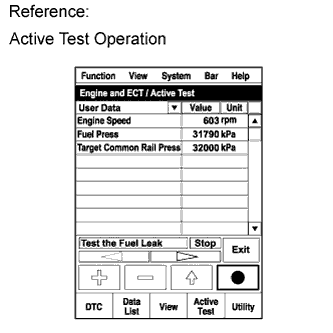
    A194065E03
  1. Enter the following menus: Powertrain / Engine and ECT / Active Test / Test the Fuel Leak.*2

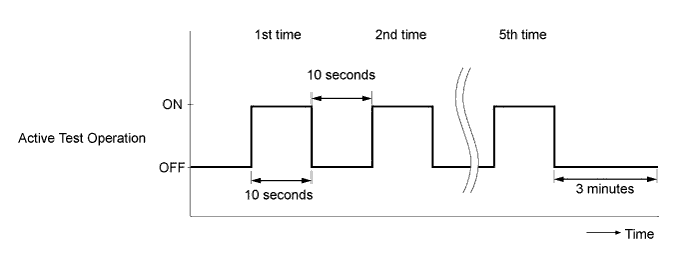
  1. Perform the following test 5 times with on/off intervals of 10 seconds: Active Test / Test the Fuel Leak.*3


  1. Allow the engine to idle for 3 minutes or more after performing the Active Test for the fifth time.

    A192848E05

    HINT:
    When the Active Test "Test the Fuel Leak" is used to change the pump control mode, the actual fuel pressure inside the common rail drops below the target fuel pressure when the Active Test is off, but this is normal and does not indicate a pump malfunction.

  1. Enter the following menus: Powertrain / Engine and ECT / DTC.

  1. Read Current DTCs.

  1. Clear the DTCs (Click here).

    HINT:
    It is necessary to clear the DTCs as DTC P1604 or P1605 may be stored when air is bled from the fuel system after replacing or repairing fuel system parts.

  1. Repeat steps *1 to *3.

  1. Enter the following menus: Powertrain / Engine and ECT / DTC.

  1. Read Current DTCs.

    OK:
    No DTCs are output.


16. INSPECT FOR FUEL LEAK

CAUTION:
  1. During Active Test mode, engine speed becomes high and combustion noise becomes loud, so pay attention.
  2. During Active Test mode, fuel becomes high-pressured. Be extremely careful not to expose your eyes, hands, or body to escaped fuel.

  1. Check that there are no leaks from any part of the fuel system when the engine is stopped. If there is fuel leakage, repair or replace parts as necessary.

  1. Start the engine and check that there are no leaks from any part of the fuel system. If there is fuel leakage, repair or replace parts as necessary.

  1. Disconnect the return hose from the common rail.

  1. Start the engine and check for fuel leaks from the return pipe.
    If there is fuel leakage, replace the common rail.

  1. Connect the intelligent tester to the DLC3.

  1. Start the engine and push the intelligent tester main switch on.

  1. Select the Fuel Leak test from the Active Test mode on the intelligent tester.

  1. If the intelligent tester is not available, fully depress the accelerator pedal quickly. Increase the engine speed to the maximum and maintain that speed for 2 seconds. Repeat this operation several times.

  1. Check that there are no leaks from any part of the fuel system.

    NOTICE:
    A return pipe leakage of less than 10 cc (0.6 cu in.) per minute is acceptable.

    If there is fuel leakage, repair or replace parts as necessary.

  1. Reconnect the return hose to the common rail.


17. CHECK FOR ENGINE OIL LEAKS


18. INSTALL NO. 2 ENGINE UNDER COVER (for 4WD)
  1. Install the under cover with the 2 bolts.

    Torque:
    28 N*m{ 286 kgf*cm , 21 ft.*lbf }


19. INSTALL NO. 1 ENGINE UNDER COVER (for 4WD)
  1. Install the under cover with the 4 bolts.

    Torque:
    28 N*m{ 286 kgf*cm , 21 ft.*lbf }