| OK |  |
| Go to step 10 |
SFI SYSTEM > Fuel Pump Control Circuit |
| 1.CHECK FUEL PUMP OPERATION |
Check if there is pressure in the fuel inlet hose.
|
| ||||
| NG | |
 |
| 2.PERFORM ACTIVE TEST USING INTELLIGENT TESTER (OPERATE CIRCUIT OPENING RELAY) |
Connect the intelligent tester to the DLC3.
Turn the ignition switch ON and turn the tester ON.
Enter the following menus: Powertrain / Engine and ECT / Active Test / Fuel Pump / Speed.
Check whether operating sounds can be heard while operating the relay using the intelligent tester.
|
| ||||
| NG | |
|
| 3.INSPECT INTEGRATION NO.1 RELAY (C/OPN RELAY) |
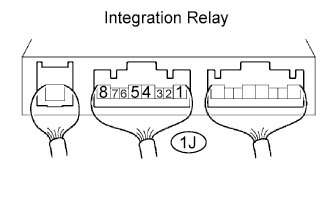 |
Disconnect the integration relay from the engine room junction block (Click here).
Measure the voltage of the C/OPN relay.
| Terminal Connection | Condition | Specified Condition |
| 1J-8 - Body ground | Ignition switch ON | 10 to 14 V |
|
| ||||
| OK | |
|
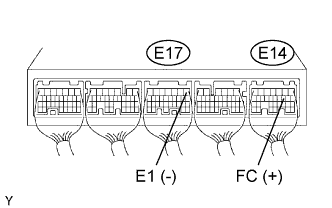
| 4.CHECK ECM (FC VOLTAGE) |
 |
Turn the ignition switch ON.
Measure the voltage of the ECM connectors.
| Tester Connection | Specified Condition |
| E14-10 (FC) - E17-1 (E1) | 9 to 14 V |
|
| ||||
| NG | ||
 | ||
| ||
| 5.INSPECT ECM POWER SOURCE CIRCUIT |
|
| ||||
| OK | |
|
| 6.INSPECT FUEL PUMP RELAY (Marking: F/PMP) |
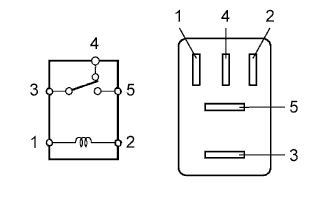 |
Remove the relay from the engine room relay block.
Measure the resistance of the relay.
| Tester Connection | Specified Condition |
| 3 - 4 | Below 1 Ω |
| 3 - 5 | 10 kΩ or higher |
| 3 - 4 | 10 kΩ or higher (when battery voltage is applied to terminals 1 and 2) |
| 3 - 5 | Below 1 Ω (when battery voltage is applied to terminals 1 and 2) |
|
| ||||
| OK | |
|
| 7.INSPECT FUEL PUMP |
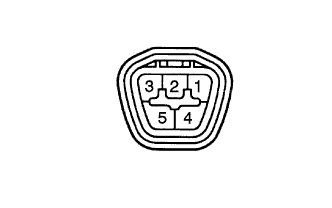 |
Inspect fuel pump resistance.
Measure the resistance between terminals 4 and 5.
Inspect fuel pump operation.
Apply battery voltage to both terminals. Check that the pump operates.
|
| ||||
| OK | |
|
| 8.CHECK WIRE HARNESS (FUEL PUMP - BODY GROUND, FUEL PUMP RELAY (Marking: F/PMP)) |
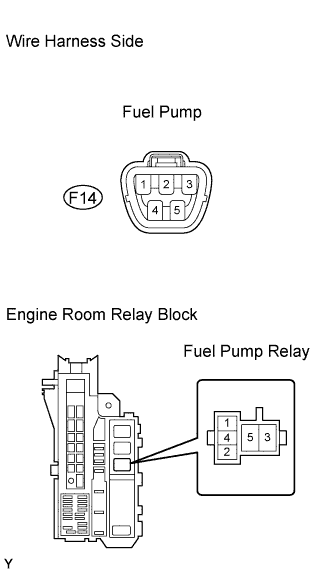 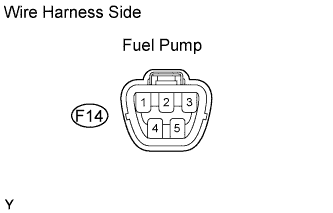 |
Check the wire harness between the fuel pump and fuel pump relay.
Disconnect the F14 fuel pump connector.
Remove the fuel pump relay from the engine room relay block.
Measure the resistance of the wire harness side connectors.
| Tester Connection | Specified Condition |
| F14-4 - Relay block fuel pump relay terminal 4 | Below 1 Ω |
| F14-4 or Relay block fuel pump relay terminal 4 - Body ground | 10 kΩ or higher |
Check the wire harness between the fuel pump and body ground.
Disconnect the F14 fuel pump connector.
Measure the resistance of the wire harness side connector.
| Tester Connection | Specified Condition |
| F14-5 - Body ground | Below 1 Ω |
|
| ||||
| OK | |
|
| 9.CHECK WIRE HARNESS (INTEGRATION RELAY - FUEL PUMP RELAY (Marking: F/PMP)) |
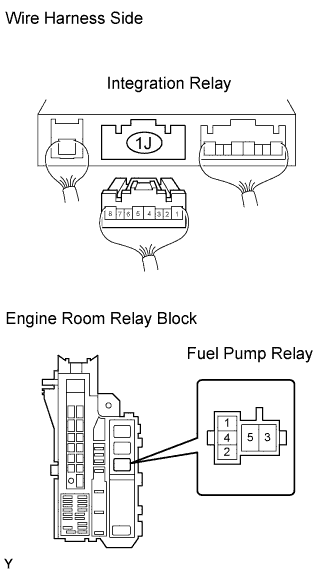 |
Disconnect the 1J integration relay connector from the engine room junction block (Click here).
Remove the fuel pump relay from the engine room relay block.
Measure the resistance of the wire harness side connectors.
| Tester Connection | Specified Condition |
| 1J-8 - Relay block fuel pump relay terminal 3 | Below 1 Ω |
| 1J-8 or Relay block fuel pump relay terminal 3 - Body ground | 10 kΩ or higher |
|
| ||||
| OK | ||
| ||
| ||
| 10.INSPECT FUEL PUMP RELAY (Marking: F/PMP) |
|
Remove the relay from the engine room relay block.
Measure the resistance of the relay.
| Tester Connection | Specified Condition |
| 3 - 4 | Below 1 Ω |
| 3 - 5 | 10 kΩ or higher |
| 3 - 4 | 10 kΩ or higher (when battery voltage is applied to terminals 1 and 2) |
| 3 - 5 | Below 1 Ω (when battery voltage is applied to terminals 1 and 2) |
|
| ||||
| OK | |
|
| 11.INSPECT FUEL PUMP RESISTOR (RESISTANCE) |
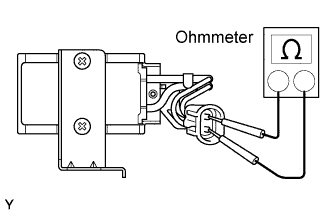 |
Inspect the fuel pump resistor resistance.
Measure the resistance.
|
| ||||
| OK | |
|
| 12.CHECK WIRE HARNESS (FUEL PUMP RELAY (Marking: F/PMP) - FUEL PUMP RESISTOR, FUEL PUMP RESISTOR - FUEL PUMP) |
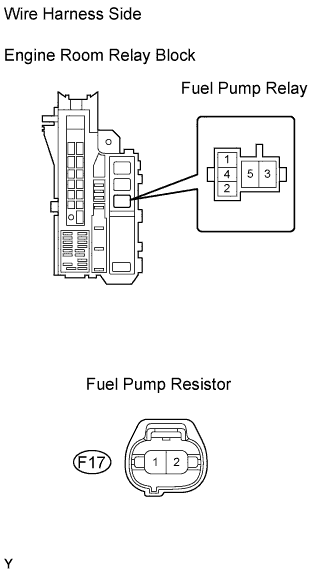 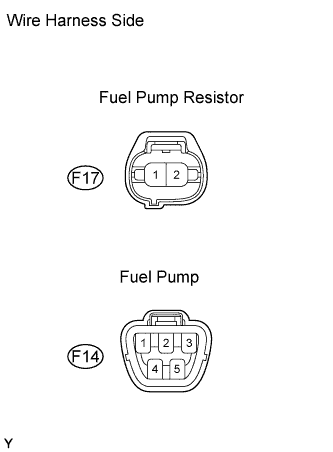 |
Check the wire harness between the fuel pump relay and fuel pump resistor.
Remove the fuel pump relay from the engine room relay block.
Disconnect the F17 fuel pump resistor connector.
Measure the resistance of the wire harness side connectors.
| Tester Connection | Specified Condition |
| Relay block fuel pump relay terminal 5 - F17-1 (+B) | Below 1 Ω |
| Relay block fuel pump relay terminal 5 or F17-1 (+B) - Body ground | 10 kΩ or higher |
Check the wire harness between the fuel pump resistor and fuel pump.
Disconnect the F17 fuel pump resistor connector.
Disconnect the F14 fuel pump connector.
Measure the resistance of the wire harness side connectors.
| Tester Connection | Specified Condition |
| F17-2 (FP) - F14-4 | Below 1 Ω |
| F17-2 (FP) or F14-4 - Body ground | 10 kΩ or higher |
|
| ||||
| NG | ||
| ||
| ||
