 |
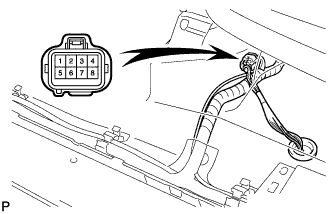
Fold back the floor carpet and disconnect the joining connector, as shown in the illustration.
- HINT:
- This connector has the lines of the fuel pump and rear speed sensor.
FUEL PRESSURE REGULATOR > REMOVAL |
| 1. DISCHARGE FUEL SYSTEM PRESSURE |
Disconnect the cable from the negative (-) battery terminal.
Remove the front driver side scuff plate.
Using a screwdriver, detach the 7 claws.
Using a clip remover, detach the 3 clips and remove the scuff plate.
|
Fold back the floor carpet and disconnect the joining connector, as shown in the illustration.
Connect the cable to the negative (-) battery terminal.
Start the engine. After the engine has stopped on its own, turn the ignition switch OFF.
Crank the engine again, and then check that the engine does not start.
Loosen the fuel tank cap, and then discharge the pressure in the fuel tank completely.
Connect the fuel pump connector.
Install the front driver side scuff plate.
Clear the DTCs (Click here).
| 2. DISCONNECT CABLE FROM NEGATIVE BATTERY TERMINAL |
| 3. REMOVE INTAKE AIR CONNECTOR |
Disconnect the No. 2 ventilation hose.
Disconnect the vacuum hose.
Loosen the 2 hose clamps, remove the 2 bolts and remove the intake air connector.
| 4. REMOVE FUEL PRESSURE REGULATOR ASSEMBLY |
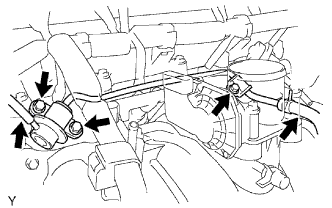 |
Disconnect the vacuum hose.
Disconnect the No. 2 fuel hose.
Remove the 3 bolts and fuel pressure regulator.