 |
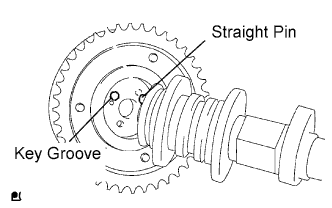
Put the camshaft timing gear and camshaft together by aligning the key groove and straight pin.
CAMSHAFT > INSTALLATION |
| 1. INSTALL CAMSHAFT TIMING GEAR |
|
Put the camshaft timing gear and camshaft together by aligning the key groove and straight pin.
Check that there is no gap between the gear's flange and the camshaft.
With the camshaft timing gear fixed in place, install the flange bolt.
| 2. INSTALL VALVE STEM CAP |
Apply clean engine oil to the valve stem tip, and install each valve stem cap.
| 3. INSTALL VALVE LASH ADJUSTER |
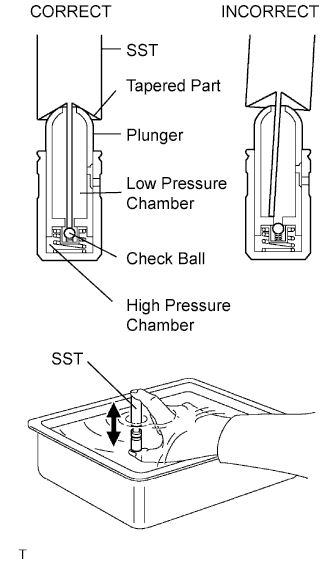 |
Place the lash adjuster into a container full of engine oil.
Insert SST's tip into the lash adjuster's plunger and use the tip to press down on the check ball inside the plunger.
Squeeze SST and lash adjuster together to move the plunger up and down 5 to 6 times.
Check the movement of the plunger and bleed air.
After bleeding air, remove SST. Then, try to quickly and firmly press the plunger with a finger.
Install the lash adjuster.
| 4. INSTALL VALVE ROCKER ARM |
Apply clean engine oil to the valve lash adjuster tips and valve stem cap surfaces. Then install the valve rocker arms.
| 5. INSTALL CAMSHAFT |
 |
Apply clean engine oil to the camshaft's cam portion and the cylinder head journals.
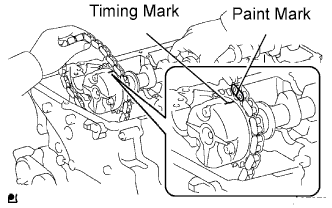
Install the timing chain on the camshaft timing gear with the painted mark of the link aligned with the timing mark of the camshaft timing gear.
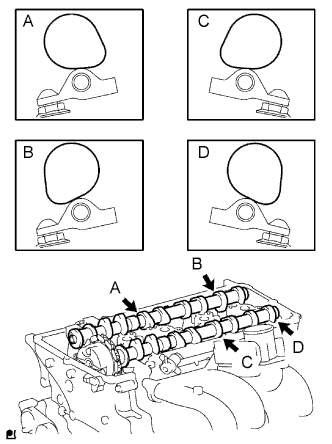 |
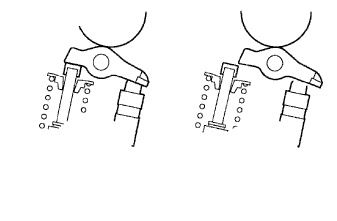
Set the 2 camshafts as shown in the illustration.
 |
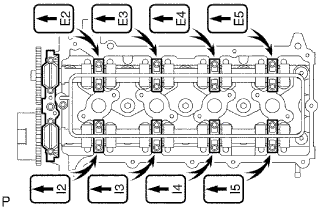 |
Loosely install the No. 1 camshaft bearing cap.
Confirm the proper location of each camshaft bearing cap and install each one.
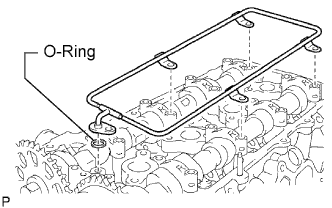 |
Install a new O-ring to the No. 1 camshaft bearing cap.
Temporarily install the oil delivery pipe.
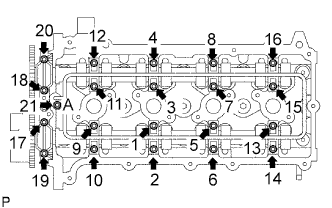 |
Temporarily install the 21 bolts and 20 washers. Tighten the 21 bolts and 20 washers in the order shown in the illustration.
| 6. INSTALL CAMSHAFT TIMING SPROCKET |
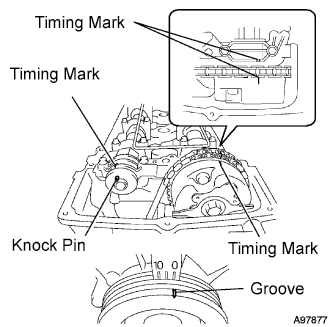 |
Rotate the camshaft so that the camshaft's timing mark and the No. 2 camshaft knock pin are as shown in the illustration.
Turn the crankshaft pulley, and align its groove with timing mark 0 of the timing chain cover.
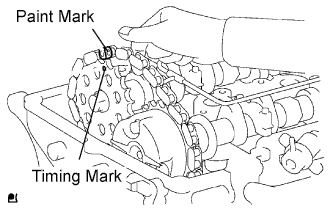 |
Install the timing chain on the camshaft timing sprocket with the paint mark aligned with the timing marks on the camshaft timing sprocket.
Align the No. 2 camshaft knock pin and camshaft timing sprocket's pin hole. Then install the camshaft timing sprocket to the No. 2 camshaft.
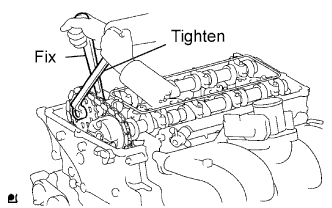 |
Fix the camshaft in place with a wrench, and then tighten the sprocket bolt.
Remove the hexagon wrench from the chain tensioner.
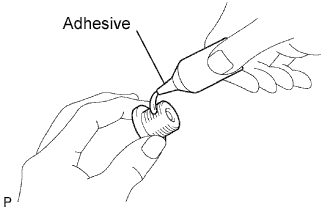 |
Apply adhesive to 2 or 3 threads of the timing chain cover plug.
Using a 10 mm socket hexagon wrench, install the timing chain cover plug.
| 7. INSTALL TIMING CHAIN GUIDE |
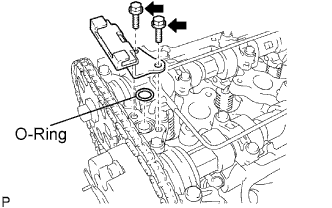 |
Install a new O-ring to the camshaft bearing cap.
Install the timing chain guide with the 2 bolts.
| 8. INSTALL CYLINDER HEAD COVER |
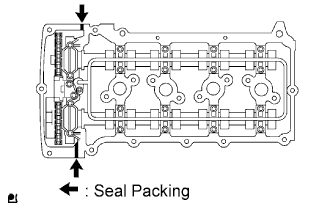 |
Install the 2 gaskets to the cylinder head cover.
Remove any old packing (FIPG) material.
Apply seal packing to the 2 locations shown in the illustration.
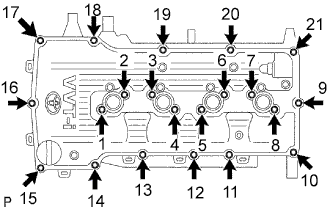 |
Loosely install the head cover with the 19 bolts and 2 nuts.
Uniformly tighten the 19 bolts and 2 nuts in the sequence shown in the illustration.
In numerical order, confirm that the bolts labeled 1 to 18 are tightened to the torque specification. Tighten the bolts as necessary.
Connect the wire harness to the 6 clamps.
| 9. INSTALL IGNITION COIL |
Install the ignition coil with the bolt.
| 10. INSTALL INTAKE AIR CONNECTOR |
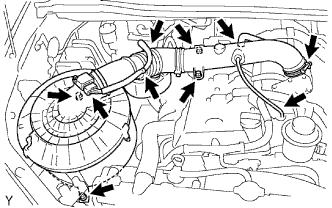 |
Install the air cleaner and intake air connector assembly with the 4 bolts, and tighten the hose clamp.
Connect the MAF meter connector and harness clamps.
Connect the No. 2 ventilation hose.
Connect the vacuum hose.
| 11. INSTALL DRIVE BELT |
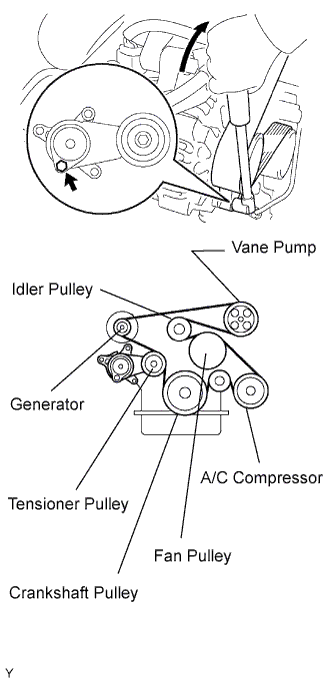 |
Install the drive belt to all the pulleys except the drive belt tensioner pulley.
Use the hexagon-shaped part indicated by the arrow in the illustration to move the tensioner pulley downward and then install the drive belt to the tensioner pulley.
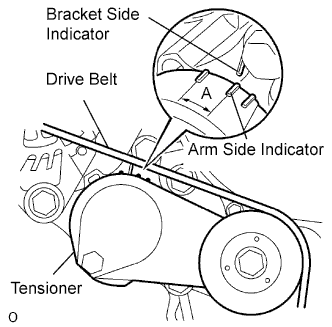 |
After a new belt has been installed, check that the tensioner indicator mark is within range A shown in the illustration.
| 12. CONNECT CABLE TO NEGATIVE BATTERY TERMINAL |
| 13. INSPECT FOR ENGINE OIL LEAK |
Start the engine, and check that there are no oil leaks after performing maintenance.
| 14. INSPECT FOR ENGINE COOLANT LEAK |
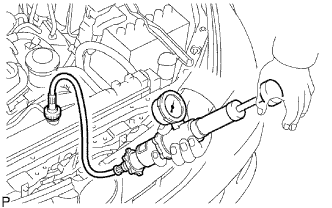 |
Fill the radiator with coolant and attach a radiator cap tester.
Warm up the engine.
Using the radiator cap tester, increase the pressure inside the radiator to 118 kPa (1.2 kgf/cm2, 17.1 psi), and check that the pressure does not drop.
If the pressure drops, check the hoses, radiator and water pump for leaks. If no external leaks are found, check the cylinder block and head.
| 15. CHECK IGNITION TIMING |
Warm up the engine and stop the engine.
 |
When using the intelligent tester:
Check the ignition timing.
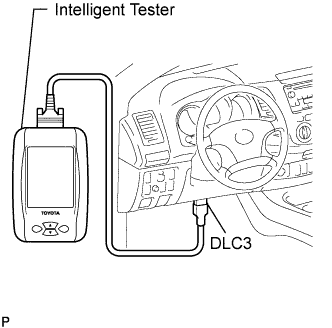
Connect the intelligent tester to the DLC3.
Start the engine and idle the engine.
Turn the intelligent tester main switch ON.
Enter the following menus: Powertrain / Engine and ECT / Data List / IGN Advance.
 |
When not using the intelligent tester:
Check the ignition timing.
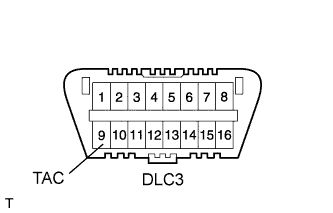
Using SST, connect a tachometer tester probe to terminal 9 (TAC) of the DLC3.
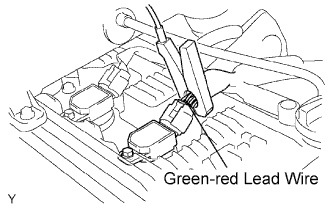 |
Clamp a timing light tester probe to the No. 1 cylinder ignition coil connector's 4 lead wires or green-red lead wire.
Start the engine.
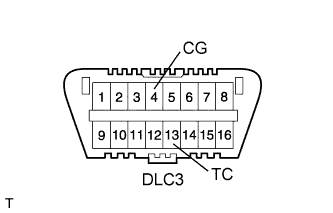 |
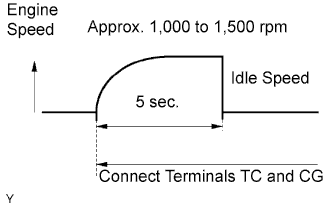
Using SST, connect terminals 13 (TC) and 4 (CG) of the DLC3.
 |
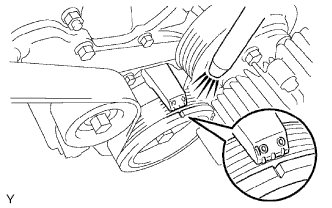 |
Using a timing light, measure the ignition timing.
Remove SST from terminals 13 (TC) and 4 (CG) of the DLC3.
Check the ignition timing.
Confirm that the ignition timing moves to the advanced angle side when the engine speed is increased.
Remove the timing light.
| 16. CHECK IDLE SPEED |
Warm up and stop the engine.
When using the intelligent tester:
Check the idle speed.
|
Connect the intelligent tester to the DLC3.
Start the engine and idle the engine.
Turn the intelligent tester main switch ON.
Enter the following menus: Powertrain / Engine and ECT / Data List / Engine SPD.
|
When not using the intelligent tester:
Check the idle speed.
Using SST, connect a tachometer tester probe to terminal 9 (TAC) of the DLC3.
Start the engine and idle the engine.
Check the idle speed.
| 17. CHECK CO (for Leaded Gasoline Specification Vehicle) |
Initial condition:
Engine at normal operating temperature
Air cleaner installed
All pipes and hoses of air induction system connected
All accessories switched OFF
All vacuum lines properly connected
SFI system wiring connectors fully seated
Ignition timing set correctly
Transmission in neutral position
Tachometer and CO meter calibration at idle
Warm up the engine at a constant speed (approximately 50 km/h (31 mph)). Close the throttle valve for 5 minutes after the engine coolant temperature becomes stable (80 to 90°C (176 to 194°F)) and idle the engine for 5 minutes.
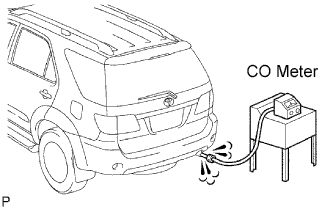 |
Insert a tester probe at least 40 cm (1.3 ft.) into the tailpipe.
Wait at least 1 minute before measuring to allow the concentration to stabilize. Complete the measuring within 3 minutes.
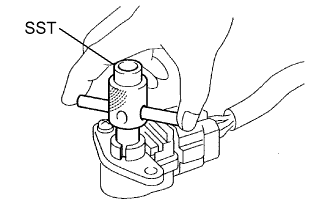 |
If the CO concentration does not conform to regulations, adjust it by turning the idle mixture adjusting screw in the variable resistor with SST.
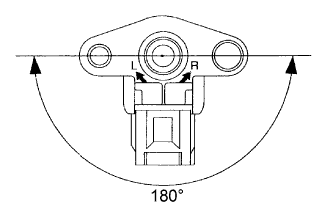 |
The idle mixture adjusting screw can be adjusted within a 180° angle range.
If the CO concentration is within the specification, this adjustment is complete.
If the CO concentration cannot be corrected by idle mixture adjustment, see the table below for other possible causes.
| CO | Problems | Causes |
| High | Rough idle (black smoke from exhaust) |
|
| 18. CHECK CO/HC (for Unleaded Gasoline Specification Vehicle) |
Start and warm up the engine.
Run the engine at 2,500 rpm for approximately 180 seconds and idle the engine.
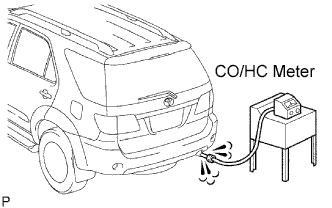 |
Insert a CO/HC meter testing probe at least 40 cm (1.3 ft.) into the tailpipe.
Check the CO/HC concentration at idle.
If the CO/HC concentration is not as specified, perform troubleshooting in the order given below.
Check the heated oxygen sensor operation (Click here).
See the table below for possible causes, and then inspect and repair the applicable causes as necessary.
| CO | HC | Problems | Causes |
| Normal | High | Rough idle |
|
| Low | High | Rough idle (Fluctuating HC reading) |
|
| High | High | Rough idle (Black smoke from exhaust) |
|
| 19. CHECK FUNCTION OF THROTTLE BODY |
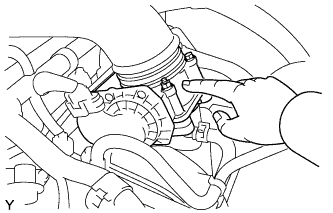 |
Check the throttle control motor operating sound.
Turn the ignition switch ON.
When pressing the accelerator pedal, check the operating sound of the running motor. Make sure that no friction noises emit from the motor.
If friction noise is heard, replace the throttle body.
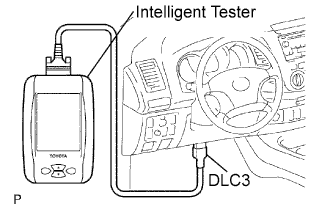 |
Check the throttle position sensor.
Connect the intelligent tester to the DLC3.
Turn the ignition switch ON.
Under Current Data, check that the throttle valve opening percentage (Throttle Pos) is within the standard.